
In this post, I’m going to walk through the creation of a spinning cube program in Unity. For this demo, we’ll build it with the Mixed Reality Tool Kit (MRTK) and set it up so that you could deploy it to a HoloLens 2. A spinning cube is sort of the 3D equivalent of “Hello World.” So, it’s a good starting point for developing with Unity and using MRTK.
I’m going to use this as an opportunity to explain script reuse and how you can use the same script with parameters with multiple objects. I’m also going to use this as an opportunity to explain basic game object hierarchy and how you can rotate a parent object to cause all the child objects to rotate as well. Finally, we’ll use this project to show off the MRTK orbital component that will allow us to keep objects in the center of view.
To make this project work, we’re going to create one cube object, an empty game object, six directional lights, and one rotator script. We’re going to use the lights to change the appearance of our cube as it spins. The standard material for the cube will reflect the light if we change the colors. By using the orbital component in MRTK, we’ll give the user a way to inspect the object from different angles, even while things are rotating.
Getting the Project Ready
Rather than replicating the steps necessary to create a new project and configure it with MRTK and set it set to deploy to the HoloLens 2, I’m going to refer you to the first 16 steps in the post Building a Unity Project with Speech Recognition using MRTK for a HoloLens 2. The only change we’ll make is that we’ll name the project SpinningCube, since that’s what we’re doing.
Adding the Cube and Lights
[Note: We’ve intentionally continued the numbering throughout the entire post so that we can refer to unique steps in the post.]
Let’s get started by adding our cube and the lights.
-
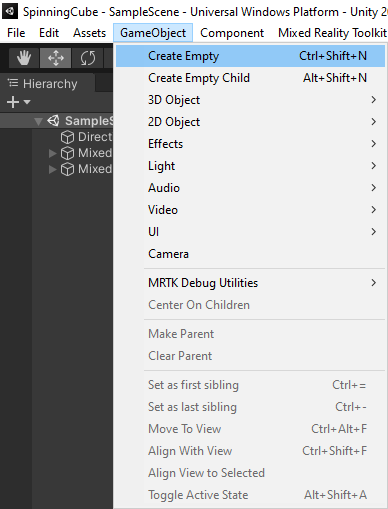
Click the GameObject menu and click the Create Empty option.
-
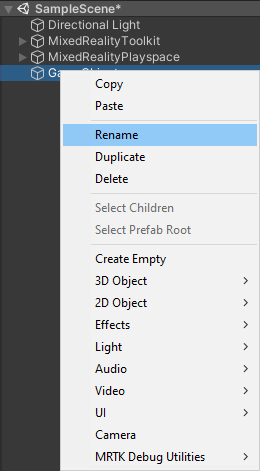
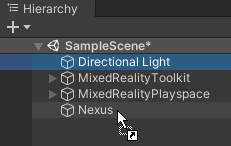
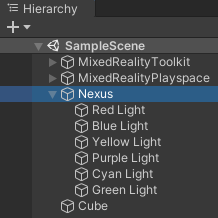
Right-click on the GameObject in the menu, select the Rename option, then type a new name called Nexus.
-
Click and hold the Directional Light object and drag it into (under) the Nexus object.
- Right-click the Directional Light and click the Rename option in the menu. Enter the name Red Light for the light.
-
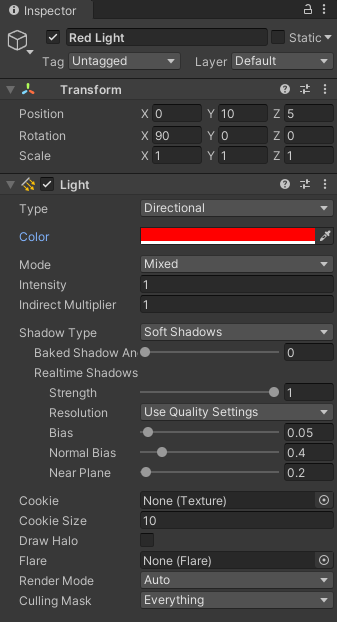
With the Red Light selected, go to Inspector panel, and enter the position of X 0, Y 10, Z 5 and a rotation of X 90, Y 0, Z 0. This points the light to a spot 5 meters ahead of the visible camera.
-
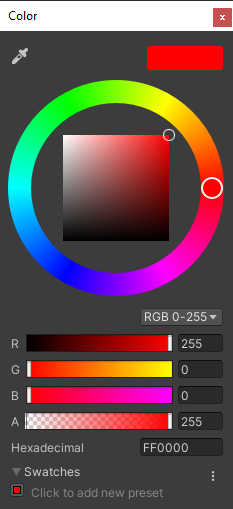
In the light component, double-click the Color option. In the dialog that appears, set the Red (R) to 255, Green (G) to 0, Blue (B) to 0, and make sure that Alpha (A) is set to 255.
- Right-click the Red Light object and select Duplicate from the menu. Repeat this process four more times until you have five lights under your Nexus object.
- Using the preceding steps (4-7) and following table, reconfigure the lights you duplicated under Nexus:
Position
Rotation
Color
Name
X
Y
Z
X
Y
Z
R
G
B
Blue Light 10 0 5 0 -90 0 0 0 255 Yellow Light -10 0 5 0 90 0 255 255 0 Purple Light 0 0 10 0 -180 0 255 0 255 Cyan Light 0 0 0 0 0 0 0 255 255 Green Light 0 -10 5 -90 0 0 0 255 0 - Create the cube by clicking GameObject, 3D Object, Cube from the menu.
You’ll notice that the cube appears to have a different color on each side. If you check the material for the cube, you’ll see that the material is a neutral color. The colors that appear on the cube are coming from the different lights we added to the scene.
Adding the Orbital Component
One way to make it possible to see what we’ve done is to add an Orbital component that comes as a part of MRTK. We can use this to keep an object (or collection of objects) in front of the camera. Let’s add the Orbital component to our cube and to our lights separately. If we weren’t going to rotate the cube separate from the lights later, we could move the cube under our Nexus object, but since we want different rotations, we’re going to keep these two objects separate.
-
In the Hierarchy, select the object we named Nexus.
- In the bottom of the Inspector pane, click the Add Component button. Start typing orbital and select Orbital when it appears.
- Notice that Unity added a SolverHandle and set it to Head in addition to the Orbital component. The SolverHandle is necessary so Orbital knows what it’s tracking. In this case, Head is the same as the primary camera.
- In the Orbital component, click the Orient Type dropdown and select Unmodified. This will prevent Orbital from trying to orient the object.
- Also, in the Orbital component, change the Local offset’s Y value to zero and the Z value to 2– so the resulting offset is X 0, Y 0, and Z of 2.
- Select the Cube object in the hierarchy and repeat steps 11-14.
Testing the App
Now we can test our solution. We can press the Play button to see our cube floating in front of us in the game tab. If we move in the play mode, we can see different sides of our cube. You can right-click in the game window and move your mouse to move around in the 3D game space.
That’s a good start, but let’s create a reusable rotation script.
Adding the Rotator Script
We want to setup two different objects to rotate. First, we want to rotate the cube that we added to the scene, but second, we want to rotate the lights in the scene differently. To do that, we’re going to create a rotate script, and in the next section, we’ll attach the script to objects and configure them.
The script will define two public fields – RotationXYZ and RotationRateScale. The first will set the rotation along each axis, and the second will allow us to scale the rotation speed overall without modifying the individual variables. The only other part of this script will in Update() and will use the Transform component’s Rotate method to rotate the object.
Let’s get started.
-
In the menu, click Assets, Create, and finally C# Script.
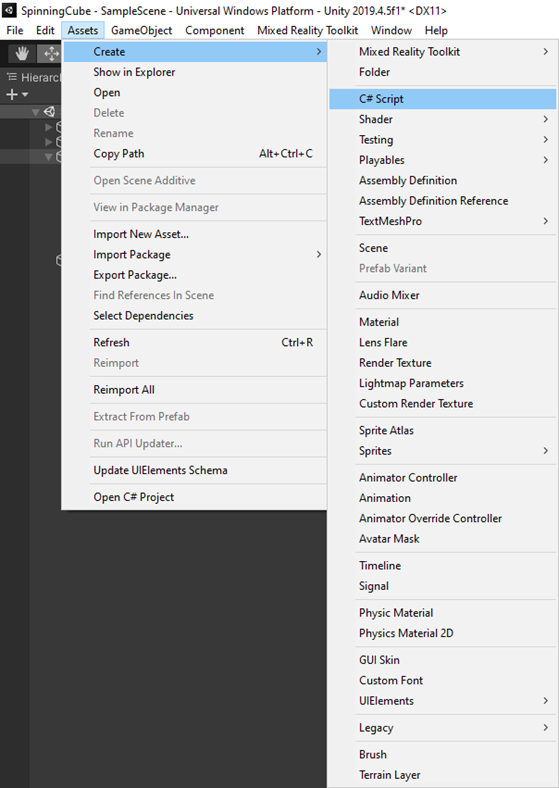
- Name the script Rotator and press Enter.
- Close the MRTK Project Configurator dialog, then double-click your Rotator script to launch Visual Studio.
- Inside the top of the class, define the two public variables:
public Vector3 RotationXYZ = new Vector3(1.0f, 2.0f, 3.0f);
public float RotationRateScale = 1.0f; - Inside the Update method, add the following code to rotate the object:
float totalScale = Time.deltaTime * RotationRateScale;
Vector3 v3 = new Vector3(RotationXYZ.x * totalScale, RotationXYZ.y * totalScale, RotationXYZ.z * totalScale);
gameObject.transform.Rotate(v3); - Click the Save All button in the ribbon to save your changes to the script.
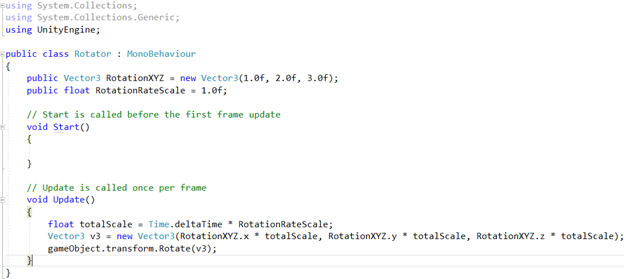
The script initializes the rotation to a default rotation of X 1, Y 2, Z 3 degrees per second and an overall scale of 1. The update method uses Time.deltaTime – a global property to determine what fraction of a second has occurred since the last call to Update(). This is the way that we can scale the degree of the rotation based on the framerate that’s happening inside of Unity. The code gets the total scaling for the rotation by multiplying our overall rate scale times deltaTime. Then a new Vector3 is created with the rotation needed, and this is applied via the transform component’s rotate method.
Attaching the Rotator Script to the Cube and the Nexus
Our rotator script is fully functional – but it’s not connected to anything. We connect it to our cube and to our Nexus object by selecting the object and dragging the script into a blank spot in the hierarchy.
- Start by clearing the MRTK Project configurator by clicking the X in the upper right-hand corner.
- Select the Cube object in the hierarchy.
- Drag the Rotator script into a gap between components in the inspector pane and release.
- Select the Nexus object and repeat step 24.
- In the Inspector panel, in the Rotator component, change the Rotation Rate Scale to 10.
By setting the rotation scale to 10 for the lights, you’re causing the lights and the cube to rotate at different rates, and therefore the surfaces of the cube will turn different colors as different lights start acting on them.
Viewing the Final Solution
To view the final solution, simply press the Play button and watch how the Game tab shows your cube spinning – and with the lights spinning at different rates.
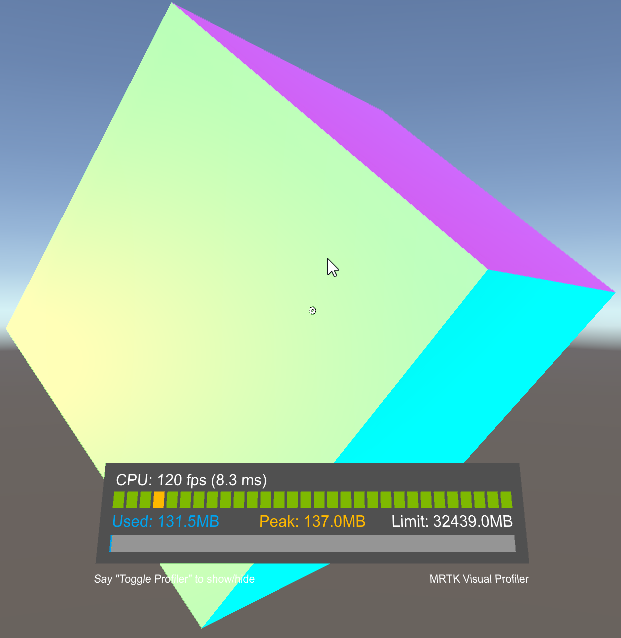
You can now go to Nexus and change the rate – or the individual rotation values for each of the X, Y, and Z components to see different spinning effects. You can also navigate around the scene and the cube and lights will follow you. You can use this to look at different parts of the cube in the scene.
If you want to get the completed project, it’s available at https://github.com/rlbogue/UnityPublic/tree/master/SpinningCube
No comment yet, add your voice below!