Skip to content

Development

Building a Course: Rendering All Stale Videos

When you’re building a large-scale course with hours of videos comprised of literally hundreds of videos, you’re invariably going to run into a problem that will require you to rerender the videos. In our case, we needed to replace the background. We got feedback that our plain white background, which we often use in our videos because it’s non-distracting, resulted in too much white on the screen. The result was the need to rerender all the videos with a new background.

Since the move to the Blackmagic Pocket Cinema 6K camera, we found our render times climbing to about 5:1. That meant a one-minute video would be a five-minute wait to complete. It also meant that repacking all the videos by hand would take weeks. The way we solved it was to create an extension for Vegas to render all the project files in a directory tree, but that wasn’t the way we started.

Scripting and Off-the-Shelf

When it comes to needing tools to build courses, my first goal is always to buy something. I’d much rather buy something and put a bit a script around it than have to build something from scratch. There’s a simple reason for this: time. It’s cheaper to spend $100 than it is to spend 10 hours building a tool. While there are a number of tools that plug into VEGAS to allow for batch rendering – and even an out-of-the-box script – none of them approached what I was trying to do. They either allowed output to multiple formats or they wanted you to build a single project with multiple regions in it, each of which would get rendered to a separate file. That might make sense for some situations, but it’s not practical with hundreds of files and 12 hours of content.

I resolved to start by trying to revise the Batch Render script that is included with the product. I got the framework built out and tried to use it only to realize the primary limitation with the approach. It’s difficult to debug. The script is a C# script, and Vegas supports extensions, too, with a single interface. So, I broke out Visual Studio and converted the script to an extension.

The Code

Basically, I needed to take media files, copy them to the reference directories for each of the projects, and then render the files. However, since I expected I’d never get all the work done in a single sitting, I needed to be a bit more intelligent about when I rendered. That all started with copying the media files.

The Media

I ultimately decided that the tool would pick up media files from a master directory and copy them into the media directories for each of the projects (actually the working directories), since, in some cases, a single folder might host several project files. The copying would only happen if the files in the master directory were newer than the files that exist in the media directory already.

We use this strategy because the automatic file location in Vegas is good if the files are placed under the project directory but not good if they’re in random directories – including directories above the project. By placing copies in the media folder, we knew that Vegas would locate the files even if we needed to render from another machine on the network.

In the end, I’d figure out when the last file in the media directory was modified and use that in deciding what projects to render.

Deciding Which Projects to Render

A project needed rendered if the project file had been updated since the last rendering or if the media the project uses was updated. We keep all the rendered files in a specific subdirectory from the project file – Render – so locating the rendered file wasn’t that difficult. Then it’s a bit of checking to know whether the project needed to be rendered or not – except for two problems.

The first issue was that some of the project files that we had in the directories were leftovers. We kept them for reference, but the output didn’t make it into the core of the project. For those, we had a simple solution. Suffix the file name with -DNR (for “do not render”). We’d have the tool skip any files with the -DNR suffix. However, that still created one more problem: nested files.

While Vegas supports nested project files natively – that is, you can use one project file as a source for another – they’re not the most performant. As a result, if we need to split a long video (as we often do), we render the output of the master file, then use Vegas to slice into that file. The rendering time for those files is 1:5 (one minute of render for five minutes of video). So what happens is we end up needing to do some files first, so the rest of the files can use the output out of the render directory as their source. We reused the suffix idea and suffixed these files with -1st. We’d process all of those first, then all the other files. This ensured that we created the files the other renderings needed.

The User Interface

The user interface was super simple: just a set of text boxes for configuration and then a dialog with a Data Grid View in it. The Data Grid View includes the directory and project name as well as the length, media files copied, start, end, elapsed rendering times, and a status. Length and rendering times are only recorded if the file is rendered.

Vegas has two quirks related to opening new files. First, there’s no method you can call to close the existing file. There’s a workaround to create a new blank file and turn off prompting to save the existing file. The second quirk is that your dialog gets hidden during the opening of a new file. To solve this, you can just reshow the dialog after the file is loaded.

In the end, there’s an option to save the output file to a CSV file to save the results of the operation – and to provide some baseline timings.

Wait for Idle

One of the other quirks with Vegas was that you have to call WaitForIdle() before you can read values from the project that you just loaded. You need to do this so you can get the length – so you know how to set up the rendering. If you don’t, you’ll get a length of zero – and that doesn’t work so well.

Rendering

The last step is starting the rendering process. That’s about setting a few things – like the length – and then kicking off the process. Of course, you need to tell it where to render to – which is easy enough, given the standardized folder structure. You also need to set the rendering settings.

Luckily, Vegas allows you to save the rendering settings that you want in the user interface. You save these settings with a name so the code can just go retrieve that template. It’s looping through the various renderers looking for the specific template you want – but it’s not particularly challenging code.

The Results

The result is a “fire and forget” approach. If you need to update a batch of files, you just kick it off. If you need to change the background – or a logo/bug – you replace the file in the media master directory, and the tool will copy the files and render the files.

It turns an interactive process of 60 or 80 hours of rendering into something that you can set up before a long weekend and come back to when it’s done. There are still, of course, the issues of getting all the files staged in the video delivery platforms, but while that process is tedious, it doesn’t burn through weeks of time.

While I don’t like having to build automation to make our content projects function effectively, there are times like this one when it works out well. If you want a copy of the tool, contact us, and we’ll get you a copy, so you don’t have to build one yourself.

The Windows Universal Platform App Package and App Bundle

Recently as a part of the debugging process, I had to dig into how Windows Universal Apps are deployed so I could ensure that all the assets in my project were being deployed correctly. I thought that it would be easy to find documentation on the process, but it wasn’t. The process inside of Visual Studio is relatively opaque, and the documentation for the package itself leaves much to be desired.

Packages and Bundles

The first step before talking through how Visual Studio manages packages and bundles is to quickly explain the difference. Packages contain a single compilation of your application. It is targeted for a specific type of processor and processing word width (32-bit or 64-bit). Each package has everything that is needed to install that version of the package to the machine.

A bundle is a collection of packages for multiple processor and word widths. Each of the individual compilations and the required files are contained in individual package files. So, a bundle is a collection of packages – literally. When you unpack a bundle, you get a set of packages.

Visual Studio Package

Visual Studio uses a Package.appxmanifest file in your project to generate the package and settings. Double-clicking on the file reveals a designer:

The interface has a series of tabs that allow you to specify the various settings in the package, including the various icons that you need for the package. However, there are numerous settings available in the XML – like what platforms your solution targets – which can only be found by editing the XML directly. For that, you’ll need to right-click the Package.appxmanifest file, select Open With… and then select one of the XML formats. The file will look something like:

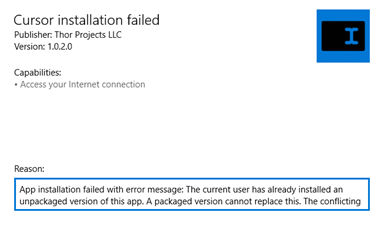
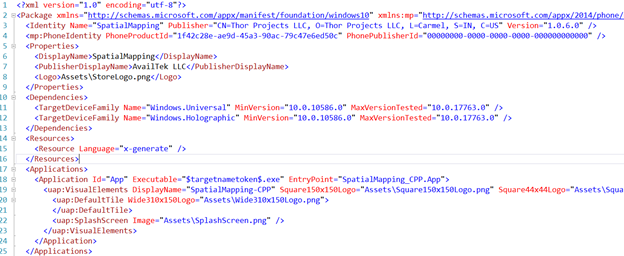
Here, you’ll notice that my solution targets two devices through the dependencies tag that isn’t available in the user interface itself. However, there is a missing element that I expected: an element that allows me to specify additional files to include in the package. Though Visual Studio will include items flagged with properties of content (like the icons) and compiler output, there’s no option to include additional files directly. That’s problematic, since I want to include C++ DLL files. With no way to directly include them in the manifest, and no way to include them as references (because they’re not MSIL/.NET DLLs), I’m stuck statically binding them or manually building the package later.

Debugging and Deployment

Deploying your Windows Universal Platform package is as easy as pressing F5, thereby telling Visual Studio to run the package. However, this process doesn’t use the typical packaging process to deploy the solution. (They’re using Loose File Registration.) In fact, if you try to install a packaged version of the application before uninstalling the Visual Studio installed version, you’ll receive a warning:

The solution is to remove the version of the application that Visual Studio deployed and then deploy the package from the .AppXBundle file. Visual Studio can create the .AppXBundles for you. This is done by right-clicking the project, selecting Store, and finally Create App Package.

The wizard starts by asking the type of package you want to create:

Until you’re ready to get the app certified to go in the store, you’ll want to create a package for sideloading. That is, you want to manually deploy the package to the machines that you want it on without going through the store. When you press the Next button, you’ll see the detail settings for the package:

In this dialog, in addition to setting the output location and version, you select which compilations will be included in the bundle. Once you press Create and wait for the builds to complete, you’ll get a dialog that offers the location for the package and a gentle nudge to try to certify your application for the app store:

With the appxbundle in hand, you can directly extract the files, or you can install the package and review the files in the installed directory.

Extracting the Package

Included with Visual Studio (via the Windows SDK) is the MakeAppX.EXE utility, which can be used to create an application package and an application bundle. It can also be used to expand application bundles and packages so you can see what files are inside. This, then, can show you what Visual Studio put into your bundle. Even if you only select a single processor type and word width, Visual Studio will create an application bundle (.AppXBundle).

Both Packages and Bundles are ZIP based files so you can rename them to .ZIP and use your favorite tool to extract them if you’d prefer to do that rather than using MakeAppX.EXE to unbundle your files.

To extract the bundle, start a Developer Command Prompt for VS 2017 (or whatever version of Visual Studio you’re running), run the MakeAppX.EXE with unbundle, then /v (for verbose) /p bundlename.appxbundle /d C:\TargetDirectory, where bundlename.appxbundle is the name of the application bundle that Visual Studio created for you, and C:\TargetDirectory is the directory where you want the files extracted to.

MakeAppX.EXE unbundle /v /p BundleName.appxbundle /d C:\TargetDirectory

Once you review the directory and figure out the name of the package, you can run MakeAppX.exe again with unpack /v /p packagename.appx /d C:\TargetDirectoryPackage. Obviously packagename.appx is the name of the package, and C:\TargetDirectoryPackage is where you want the directory where the package is to be extracted to.

MakeAppX.EXE unpack /v /p PackageName.appx /d C:\TargetDirectoryPackage

Now you can review exactly which files are being deployed on the device.

Working from the Installation Directory

This approach is fine for applications you’ve created or those for which you have an .appxbundle or .appx file. But what if you want to look at what another application installed – and where? For that, you’ll need to look at the installation directory on your computer. This time, you’ll need an administrative command prompt. This can be done by right-clicking on the command prompt and selecting Run as Administrator…

The directory that the applications are installed in is C:\Program Files\WindowsApps. This folder is hidden – and it’s not one that users have direct access to. We’re going to have to first take ownership of the folder then change the permissions. The first command is the TAKEOWN.EXE command. For this, we’re going to run:

TakeOwn.EXE /F “C:\Program Files\WindowsApps”

This will set the owner of the directory to the current logged in user. The next thing we need to do is to give ourselves permissions to the folder. That’s done with the ICACLS command.

ICACLS “C:\Program Files\WindowsApps” /grant myusername:(F)

In the above line, change myusername with your username. (If you don’t know your username, type whoami and press Enter.)

Once you’ve done this, you can close the command prompt. If you don’t have hidden files visible in File Explorer, you’ll need to go to File Explorer Options (which you can get to by starting to type the name in the Start menu). When the dialog appears, select the View tab, then select the radio button to Show hidden files, folders, and drives before clicking the OK button.

Now you can open the file explorer and navigate to C:\Program Files\WindowsApps. You’ll see a listing of the packages installed on your computer. Navigating into each folder shows you what files were installed with the package:

It’s easy enough to see what is making your application package – if you know where to look.

developer

Article: SharePoint Development in 2017

When SharePoint first came out in 2001, development for the platform wasn’t easy. It was ASP—not ASP.NET, which was the first development approach for SharePoint. In 2003, the platform was migrated to .NET, but it wasn’t until 2007 that it had a proper customization strategy in the form of features and solutions. The world has changed since then, and SharePoint has had several development models come—and one has both come and gone. In this article, we’ll look at the development models available in SharePoint and Office 365 development and explain why one would choose one model versus another.

Introducing the Development Options

The last four years in SharePoint have been tumultuous, to say the least. Of the five models available, three were introduced in the last four years. These are the five models:

  • Server-Side Object Model (a.k.a. Server Solutions): Introduced in 2007 and available today for on-premises deployment, this model has the richest support and the greatest longevity, but puts a great deal of onus on the developer to write good code, because the code runs directly inside the SharePoint processes.
  • Sandboxed Solutions (a.k.a. User Code Host, Partially Trusted Callers): Introduced in 2010, these solutions allowed end users to write to a subset of the SharePoint API. These solutions had severe limitations but were designed to reduce platform instability with poorly-behaved developer code. It’s no longer available on Office 365/SharePoint Online and is not planned for further investments.
  • Add-Ins (previously known as “Apps”): Released with SharePoint 2013, these client-side-based applications run on other servers or in JavaScript in the browser, so they eliminate the challenges of server-side code. The complexity of this model, which includes the required wildcard DNS entries and authentication changes, required a different (and some say greater) developer skill set. Add-Ins are available both on-premises and online.

Full article at developer.com. Read more…

Developer Productivity: Managing Cycle Times in Iterative Development

Article: Developer Productivity: Managing Cycle Times in Iterative Development

Thus far in the series, we’ve focused on managing productivity at an individual developer level. However, sometimes developer productivity results from the best management of the developers and the rest of the team. Measuring individual developer productivity is convenient because it tells you how well a single developer is performing. However, even the best developers can perform poorly when they’re put into a cadence that doesn’t work for the project or the organization. Here we’ll look at iterations, and how quickly we cycle can make a big difference.

Iterative Development

It’s important to realize that even waterfall development was initially designed to be iterative. The idea wasn’t that you’d do something once and then never work on it again. However, if you have project managers on the team, for example, who are used to building a bridge, some of their experiences might get brought along. When building a bridge, it has to be built right and built just the one time. Thus, very early on, projects were pushed into one iteration and long cycles of design, development, testing, and release.

The agile movement has revived the need for iteration, and focuses on quick turns of innovation. Whether your iteration is a week, two weeks, or a month, this is a substantially faster iteration pattern than the monolithic waterfall projects from the distant past.

A Lesson from Manufacturing

It’s no secret that American car manufacturing got its clock cleaned in the 1980s and 1990s by the Japanese. Much has been made of the Toyota Production System—what is now most frequently called “lean manufacturing.” One of the often-overlooked components of the system was the ability to change over from manufacturing one item to another very quickly.

Part of the developer.com series, Developer Productivity. Read more…

projmanager

Article: Developer Productivity: Ensuring Productive Meetings

If you work in an organization, you’ve experienced bad meetings. These soul-sucking, time-crushing meetings leave you deflated and wondering if you’ll ever be able to get anything done. Learning how to make sure that developers are only in the meetings they need to be in—and that the meetings that they’re in are productive—is a key way to maintain developer productivity.

It really doesn’t matter whether you’re using an agile software development methodology, waterfall, or a blending of the two that you call something like “Agile-Fall.” In truth, the meetings that you experience as a developer share common characteristics no matter what the methodology. Let’s look at agile meetings first.

Agile Meeting Types

Developers working in agile projects typically experience four basic kinds of meetings. The daily standup meeting is the most frequent, and therefore potentially the most time-consuming. The backlog, or estimating meeting, occurs each sprint or iteration so that developers can estimate the effort for each task and determine dependencies. Show and tell meetings occur each sprint to help demonstrate what’s working. These meetings are primarily designed for the clients, but often developers are asked to join to “show off” their features. The other meetings are “traditional” meetings, which may include organizational meetings as well as requirements-gathering meetings that developers get pulled into.

Standup Meetings

Everyone is supposed to stand up to keep the meeting short. Three questions are designed to elicit commitment and create opportunities for support.

Part of the series on developer.com, Developer Productivity. Read more…

flow

Article: Developer Productivity: Eliminating Distractions and Finding Flow

Every new development tool promises improved productivity. New languages promise better developer productivity; but, sometimes, the key factors for developer productivity aren’t the tools, the computer, or even the additional monitors. Sometimes, the keys to allowing developers to get more done are psychological factors that we’ve known about for decades.

Deliberate Distractions

In our world, we’re constantly interrupted. Our phone goes off with that latest alert from ESPN. It’s constantly vibrating from the stream of incoming messages, chirping from the latest text with our friends, and more. We ignore the phone vibrations from emails because Outlook conveniently pops up a toast notification telling us about the latest message. It’s stacked full of messages from the corporate HR department telling us about something we don’t care about, the thread of inane comments, and the SPAM that has become a part of our daily lives. More toast from our instant messaging tools pop up with notifications when our colleagues and friends become available.

Many developers feel the need to keep a social media feed open so they don’t miss out on something important. Whether it’s Twitter, Facebook, or something more business-related like Slack, we’re concerned that we’ll miss out on something important if we’re not connected. These channels generate more distractions.

Part of the series on developer.com, Developer Productivity. Read more…


trainer

Article: Ten Technical Trainer Interview Questions You Should Know

At the tail end of the process, the criticality of training and user assistance is often lost.  The role is often underfunded and overworked – but intensely valuable to making the software work for the users.  The Anatomy of a Software Development Role: Training shows how the role brings the development home to the users.

From the developer.com series, Top Ten Interview Questions. Read more…

webapp

Article: Web Application Vulnerabilities

In today’s world, most developers are building Web applications or applications that expose Web services publicly. Most applications are connected to the Internet in some way or another. However, most developers haven’t been formally (or informally) trained in Web application security or which vulnerabilities they should look out for.

Article on codeguru.com. Read more…

QA professional

Article: Ten Quality Assurance Interview Questions You Should Know

Perhaps the most challenging role in the software development process is that of the quality assurance professional.  It requires a set of soft skills for dealing with developer egos and hard technical skills to get bugs to scurry out of their hiding places and into the light.  Candidate for these roles can expect questions about their hard skills including the tools that they use.  For more about how critical the quality assurance role is, check out Anatomy of a Software Development Role: Quality Assurance.

From the developer.com series, Top Ten Interview Questions.  Read more…

Recent Posts

Public Speaking