Video Studio 3.0
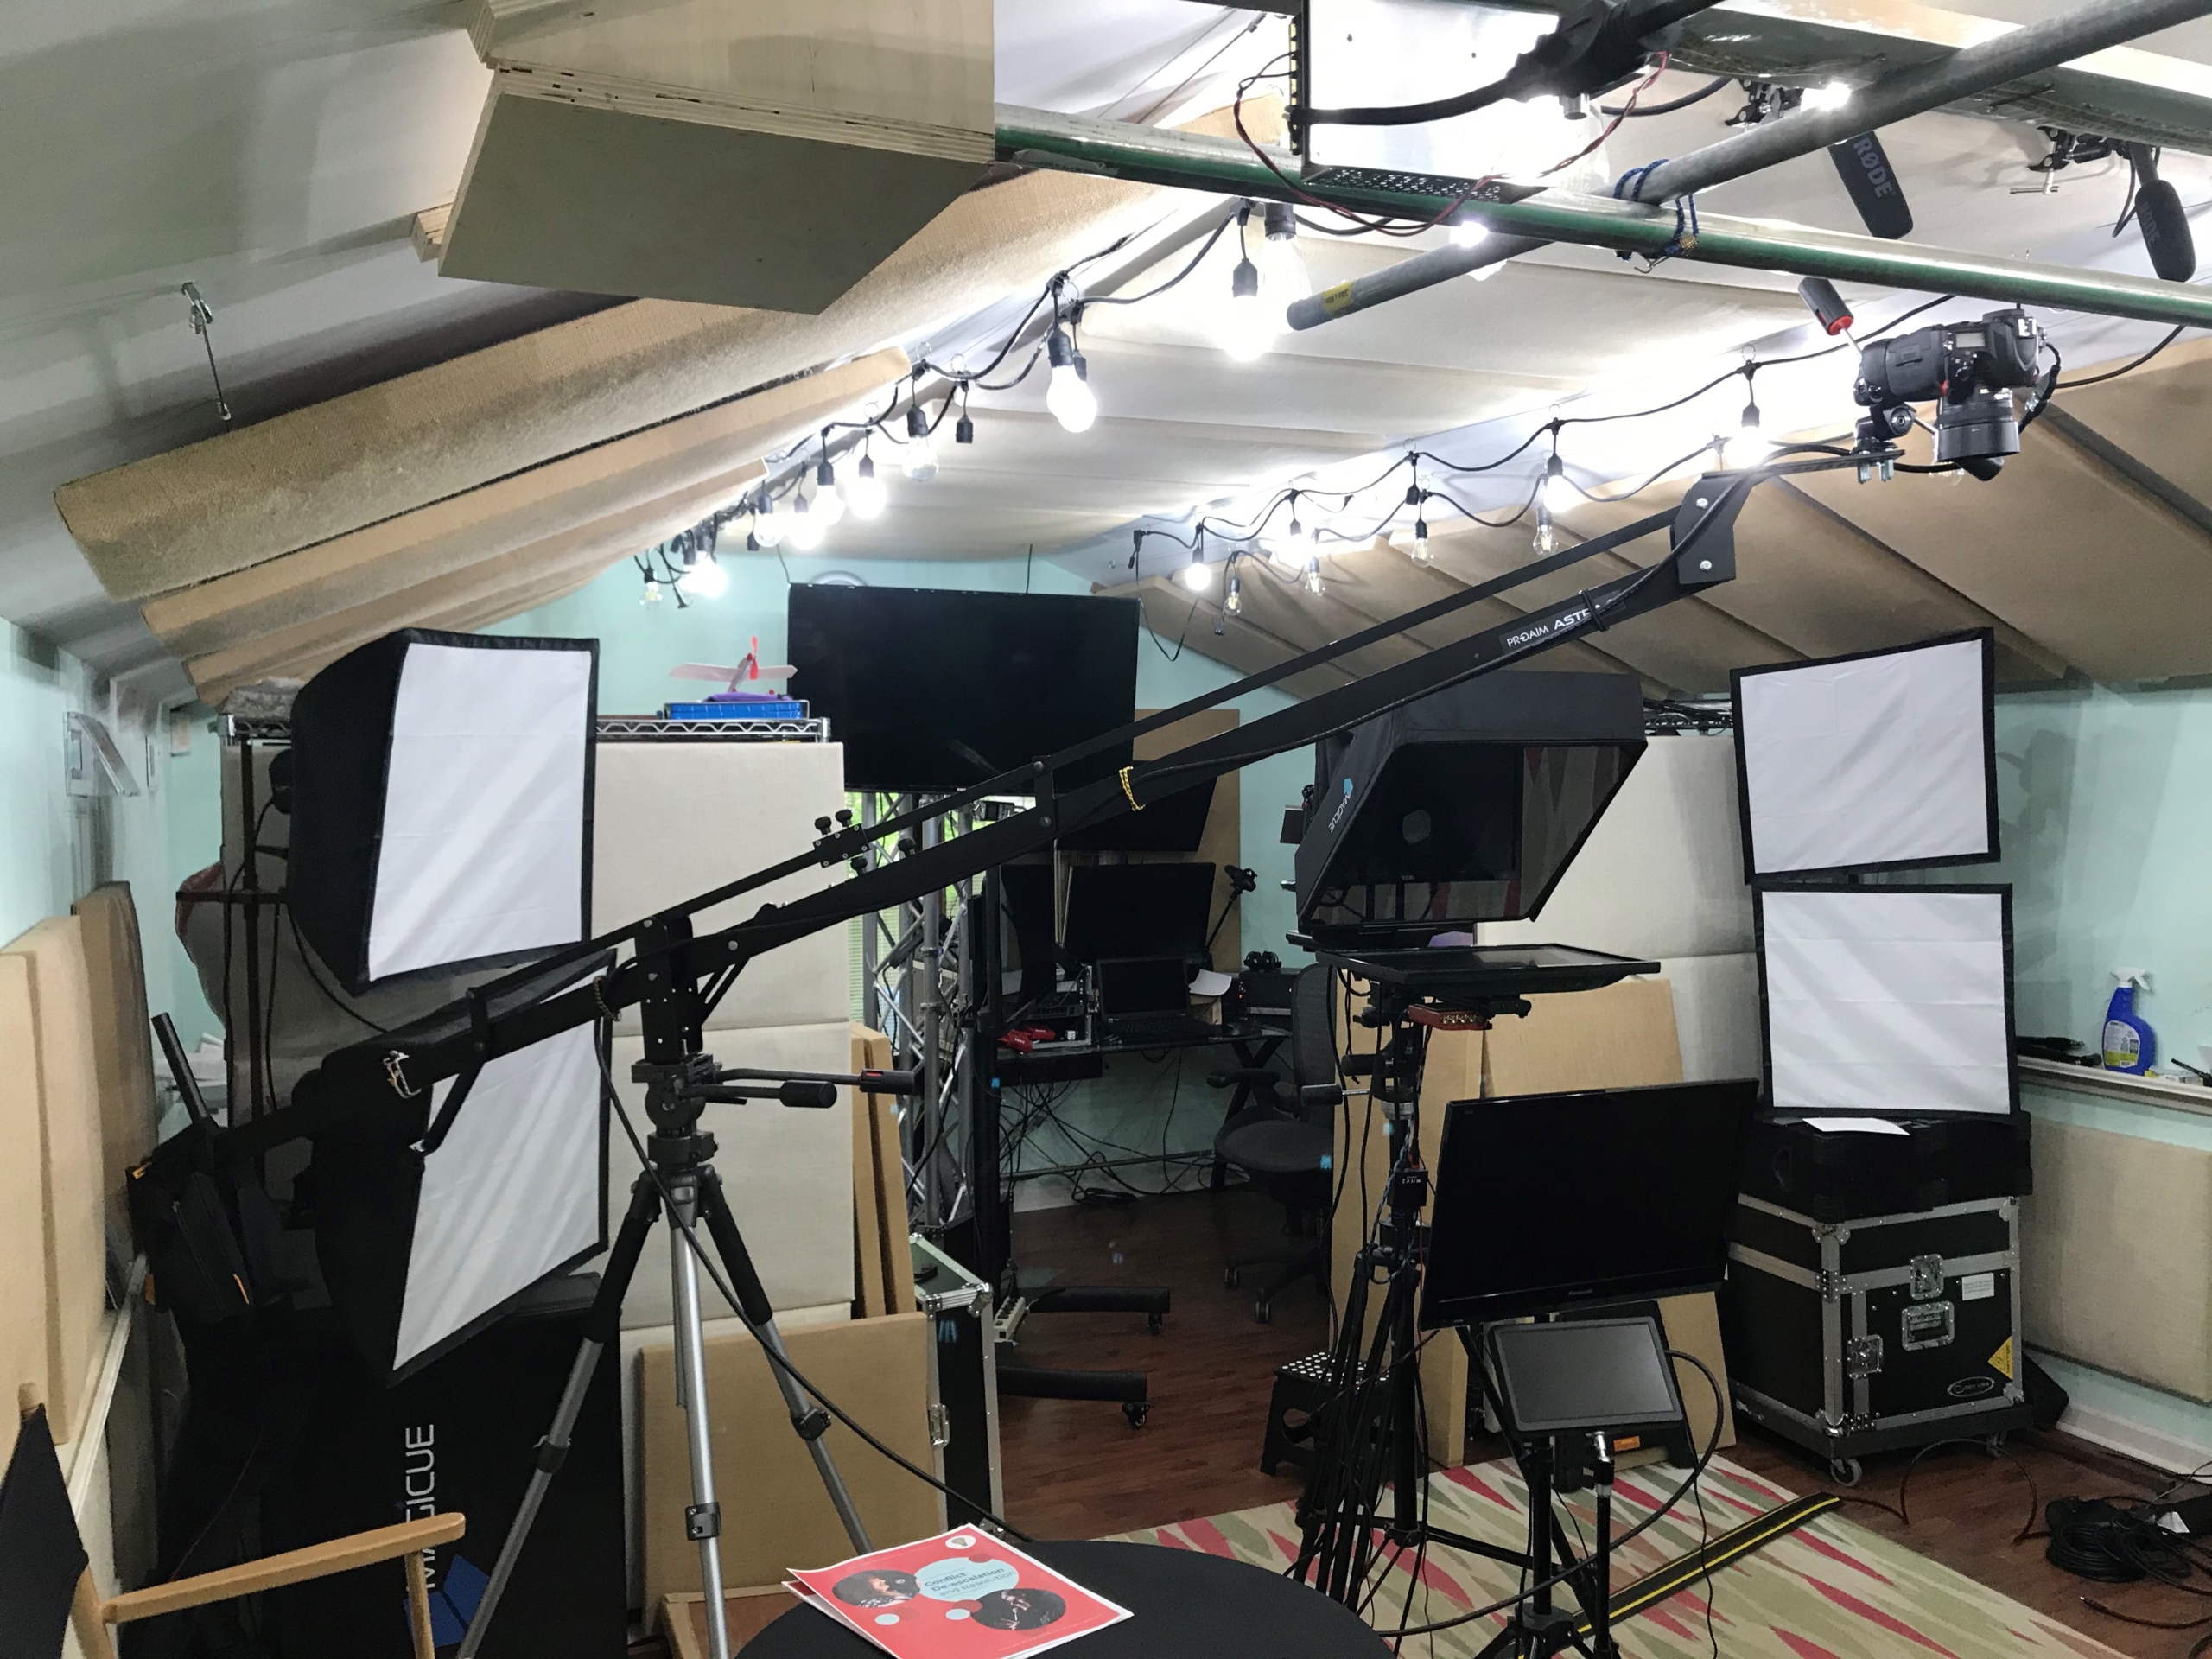
It was 2017 when I last shared about the video studio and the configuration. Since then, we’ve made some important upgrades, like retiring the two Canon XH A1s in favor of a Blackmagic Pocket Cinema 6K. We also added two teleprompters (Glide Gear and Magicue), a jib, and a few other pieces to pull it together. Let’s take a step back and talk about the problem.
The Limitations
Most of the time, we’re shooting video for the internet, and that means a final resolution of 1280×720. The limitation of the Canon XH A1s – 1440×1080 wasn’t a problem. However, some of the more recent stuff has been going to a final resolution of 1920×1080 – so the Canons weren’t going to cut it. We have the Nikon D750, but it has a 10 minute recording limit.
We also recognized that even though we had managed most of the angular deflection of our eyes while recording, it was becoming more apparent that we weren’t looking at the lens of the camera when we were recording – we were looking right below it.
Finally, we didn’t have a good way to get overhead shots. For some of the infection prevention videos that we were shooting for Terri, we needed a way to show people multiple angles of handwashing and hand rub.
The Camera
There are a lot of factors that go into picking a digital video camera. For us, it needed to work primarily as a studio camera and secondarily as a camera that we could travel with. Blackmagic Design was a reasonable choice if for no other reason than we’ve had the ATEM and liked it. We landed on the Pocket Cinema 6K for two key reasons. First, it would use standard Canon EF lenses, giving us some flexibility. Second, it would allow us to do cropped frame to 4K for the foreseeable future.
The Good
There’s a lot of great things about the camera. We married the camera with a Tamron 28-300mm lens, which is great. The images are clear, and the minimum F/3.5 isn’t a problem in the studio, where we’ve got plenty of light. The screen is good. The menus are intuitive. The recorded video is very clean. The adapter cord allows us to attach the Rode NTG-1.
We ended up adding a SmallRig cage to it to provide mount points and protect it. We decided to add a top carry handle and we grabbed a few Magic Arms – double-headed threaded articulation. Overall, we’re very happy with the camera, but it didn’t come without a few issues.
I had some trouble with the CFast card I bought to record on. Ultimately, I decided to transition towards recording to portable storage drives. The onboard USB-C port allows for SSDs (solid state drives) to be attached through an adapter or enclosure. I could then slide in a pair of 1TB SSDs – one at a time. They record great, and a simple USB3 adapter cable allows me to pull the data off them and on to the editing bay at about 300MBps, or roughly 2.5x the recording rate. From a workflow perspective, this means that I can be offloading recorded information at the same time that we’re recording more. Given that 1TB is about 4 hours of recording at the settings we use – 4K ProRes – we can basically swap drives during the middle of a day of recording.
The Bad
Perhaps the biggest disappointment was the problems with the USB-C port that’s on the camera. It was supposed to be that you could power the camera with USB-C, but it wouldn’t charge the camera. However, the language of marketing copy kept shifting, as I was digging into the problems I had with why my USB-C power pack wasn’t able to keep the camera powered. The camera would turn itself off after about 40 minutes. Ultimately, I got the answer that it wouldn’t work that way. If you must, you can charge the onboard battery with the USB-C – when the camera is powered off.
I ended up getting a V Mount/V-Lock battery plate with a D-Tap, a D-Tap cable that would connect to the camera, and an adapter between Sony F970 batteries and V Mount. That all required a cheese plate to allow for mounting. Assembled, it’s good. Finding all the pieces wasn’t easy.
I settled on this approach, because I hate having to carry around so many kinds of batteries. When I got the light panels, I got a Watson Duo LCD Charger, which charges the F970 batteries they take. With this solution, I’ve got one set of batteries that the light panels or the camera can use. The charger also means I can recharge the batteries from a wall or any 12-volt lighter socket.
I have no idea how long the camera will run on battery power in this configuration – but it’s a very long time.
The Teleprompters
I knew that I wanted a teleprompter and was trying to get one without spending an arm and a leg, that led me to the Glide Gear TMP100. It was designed for a tablet, but I expected I could use a 10″ monitor. The key consideration for me was that it be full resolution HD. What I didn’t account for was that the monitor was substantially thicker than what the rig was designed for. It required some modifications to get things to work out, and even then, it wasn’t quite right. Ultimately, that led us to a 19″ teleprompter from Draco called Magicue. It’s much bigger and better in many ways – and of course, more expensive.
For both, I needed to address the problem of the mirror flip. Most people do special software to do this, but for our workflow, having the ability to use Microsoft Word or Microsoft PowerPoint was important. We produce video every week, and we have guests renting the studio. It had to be easy. That required a Decimator MD-Cross to flip the signal. It’s like the Decimator MD-HX that we use to frame up signals for the Blackmagic ATEM – except that it supports flipping.
The other thing that I needed for both was a Z-Tilt Tripod Head/Mount. In the teleprompters, getting the camera positioned right is critical. Trying to do that on a micro-ball head just wasn’t stable or easy enough. Since you don’t need side to side, the Z-Tilt is perfect.
Glide Gear
In addition to the issue mentioned above with mounting the monitor, the hood on the Glide Gear was a problem. It wouldn’t seal around the edges of the lens. That’s important both for recording quality, but also because, if you don’t seal it, you get light pollution through the back of the glass, and you can’t read the teleprompter.
Because of the dimensions, it also necessitated a fixed 28mm lens for the Blackmagic to get the right angle and get close enough to the glass to not see the frame. The lens isn’t much crisper than the Tamron 28-300mm – but it’s lighter and much shorter.
Ultimately, we put the Sony DHR-11 on it, since it’s a compact camera and works well on a mini-ball head, and its zoom makes it possible to control what the camera sees (and doesn’t see) through the teleprompter.
We’re set up for this as a backup teleprompter, but it’s dwarfed by the Magicue 19″.
Magicue
Not withstanding the issues with the Glide Gear itself, the problem was that it’s small. The farther away you place the camera the less well you can read text. So, the problem is simply one of being able to read. The Magicue solves that problem. It’s also a more adaptable solution. You can adjust the tilt of the mirror – where it was fixed with the Glide Gear. It sounds like a small thing, but in this case, it counts. When you’re trying to get as wide a shot as possible, it’s sometimes necessary to tilt the monitor down just a bit rather than being horizontal – so it’s not seen by the camera.
The hood for over the camera is great. It seals around the lens well, and it doesn’t fall into the field of view as the Glide Gear’s shield tended to do. It even feels sturdier. Of course, you’d expect that with the greater cost – but it’s really nice.
The one hitch to the Magicue is the monitor – and, in truth, it’s an inexcusable limitation. The unit ships with a monitor that is 19″ diagonally but on a 4:3 format. On the surface, it looks good. Integrated signal flipping, SDI, HDMI, and VGA support. The detailed problem is the 1280×1024 resolution.
The challenge with a monitor for a teleprompter is that it needs to be bright, so that means just any monitor may not do. Because the image is reflected and some of the light is lost, it needs to be brighter than you’d normally need a screen to be. More importantly, you need it to be the right size. It needs to be about 19.5″ diagonally on a 16:9 format, because that format allows the width to stay inside the reflected area of the mirror. On the brightness side, it’s hard. The monitor they provide is 300cd/m2, which is moderately bright. Most monitors available off the shelf are 250 cd/m2 at best – and few places are selling 19.5″ in the consumer market these days. I did manage to find a ViewSonic VA2055SM that works fairly well, though I’ve got to turn the brightness all the way up.
There are other options that even get to 1000 cd/m2, but they’re specialty and command the specialty price tag. For now, I’ve decided that the monitor is OK. If I need to do something different in the future, I can.
Get Jibby with It
There are just some shots that are difficult to get without the right gear. The overhead shot is one of those. We wanted the overhead shot for the infection prevention demonstration videos, but also because I thought we were going to use them for the change management course we started building. Though we decided against using it for the change management course, it’s become an important part of how we can shoot demonstration video.
A jib is fundamentally a long arm that you mount a camera on the end of. In our case, the PROAIM Astra is an 8 foot jib that allows us to get a camera overhead. We elected to put the Nikon D750 on it, so we could shoot front with the Blackmagic and overhead at the same time. This created a handful of problems. First, the D750 has a camera door that ejects via the bottom, which isn’t convenient to change. We had purchased a vertical grip for it that it’s much easier to add/remove the battery, so we used it. The other problem was that the Jib is set to keep the platform vertical, so we had to get a 90-degree downward turn – and a micro ball head wasn’t going to cut it. We turned to a full tripod head that has great control for locking things off.
We had one last problem. The primary lens we use on the Nikon D750 is a Nikkor 28-300mm f/3.5 that’s great for all around shooting but also extremely heavy. Facing downward, we can lock out the zoom and stay at 28mm or let it zoom all the way in and end up at 300mm. Neither really works from 4 feet above your head (to stay out of the way of the Blackmagic camera.) That why we picked up a Nikkor 50mm f/1.8 lens. It’s a beautiful lens and has a reasonable zoom. We’d love to add a Nikkor 85mm f/1.8 lens to the studio, because it might be a tighter and better shot for some things, but it’s definitely a nice-to-have, not a must-have, for us.
The only real challenge for the jib is managing the counterweights. It’s sometimes interesting to get the camera on one end and get weights on the other to counterbalance. I had some 6lb mic boom counterweights that I had available, so I threw them into small bags and hung them on the post that is designed for regular bar weights. It’s not perfect, but it works.
The other thing for the overhead shot was to add a black rug, since our existing rug was a bit too distracting.
Miscellaneous
There were other things we rearranged, most notably the tower that used to hold the two cameras. It’s rather bare now, as we’ve removed two camera preview TVs and one switcher preview monitor, and have left the stand with little more than one preview monitor for the ATEM. There’s more gear on the floor now on various light stands and tripods, but we’re in a much more flexible position to be able to capture content in ways that make it seem seamless.
As you can tell, we’re in a much better place, not perfect still, but we’ve got a better picture, and we’ve got more flexibility to get the shots we want.

