Skip to content

Windows 8 JavaScript Applications

Working with Settings Pages in Windows 8 JavaScript Applications

Adding additional page fragments to be navigated to in the grid application is relatively straight forward, just select the Page Control new item and start modifying the code. However, while this works well for page fragments for the application, it doesn’t work all that well for settings pages. In Windows 8 you’re supposed to leverage the existing Settings Charm – however, adding your settings pages can be a bit challenging because you’re supposed to transparently save the user’s preferences which can be tricky given the unload event won’t fire on the settings pages. So in this blog post I’ll cover the three main components of making a working settings page.

Registering the Settings

The first step is connecting your settings pages to the Settings charm in the first place. So in your default.js (presuming you’re using the grid app as your starting point) paste the following code immediately under the variable declarations (so it happens first):

// Register Settings Values

app.onsettings = function (e) {

e.detail.applicationcommands = {

“about”: {

href: “/pages/about/about.html”,

title: “About”

},

“settings”: {

href: “/pages/Settings/Settings.html”,

title: “Settings”

}

}

WinJS.UI.SettingsFlyout.populateSettings(e);

};

This will register two pages on the settings menu – one for About and one for Settings. (Which I should probably call something different.)

Settings Page HTML

The next step is to convert the HTML in the Page Control .HTML file so that it can be used by settings. That should look something like this:

<div id=”settingsContainer” data-win-control=”WinJS.UI.SettingsFlyout” aria-label=”About the application” data-win-options=”{settingsCommandId:’settings’,width:’narrow’}”>

<div class=”win-ui-dark win-header” >

<button type=”button” onclick=”WinJS.UI.SettingsFlyout.show()” class=”win-backbutton”></button>

<div class=”win-label”>Server Settings</div>

</div>

<div class=”win-content”>

<div class=”win-settings-section”>

<form>

<!– Insert settings UI here –>

</form>

</div>

</div>

</div>

The keys here are:

  • Provide a DIV attached to the WinJS.UI.SettingsFlyout class including options for the command id and the preferred width (narrow or wide.)
  • Provide a unique ID for the DIV so you can fetch it in code.
  • Inside an inner set of DIVs (classed with win-content and win-settings-section) include the controls and labels to capture your configuration.

Settings Page JavaScript

The Page control javascript that was generated has a nice structure, but it also has some problems. Left as is, the unload event will never be called. That’s a problem since the Windows 8 UI guidelines call for no save button. When the user clicks outside the settings page their settings are supposed to be saved automatically. We can make this happen automatically by registering the afterhide event on the WinJS.UI.SettingsFlyout container. However, this will provide a relatively odd context for the item when it comes back in, so we need a way to work around that. Here’s a sample of some of the code we need to make this all work:

var self = null;

WinJS.UI.Pages.define(“/pages/Settings/Settings.html”, {

ready: function (element, options) {

getSettings();

document.getElementById(“settingsContainer”).winControl.addEventListener(“afterhide”, this.unload);

self = this;

},

unload: function () { // Doesn’t appear to be called

self.updateSettings();

},

updateSettings: function () {

updateSettings(settings);

storeSettings(settings);

},

});

I’ve omitted some of the lines for brevity. In this case we’re creating a ‘self’ variable that we’ll assign to this so we can use it later – that’s going to help fix our event handling concerns in a moment.

Inside the ready method/event we get our settings and apply them to the HTML – That’s being done in getSettings(). Then we register our afterhide event and finally we set our ‘self’ variable to ‘this’ so we’ll have it later.

When the settings page is hidden it calls the unload function which uses the ‘self’ variable we created earlier to call updateSettings. Again the self variable is necessary because this within the context of an event handler is the DOM item that triggered the event – which isn’t what we want. The updateSettings uses helper functions to update the computer settings from the DOM and then store them.

As said earlier, unload doesn’t get called automatically and you’re supposed to be making your updates when the user makes them. That’s fine for toggle buttons but for text boxes there aren’t good ways to capture the end of the textbox entry. I know you would normally expect to be able to use onblur but this doesn’t work if the user clicks off the settings page fragment, so we need something that will get the form after it’s been pulled from the screen, thus the afterhide event.

It’s convention to save variables without a save button so you’ll want to save all the variables from the screen to application settings as soon as the user exits. That is the job of the storeSettings() method:

function storeComputerSettings(computerSettings) {

var roaming = Windows.Storage.ApplicationData.current.roamingSettings;

for (var prop in computerSettings) {

roaming[prop] = computerSettings[prop];

}

}

In my case I pass in an object with the appropriate properties defined. I just take those and stuff them into the roaming settings for the application. Once they’re there I can come back and access them again – even on different devices. You’ll note that the approach here will simply push anything in the object passed in, into roamingSettings.

So with these pieces you’ve got a settings page that can store values when the user exits the settings page; something that should be simple that was far more complicated than necessary.

Windows 8 JavaScript Notification Toast

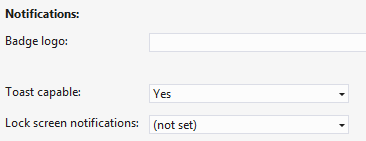
I’m working my way through a set of topics for Windows 8 application development with HTML and JavaScript and I decided that I wanted to display Toast notifications for some things – basically I wanted to let the user know that their settings were saved. Ultimately I’ll pull these but for now they’re also useful for me for debugging to know that my background threads completed successfully without having to set a breakpoint. There are two key pieces to this process. First, the application needs to support notifications and that’s in the package.appxmanifest on the Application UI tab:

You’ll see a section for notifications – and an option to do Toast capable. Then you need some code to show a toast message. Here’s something straightforward that you can adapt to suit your needs:

function sendLocalNotification(message) {

var template = Windows.UI.Notifications.ToastTemplateType.toastText01;

var contentXml = Windows.UI.Notifications.ToastNotificationManager.getTemplateContent(template);

var toastTextElements = contentXml.getElementsByTagName("text");

toastTextElements[0].appendChild(contentXml.createTextNode(message));

var toast = new Windows.UI.Notifications.ToastNotification(contentXml);

var toastNotifier = Windows.UI.Notifications.ToastNotificationManager.createToastNotifier();

toastNotifier.show(toast);

}

Happy toasting.

Working with the Windows 8 Visual Studio JavaScript Grid App – Part 1 – Data and Navigation

I’ve been working on learning Windows 8 application development and I’ve been struggling to get my head wrapped around some of the pieces, so I wanted to document some of the key pieces that I’ve learned about the Grid App template so far. Let’s start with Data.

Data.Js

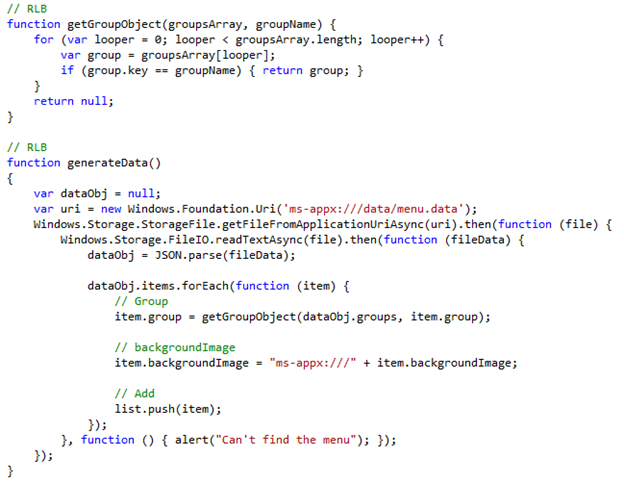
The data model that’s a part of the template is crazy. It’s static initialization inside of the /js/data.js file I wanted to eliminate that and make it read from a data file. The idea here is that I can get quite a bit of what needs to be localized into a single file that will be easy (ish) to localize. To do that I replaced the call generateSampleData().forEach(function (item) { list.push(item); }; with my own generateData() method. It’s the second method in the following image:

OK, so in this case I’m deploying the data file in a /data folder and it is called menu.data. I load it by using the Windows.Storage.FileIO API. Once I have it I parse it with JSON.parse() then I iterate each item grab the group item, stuff a link into the items list and I add the rest of the URL for the background image. I push that to the list that was defined above. The helper function above generateData() just locates the group. Yea, resolveGroupReference() is very similar, however, it expects that the groups are on items already.

The data file itself isn’t that bad – except that you have to deal with the fact that JSON.parse() is really particular about what it gets in. It has to have the keys quoted it gets upset at extra whitespace between the colon and the value, etc. Take a look at my simple sample file:

You’ll see the quoted values, and if you look to the far right you’ll see a new key/value for page which is the URL for the page to load for the item. The out of the box grid app expects every item loads the same detail page – and every group loads the same page. I didn’t want that. I wanted each item to be able to load its own page, thus adding the URL to the object. You’ll also notice that my object has a .groups and a .items – The code above in generateData() and getGroupObject() just stiches the groups into the items like the data expects.

Note: I know this is a stupid/silly way to do the groups now, I’ve just not gone back and fixed it since doing so was more of an architectural change than I was comfortable making. If you do this you’ll want to manage this slightly differently and stuff the data for groups into a different list rather than doing the silly mapping that the Grid app does.

The final thing is that the way the grid app is created it automatically sorts groups based on the key so I just prefixed the key to get the order I wanted. I could change the compare function, but I was lazy.

groupedItems.html

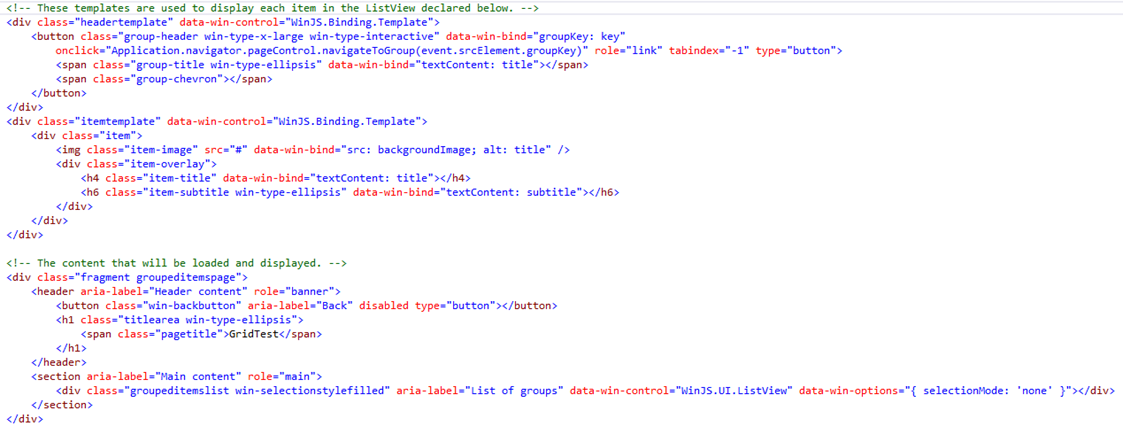
The application starts with default.html but the control on default.html loads a Application.PageControlNavigator that loads HTML fragments into the page for you. The data-win-options sets the parameter for the PageControlNavigator so that it’s home is /pages/groupedItems/groupedItems.html to be loaded in. That page has a few key pieces which I’ll explain after the screen shot.

OK, in this. The key is actually at the bottom. The last DIV tag is really a WinJS.UI.ListView – which the code will stitch together with the data model to make everything get displayed. The first two DIVs are templates that ListView will use. One key thing to note is that the group header (in the header template) is defined as a button – and it has a button handler. This will be important as we talk about navigation.

groupedItems.js

The way that the navigation and fragment pages work is that you do a WinJS.UI.Pages.Define and provide the URL of the page plus a collection of items to tie to the page. These are mostly event handlers and call backs that can be used from outside the page. The ready property/method/delegate will be called by the framework when the fragment is loaded and ready to go. This starts by binding the ListView control to its templates and defining a handler _itemInvoked:

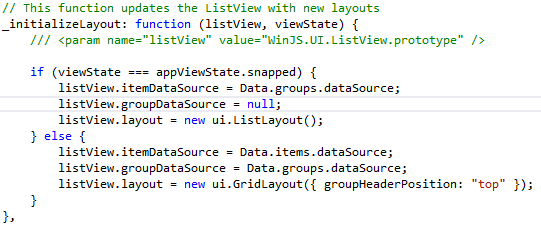
Later this method calls this._initializeLayout(), this method actually binds the data source:

This is does something crazy. If the application is in a snapped state (think side-by-side – it’s not full screen) then it loads the groups into the item template and blanks out the group data source. The effect of this is that the groups become items. In the normal case the headers are loaded as the groups and the items are loaded. This all got crazy when I started looking at _itemInvoked:

Looking at this code you can clearly see that sometimes it treats an item like a group and othertimes like an item. This doesn’t make sense unless you see that they start treating groups like items in _initializeLayout. So in order to get the navigation to use my pages that are a part of the objects now I need to go update the button event handler like so:

The commented out line is the original and the two lines that follow are me getting the group (instead of just the key) so I can get the page off of it. Next is the _itemInvoked:

Here you’re seeing the behaviors I want. I get the item out of the groups and navigate to it by calling navigateToGroup – which I updated above, and for items I get the item then navigate to the page attached to that data.

Whew!

Wow, untangling the pieces of this to get it to a working structure that I can use to nave my data initialized and to be able to navigate was quite the challenge. Next up is starting to implement some of the other features. I’ll let you know how that goes.

Recent Posts

Public Speaking