With a TechNet article titled “Configure single sign-on (Office SharePoint Server)” one might wonder why I’d feel the need to write a blog post on how to setup Single Sign-On. The answer is that the TechNet article is incomplete (as of this publishing) and obtuse. So my hope is to walk through the process with screen shots so that you can see exactly what to setup and what the values should be.
There are seven main activities that we need to do:
- Create the SSO service account — This is the account that the service will run under.
- Create the SSO groups — These groups are used to control who has the ability to administer SSO (export the master key) and who has the ability to manage it (add/remove application definitions.)
- Configure the SSO Service – Set SSO to start and get it to use the service account.
- Configure SQL Server – Authorize the SSO service account to SQL server.
- Manage SSO – Setup SSO in MOSS including the groups and the database.
- Manage the encryption key — Create the encryption key that will be used for protecting the username and password information on the system.
- Manage settings for enterprise application definitions — Define what initial applications SSO will be setup to manage passwords for.
In each of the next sections, I’ll walk you through dialog-by-dialog what you need to select and what to do in order to get a working setup.
Create the SSO Service Account
We need to create an account for the “Microsoft Single Sign-on Service” (SSO Service) to run as. This account has to be a domain account that has local administrative privileges for the front end web servers, must be a member of the SharePoint group Farm Administrators, must have db_creator and security administrator roles in SQL Server, and must be a member of the group that is defined as SSO administrators. Obviously this is a few requirements. We’ll work on the getting this account and the appropriate groups setup over the next several major steps. In this section we’ll concentrate on getting the account setup.
In the following steps I’m going to add the user to the Domain Admins group in order to get the local administrator privileges requirement met. If you are working on a production installation, I’d recommend creating a group for SharePoint Farm Administrators and add that group to the local administrators group of each of the front end web servers — as well as the index server. If you do this, use your farm administrators group rather Domain Admins in the steps below.
Let’s get started.
- From the Start Menu click Administrative Tools-Active Directory Users and Computers
- In the left hand pane on the Users folder right click and select New-User from the menu that appears. If your organization places service accounts in a different organizational unit (OU) you can certainly add this account to that location.
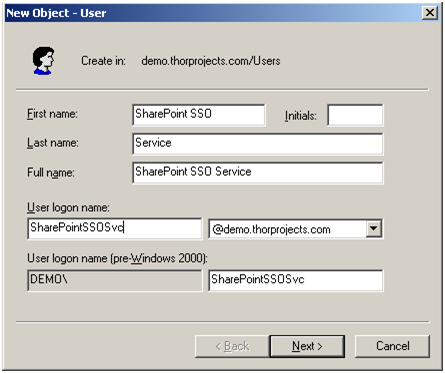
- Enter the First Name (SharePoint SSO), Last Name (Service), and User logon name (SharePointSSOSvc) fields and click the Next button. You can name the account anything you want, however, these values make it clear what the account is used for.
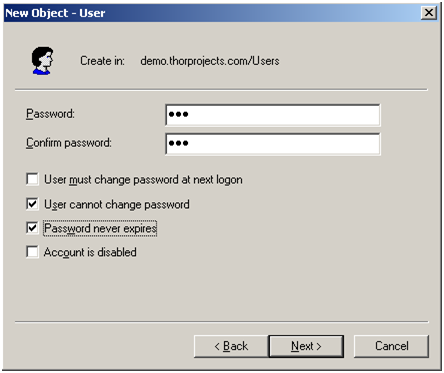
- Enter the a password into the Password and Confirm password fields. Uncheck the User must change password at next logon checkbox. Check the User cannot change password and Password never expires checkboxes. Click the Next button. This sets the account up to be a service account.
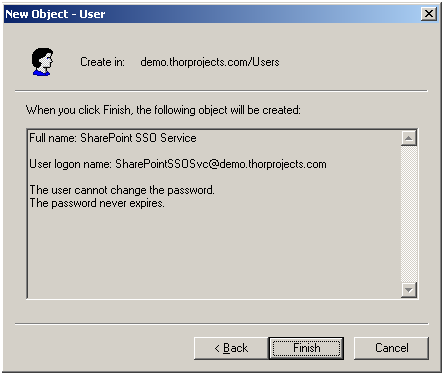
- Click the Finish button.
- On the user that was just created, right click and select Properties.
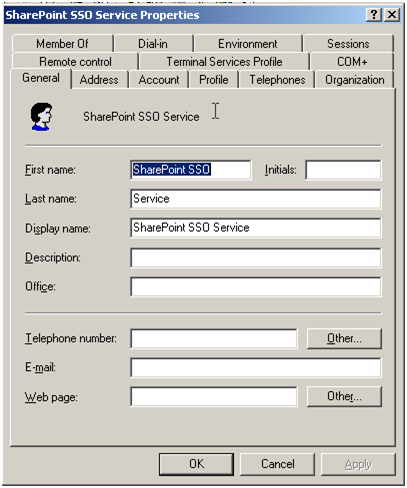
- Click the Member Of tab.
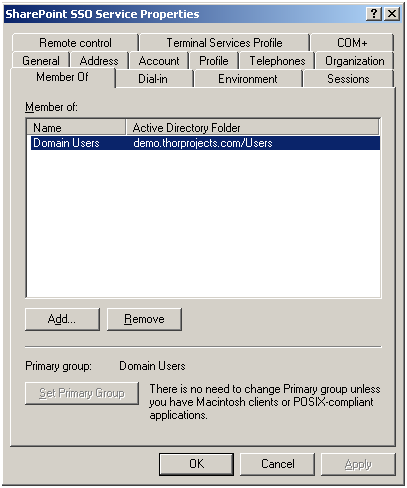
- Click the Add button
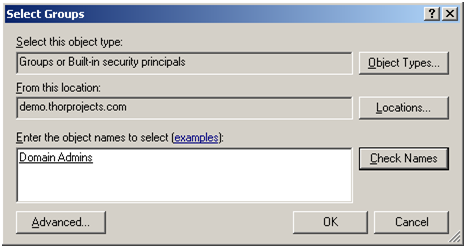
- Enter the group name Domain Admins and click Check Names then click OK. As mentioned above, if you’re using another group to provide local administrator access to the farm servers, use that group here.
- Click the OK button.
With the user account created and added to a group that will have administrative access to the farm servers. Next we need to create the groups that we’ll add the users capable of managing SSO into.
Create the SSO Groups
There are two important groups for SSO. The first group is the administrative group which includes those users capable of administering SSO. This includes the ability to backup and restore the encryption key — because of this they can effectively decrypt all user credentials in the SSO database and thus membership to this group should be severely limited. The second group, a managers group, is used to manage the application profiles in the SSO system. This group doesn’t directly have access to passwords but could inadvertently delete all of the stored passwords. In the following steps we’ll create both groups and add the SSO service account we created above into the administrators group.
- In Active Directory Users and Computers (still open from the last set of steps) from the left pane right-click Users and select New-Group. As before if your organization requires that groups be placed in a different OU, select that OU to create group in.
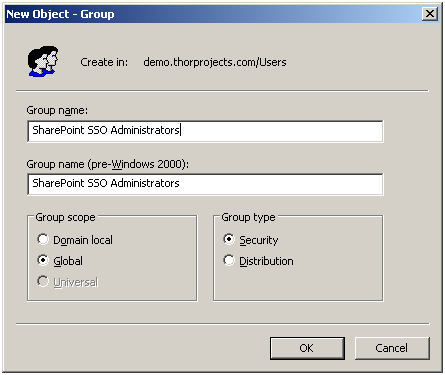
- Enter the Group Name (SharePoint SSO Administrators) and click the OK button.
- Left click the new group, and then right click the new group and select Properties.
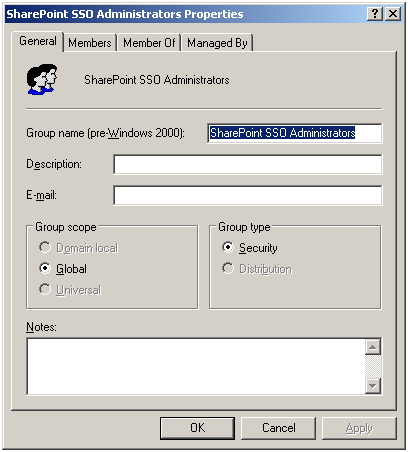
- Click the Members tab.
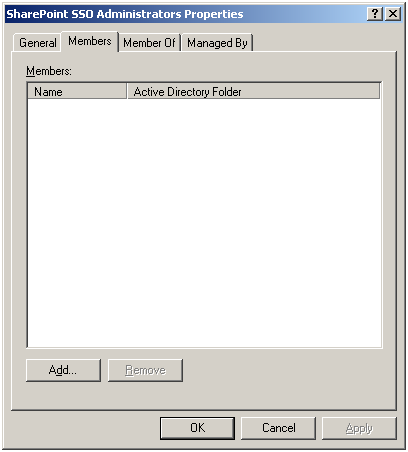
- Click the Add button.
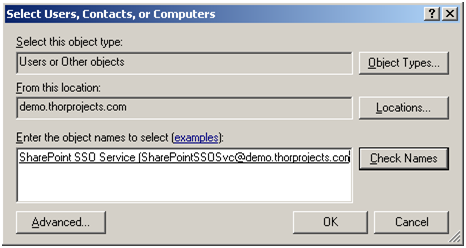
- Enter SharePointSSOSvc, click the Check Names button, and click the OK button.
- Click the OK button.
- In the left pane, right click Users and select New-Group. As before, if your organization requires a different location, use that location.
- Enter the Group Name (SharePoint SSO Managers) and click the OK button.
- Close Active Directory Users and Computers, we’re done with it.
With the groups created we’re ready to configure the service to automatically start.
Configure the SSO Service
By default the SSO service in SharePoint doesn’t start. In this activity we’re going to enable the SSO service. On each server in the farm and then once completed we’re going to change the account used for SSO in SharePoint Central Administration.
Let’s start by setting the service to start automatically and manually starting it.
- On the Start menu click Administrative Tools-Services
- In the Services application in the right hand pane scroll down to the Microsoft Single Sign-on Service, right click and click Properties.
- Change the Startup type from Manual to Automatic.
- Click the Start button.
- Click the OK button.
- Close the Services application. We’re done with it.
- Repeat steps 1-5 on each server in the SharePoint farm.
- On the Start menu click Administrative Tools-SharePoint 3.0 Central Administration
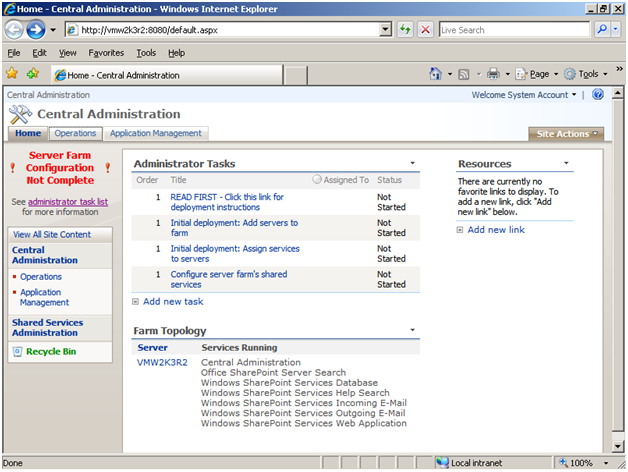
- Click the Operations tab.
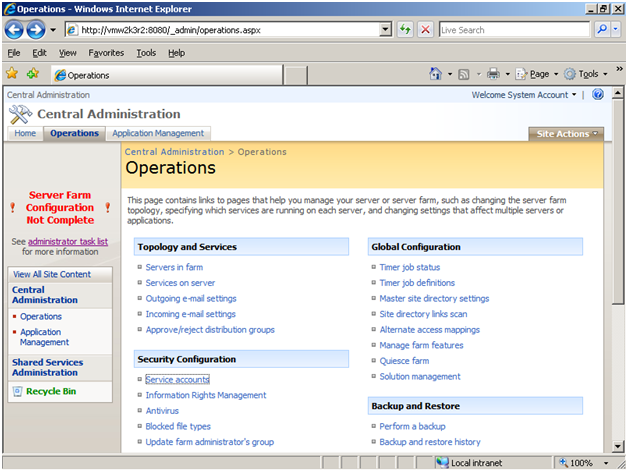
- In the Security Configuration section, click the Service Accounts link
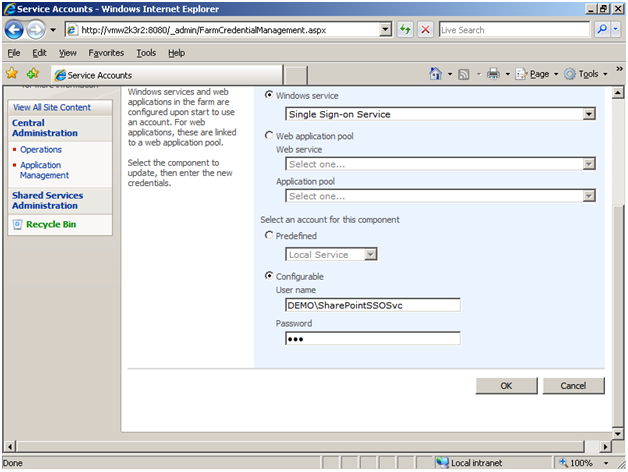
- In the Windows service drop down list select Single Sign-on Service.
- Enter the Username (DEMO\SharePointSSOSvc) and Password for the service account and click the OK button.
With that the SSO service is running, however, it doesn’t have access to SQL server so we need to fix that before managing the settings.
Configure SQL Server for the SSO Service Account
The SSO service account needs to create the SSO database and setup the correct permissions. In order to do that it needs the security administrator (securityadmin) and database creator (dbcreator) system roles. In the following steps we’ll get permissions setup for the service account.
- On the Start menu click All Programs -Microsoft SQL Server 2005 – SQL Server Management Studio.
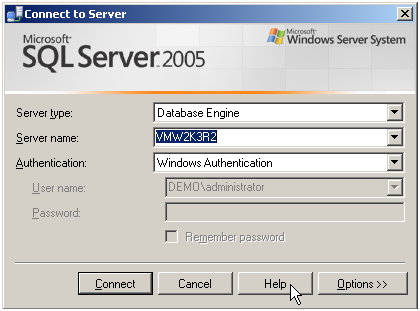
- If your server name isn’t correct in the dialog select the correct server. Then click the Connect button to connect to your SQL server.
- Click on the plus sign to the left of Security to expand it. Click on the plus sign to the left of Logins to expand it.
- Right click on the SharePoint SSO service account (DEMO\SharePointSSOSvc) and click properties.
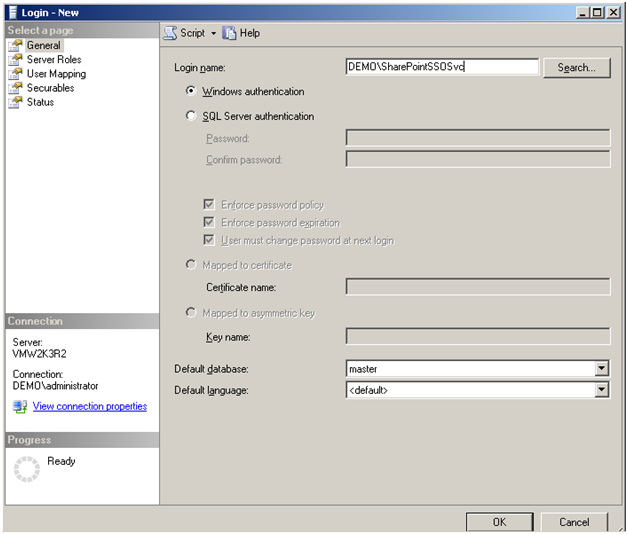
- In the Select a page (left) pane select Server Roles.
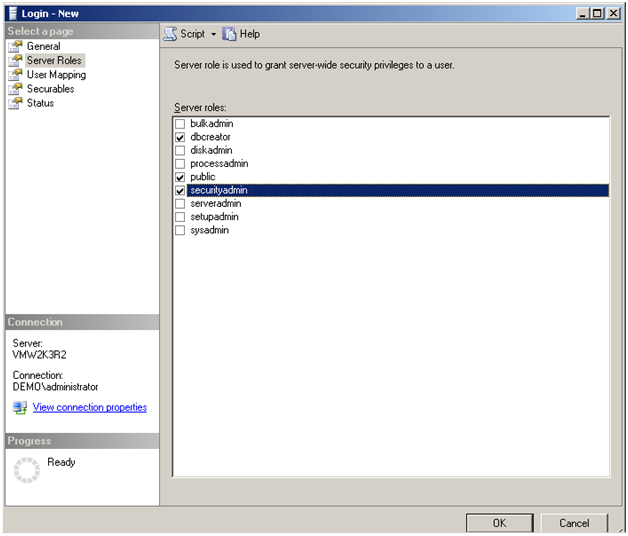
- Click the checkboxes to the left of dbcreator and securityadmin.
- Click the OK button.
- Close Microsoft SQL Server Management Studio, we’re done with it.
In these steps we corrected the permissions for the SSO service account so that it can work with SQL server. Next is to complete the activation in SharePoint by using the Manage settings for single sign-on link.
Manage Settings for Single Sign-on
In this step we’ll go through the process of creating the SSO database by using the Manage settings for single sign-on link on the central administration operations screen. The SharePoint central administration operations screen should be on your screen from the previous steps.
- On the SharePoint Central Administration Operations page in the Security Configuration heading select the Manage settings for single sign-on link.
- Click the Manage server settings link.
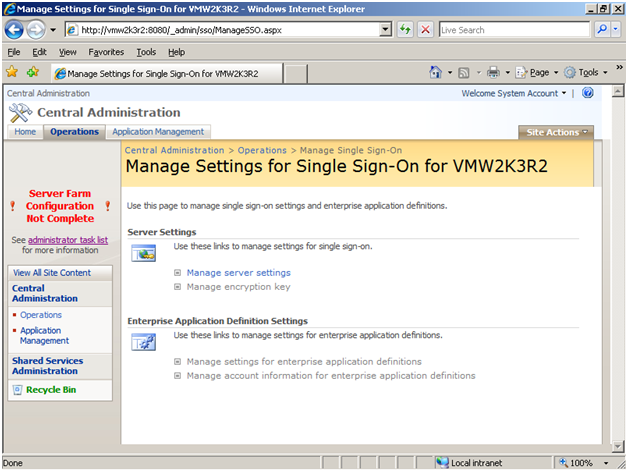
- In the far upper right corner, click the down arrow next to Welcome System Account (or whatever name is displayed.) From the menu that appears, select Sign in as a Different User.
- In the User name text box enter the SharePoint SSO Service Account (DEMO\SharePointSSOSvc) and in the Password text box enter the account’s password.
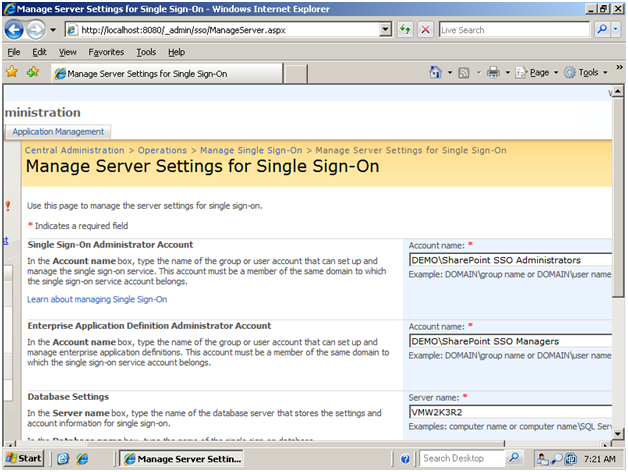
- Enter the administrators group name including the domain name (DEMO\SharePoint SSO Administrators)in the Single Sign-On Administrator Account section’s Account name textbox.
- Enter the managers group name including the domain name (DEMO\SharePoint SSO Managers) in the Enterprise Application Definition Administrator Account section’s Account name textbox.
- Click the OK button.
With that the SSO database will be created and we’re nearly done. We need only to get an encryption key created and to create an application definition.
Manage the Encryption Key
The next step is creating an encryption key for the credentials to be encrypted with. In order to do this, follow these steps:
- On the Manage Settings for Single Sign-on page click the Manage encryption key link
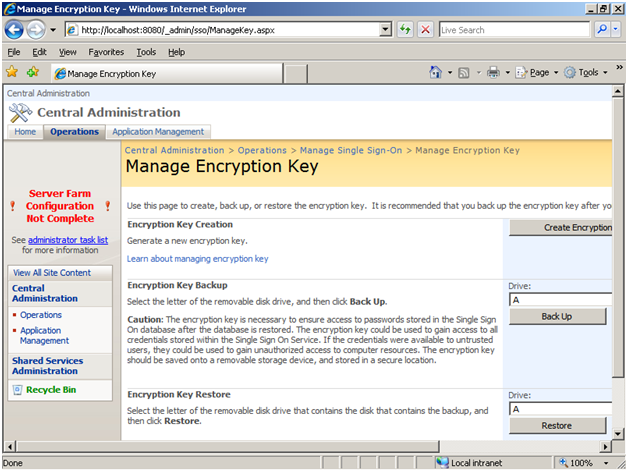
- Click the Create Encryption Key button.
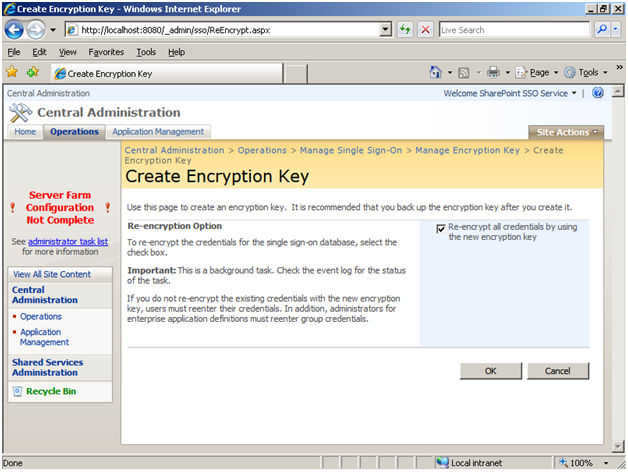
- Click the OK button.
- In the breadcrumbs, click the Manage Single Sign-On link.
With an encryption key set, you’re ready to create an application definition.
Manage Settings for Enterprise Application Definitions
The final step is to define an application definition for SSO. This can be done with the following steps.
- On the Manage Settings for Single Sign-On for… page in the Enterprise Application Definition Settings, click the Manage settings for enterprise application definitions link.
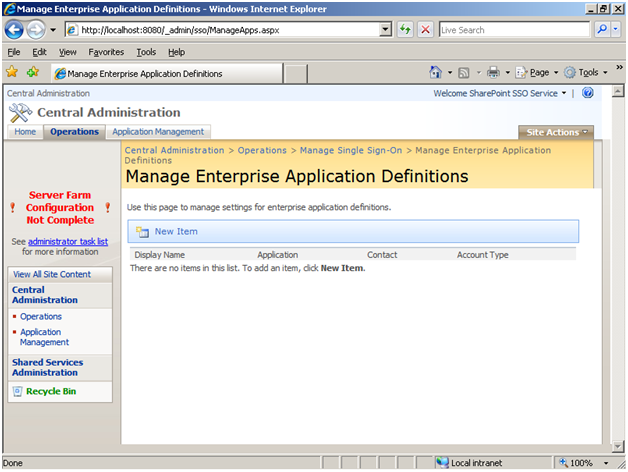
- Click the New Item button.
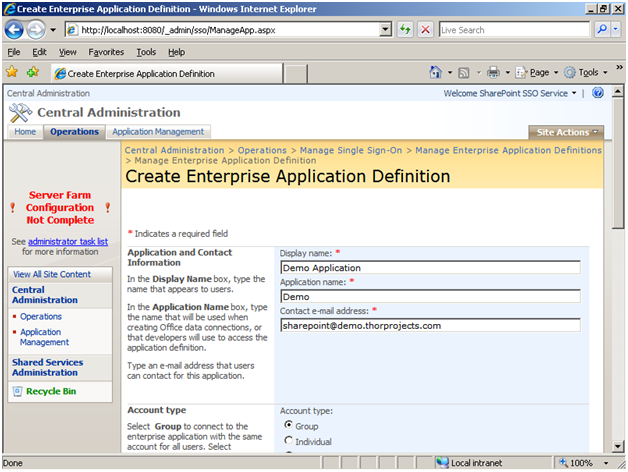
- Enter a Display name (Demo Application), a Application name (Demo), and Contact e-mail address ([email protected]).
- Select the Account type. Generally this will be Individual. Note that this cannot be changed once the application has been defined.
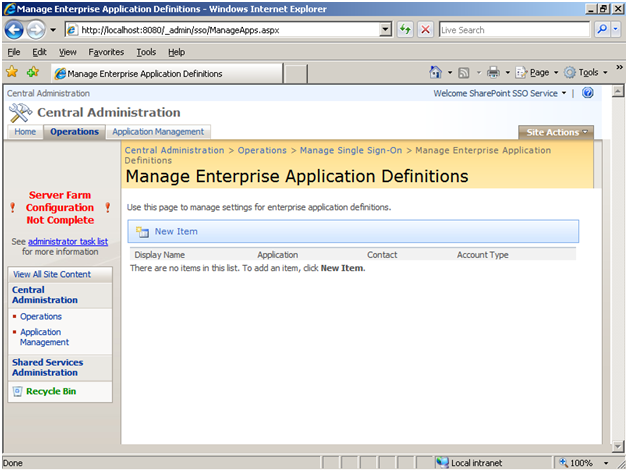
- Click the OK button.
- Close the web browser with central administration — we’re done.
Special Thanks to Hollins University. This is documentation that I did for them that they agreed I could share with everyone.


62 Comments
Rob,
This article is excellent! I’d been battling for around three weeks trying to get Oracle data into a SharePoint BDC List WebPart with no joy.
After following these steps, it works like a dream.
This article is a beacon of clarity in the fog that is the MSDN!
Great. Solved the problems that apear when the machine has been renamed before moss got installed.
Its a wonderful article, I have ever seen. Thanks to solve my problems
ONCE AGAIN Great Stuff….
Rob thanks a mil. It was a great article !
Thank you so much for posting this great article. I’ve been studying for my MOSS certification and this was an excellent guide in understanding the SSO process.
I could not proceed with the configuration after i got stucked at manage SSO settings. It gave me error “The Sql Server specified is either invalid or is an unsupported version.” My database is at different domain from my MOSS machine. Any idea?
Hi robert, great and usefull post!
While configuring sso i kept stumbling on the message “you don’t have permissions to perform this operation” when trying to configure the sso server settings
I solved this by logging out as administrator (in MOSS and windows) and logging in as the sso service accuount (in MOSS and windows)
Thank you, you saved a project deadline. Appreciate your generosity.
Whenevr I use SharePoint SSO ADmin in Step 4 on Manage Single Sign On .. I get you do not have right to perform this operation
Can’t believe how silly I am sometimes. The error “Single sign-on cannot be configured from this server. To configure single sign-on, go to the computer running the single sign-on service and specify these settings locally.” was giving me fits. Somehow I didnt realize it means exactly what it says, you cannot access central admin from any system BUT THE SERVER RUNNING IT! If you try to access the page on your personal workstation or any system that is not the central admin server, you will get the error. Just RDP or go directly to the central admin server and it should work.
Great!! Post . by using this article I have successfully configured the SSO .But Im unable to Test the Senarios. Can Any one help me in Testing of this SSO in Development environment.
well done, it would appear there are a lot of sites offering solutions, they are mostly incorrect, well done this is a clear configuration doc its a pity other sites do not offer any clarity without payment. even then they often give misleading information. keep up the good fight thankyou for solving my querie in the most simplistic easy to follow guide.
Awesome POST. This combined with the microsoft SSO step by step was a life saver!!! AWESOME!
thanks
Very well done article, however i get this message:
The Sql Server specified is either invalid or is an unsupported version.
SPECS: MOSS 2007
MSSQL 2005
Good post, admin.
Good site, admin.
Thanks. This was very straight forward.
Great article, helped me a lot, twice even!
Thanks. I was getting many errors. When I follow this article done the configuration correctly in one run. You have saved my time.
Your then man! Other folks will post some lazy instructions missing detail and small details mean alot with Technology!
Thanks for the post. Just one addition: backup the encryption key and keep it in a safe place :)
Thanks This is one of the best articles have followded
Great Post! Very helpful… Now What? How do I use the SSO with an extended Site? I sent the authentication to SSO in central Admin. How do I configure the Membership Provider in the web.config? Any help would be great Thanks!!
Ugh! The clarity of your post is great! Thanks for taking the time to write it right! Working with an issue with the encryption key though. All has gone well to this point but when I click “Create Encryption Key” nothing happens with the exception of Event ID: 6510 showing up in the event log. “The Microsoft Single Sign-on (SSOSrv) service encountered a failure while encrypting credentials.” I haven’t found any supporting documents on the Web. Any clues?
I have never seen this. My suspicion is that the core encryption DLLs for Windows are somehow corrupt — however, that’s just a guess. I’d suggest that you want to try to test it on a clean server and see if the problem is related to the server/farm configuration or is something in your environment. In either case, you’re into something new.
i configured up to sql server 2008 for sso service account.
while configureing Manage Settings for Single Sign-on i am getting error
You do not have the rights to perform this operation. please help me.
a million thanks and appreciation on your great post!! technet’s post is RUBBISH compared to yours!
Thanks a lot for this article/ HowTo. Also a great thank you to the guys of Hollins University who made it possible that you publish it here!!!
I understand everything except I need a little more explanation about what the Display Name and Application Name are. Am I just making those up? Where are they used/shown?
I new to this so a quick little blurb would be very helpful.
Thank you! Thank you!
Thanks for the great article. I was getting a permission error and thanks to you i solved it by adding my SSO admin account to Service Accounts in MOSS.
Thanks for this great summary. Is there a way to pre-polute or induvidually or batch-update credentials stored in SSO? It seems the the user is asked for credentials to the app the first time he/she uses, but not later; we would like to preload the credentials of our users. Also it seems that credentials may be invalidated if they change or expire in the external app; we wuold also like to have a scripted or command line method to automate updating those credentials to avoid users beign asked for them. but
When your advisors won’t respond to requests for meetings, it’s difficult to make progress. ,
Superb! Even a newbie like me without any SSO experience could configure SSO service with ease. Thanks!
Thanks, helped me. But you’ll have information on how to use SSO in a BDC
Hi,
The best practice is the user member to the DomainUsers(and LocalAdmin) or DomainAdmin.
this is best one to implement SSO.
hay this is really a nice article..good job and thanks for your great help !
It’s really an excellent and clarifying article!! Thank you for this great job!!!
thanks for nice post……now can i configure at my web site….please suggets
Excellent article… Thanks
Thanks , it is a great articlae . Every time I’m configuring SSO I have to follow it.
Thank you for having such a good article on SSO setup. I did not have a single problem following the instructions.
I am using this in my training to get the MOSS MCTS certification
What does when do when the binary for the SSO service is present, but it does NOT show up in services and the SP config wizard fails?
This is the best post I have seen on the web, very useful. However, I am still having an error when Manage Server Single Sign On. I dont have the SSO.mdf. Any Sugguestions on how to get this to work? b/c I am having backup errors from SSO.
Thanks
Thank you for your post.
I am getting the following error on Manage Server Setting for Single Sing-On.
Login failed for user ‘(null)’. Reason: Not associated with a trusted SQL Server connection.
I did exactly the similiar steps posted in this article.
Any help would be appreciated
What can be “Demo Application”?
Any web site with Windows authentication?
How Do I access the application? just put a link on my shaerpoint page? user Response.Redirect within some webpart?
Thanks
Thanks mate!!
For Structured and detailed configuariton of SSO.
Thanks a ton for the article. I am getting an error while clicking the manage this server link in the single sign-on settings group. The error is Page cannot be displayed. While digging into the details i saw an error in the log which states that CSSoResourcemanager cannot find connection string. Which means that the regirstry value for connection string is not written.
Help much appreciated. many thanks
I have web only SP users. I have NO domain users. Will this still work in this situation? Thanks for the great article!
thanks alot for this article, I’m following the study guide and it did not mention anything about SQL or using the SSO account to configure SSO! You’ve just saved me hours reviewing MSDN!
Awsome! Thank you very much.
thanks for shearing step by step.
Echo everything said above. Top article
Great Job! Thanks for this.
Hi
Thank you so much, it works now, although I did have problem when log in with other domain account then use your account SharePointSSOSvc to configure SSO service. Must login with SharePointSSOSvc account.
Current blog fresh infa, does the reading
Thanks!
it’s too useful to appricate
I have a question for you. Do you know how to remove SSO after it has been configured. We set it up for testing but no longer require it but I can not figure out how to remove it.
i have create sso.
but i want to know why use sso.
Thank For help
I am going to implement it for my sharepoint 2010 portal.lets see what happens.