Skip to content

SharePoint

Now Available: How Many Teams, Sites, Libraries, and Folders? White Paper

In my work with SharePoint and Office 365, I’m often asked how many teams, sites, libraries, or folders my clients should make. The answer is always hard, because there’s no one-size-fits-all approach. However, when we consider how our brains work and a few other factors, it becomes easier to understand how to build the hierarchy of containers.

It’s what inspired this white paper, “How Many Team, Sites, Libraries, and Folders?” In it, we discuss some of the psychology surrounding how we think about and organize our spaces, and we eventually offer some rough guidelines for you to consider within your environment.

To get this white paper, just click the link below.

Get the How Many Teams, Sites, Libraries, and Folders? White Paper

The SharePoint Shepherd’s Ultimate Guide Updates Available – Now With Modern Pages

We’re pleased to announce that we’ve released the newest build of The SharePoint Shepherd’s Guide for End Users: Ultimate Edition with the ability to deploy the guide as modern pages.

Over the years, we’ve strived to listen to what our clients have been saying. Once we started working on Office 365 materials, one of the concerns we received had to do with modern pages. Starting with the 2016 Guide, we switched to deploying with publishing pages, since they have better content control capabilities. However, as modern Team and Communication sites became more prevalent, we started hearing concerns about users almost exclusively working in those modern sites, and though the content covers modern pages, they were still being delivered as classic publishing pages.

Now, when you go to install the materials, you’ll have the option to choose whether to deploy to publishing pages, as before, or modern pages. (Depending on which versions the SharePoint you are deploying to supports.)

We’ve also updated nearly every single existing task to account for user interface changes, and added a few new tasks regarding navigating the SharePoint start page and working with sharing links.

You can get The SharePoint Shepherd’s Ultimate Guide for End Users right now by going to our website: www.SharePointShepherd.com/guide.

Data Driven Apps – Flattening the Object with PowerApps, Flow, and SharePoint

The scenario we started to explore in Data Driven Apps – Early and Late Binding with PowerApps, Flow, and SharePoint was one of a test engine: we had tests in which we didn’t want to have to code every question as its own form – or even two different tests with two different applications. We left the problem with a set of rows in the table that each represented a separate answer to a question.

The User Experience

The need for flattening these multiple rows into a single record is to make it easier for users to work with. It’s not easy in the user tools – like Excel – to collect a series of rows and to generate an aggregate score. It’s easier to score a single record that has columns for the individual questions and then score that one record.

That’s OK, but the question becomes how do we take something that’s in a series of rows and collapse it into a single record using PowerApps, Flow, and SharePoint? The answer turns out to be a bit of JSON and a SharePoint HTTP request.

JSON

JavaScript Object Notation (JSON) is a way of representing a complex object, much like we used to use XML to represent complex object graphs. Using JSON, we can get one large string that contains the information in multiple rows. From our PowerApp, we can emit one large and complex JSON that contains the information for the test taker and for all the questions they answered.

This creates one item – but it doesn’t make it any easier for the user to process the values. For that, we’ll need to use Flow to transform the data.

We can write this JSON into a staging area in SharePoint and attach a Flow to the list, so any time a row is changed, the Flow is triggered. The Flow can then process the item, create the properly formatted row, and delete the item that triggered the event.

The SharePoint HTTP Request

The power to do this transformation comes from the ability for Flow to call SharePoint’s HTTP endpoints to perform operations. While most of the time, Flows use the built-in actions, the “Send an HTTP request to SharePoint” can be used to send an arbitrary (therefore late-binding) request to SharePoint to take an action. In this case, we’ll use it to put an item into a list. This request looks something like this when completed:

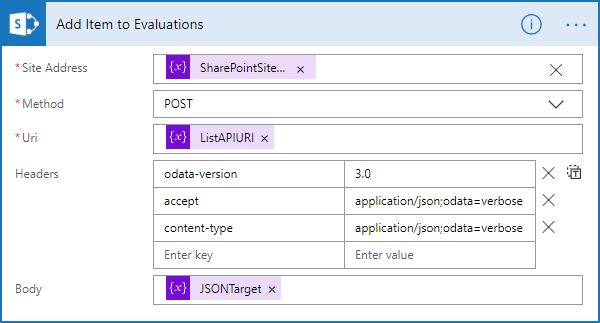
You’ll notice a few things here. First, it requires the SharePoint site URL. (Which you can get by following the instructions in this post.) In this example, the value comes from the SharePointSiteURL variable.

The next thing you’ll notice is that we’re using the HTTP method POST, because we’re adding a new item. URI (the endpoint we want to call) is coming from the variable ListAPIURI, which is being set to:

_api/web/lists/GetByTitle(‘Evaluations’)/items

The title of the list we want to put the item into is ‘Evaluations’, thus the URL. It’s possible to refer to the endpoint a few different ways, including by the list’s GUID, but most of the time accessing the list by title works well, because it’s readable.

The next configuration is to set the headers, which are essential to making this work. You can see that odata-version is set to 3.0, and both accept and content-type are set to application/json;odata=verbose.

Finally, we have the JSON, which represents the item. This is largely a collection of the internal field names from SharePoint – but it has one challenging, additional field that’s required.

__metadata

In addition to the internal fields you want to set values to, you must also set an item “__metadata” to the collection of { “type”: “SP.Data.ListItem” } – unless you’re using SharePoint content types. In that case, you’ll have to figure out what the API is referring to the content type as. We’ll cover that in the next post.

Internal Names of Fields

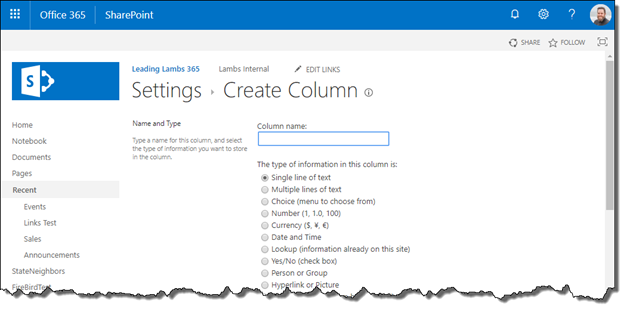
For the most part, we don’t pay much attention to the internal name of the field. It’s noise that SharePoint uses to handle its business. However, when you create a field, an internal name is created as the name of the field you provide with special characters encoded. Mostly people use spaces when they’re creating names, so “My Field” creates an internal name of My_x0020_Field. You can determine the field’s internal name by looking in the URL when you’re editing the field. The name parameter will be the field’s internal name. (With one exception: if you used a period in the name, it won’t show as encoded in the URL but will be encoded in the name as _x002e_)

Processing the Questions

To get the JSON to send to SharePoint, we need to have three segments that we assemble. There’s the initial or starting point with the __metadata value, there’s a middle with our questions, and there’s an ending, which closes the JSON.

To make the construction easy, we’ll use the Compose data operation action to create a string and put it in a variable. The initial segment we’ll set and then assign to the variable (Set Variable). For the other two segments, we’ll use the Append to string variable action. The result will be a variable with the entire JSON we need.

So, the start looks something like:

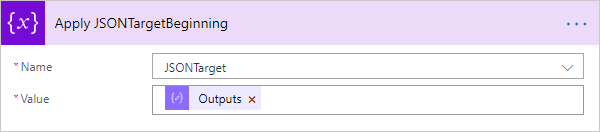
After this, we can set a specific field that we want to set. Once this action is done, we use its output to set to our end variable, like this:

Now we get to the heart of the matter with JSON Parsing that we’ll use to do the flattening.

JSON Parsing

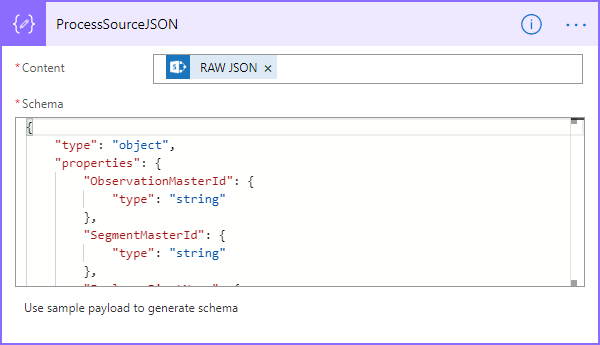
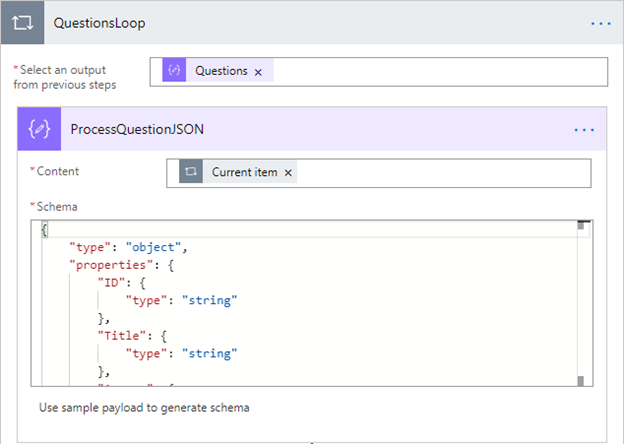
There’s a Data Operation called Parse JSON that allows us to parse JSON into records that we can process in a loop. We add this item, and then, generally, we click the ‘Use sample payload to generate schema’ to allow us to create a schema from the JSON. Flow uses this to parse the JSON into the values we can use. After pasting JSON in and allowing the action to create the schema, it should look something like:

Next, we can use a loop and use the questions variable from the parse operation as our looping variable and move directly into parsing the inner JSON for the question.

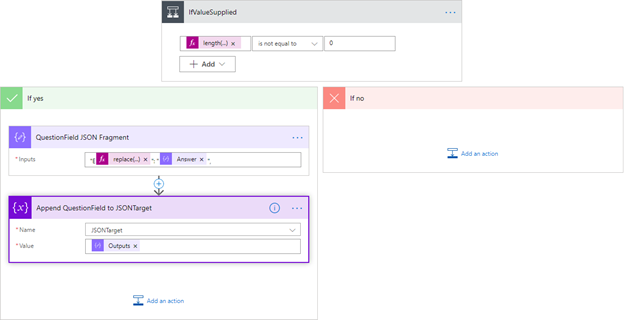
From here, we’ve got our answer, but it’s worth making one check. If, for some reason, they didn’t answer a question, we’ll create a problem, so we do a check with a condition:

length(body(‘ProcessQuestionJSON’)?[‘Answer’])

If this doesn’t make sense, you may want to check out my quick expression guide, but the short version is that it’s checking to make sure the answer has something in it.

If there is something in the answer, we create a fragment for the field with another compose. In our case, we prefixed numeric question numbers with an E. Because the questions also had periods in them, we had to replace the period with _x002e_. The fragment ends with a comma, getting us ready for the next item. The fragment is then appended to the JSON target.

The Closing

We’re almost done. We just need to add an end. Here, because we ended with a comma before, we need to just include at least one field and the closing for our JSON. In our case, we have an ObservationMasterID that we use – but it can literally be any field.

This just gets appended, and then we call our SharePoint HTTP that we started with, and we get an item in our list with all our questions flattened into the record.

Data-Driven Apps – Early and Late Binding with PowerApps, Flow and SharePoint

Most of the time, if I say, “early and late binding,” the response I get is “huh?” It doesn’t matter whether I’m talking to users, developers, or even architects. It has a design impact, but we usually don’t see that it’s happening any more than a fish knows it’s in water. In this post, I’m going to lay out what early and late binding is, and I’m going to explain a problem with designing data-driven apps with PowerApps, Flow, and SharePoint. In another post, I’ll lay out the solution.

The Data-Driven Application

Every organization has a set of forms that are largely the same. The actual questions are different, but the way the questions are responded to is the same. One way to think about it is to think of quizzes or tests. Most test questions fit the form of pick one of four answers. They are this way, because those are the easiest kind of questions to psychometrically validate. The content of the questions changes, but the format doesn’t.

Imagine for a moment you’ve got a test for chemistry and a test for physics. Would you want to create two different apps for them? Do you want to hardcode every screen? Or would it be better to have it be data-driven, with a table for questions and the tests they belong to, and then an application that reads this data and allows you to enter data for each of the questions based on the same template? Obviously, the latter is better, but it does create a data structure problem. Instead of having everything in one row, there will be numerous rows of data for the same quiz.

That makes it hard for you to score the quiz and record all the answers into one row for the student. In fact, because of early binding, you can’t directly create a PowerApp that will write to fields that are added after the PowerApp is published. That is, let’s say you have five questions with individual fields in a row for the answers. If you add a new, sixth question and column, you’ll have to go in and refresh your Data Connection in PowerApps and then write code to write the value out into that column. That’s okay if you don’t make many changes, but if the questions change frequently, this isn’t practical.

Early Binding

Languages like C# and Java are type-binding languages. The type of the variable is determined by the developer before the execution begins. Integers, Booleans, floats, and so forth are set out in the code, and the variables used make sure the data matches the type of the variable.

Though both languages now offer type-flexible variables that can accommodate many actual types, and both have always supported arbitrary name-value pairings, they demonstrate a bias towards knowing what you’re going to get and the compiler validating it.

In contrast, JavaScript is a type-less language. Everything is basically just an arbitrary collection of objects. The good news is that you can readily expand or extend JavaScript. The negative is that simple typos or capitalization errors can create problems that are very difficult to debug. The compiler won’t help you identify when one part of a program sends data that another part of the program doesn’t know how to deal with.

In short, type binding and early binding helps us ensure that our programs are more reliable and reduces our cost to develop – most of the time.

Late Binding in an Early Binding Environment

If you’ve done much development with C# or Java, you realize that, even though the language fundamentally wants to do early binding, you can structure your code in a way that’s data-driven. You can use type-less variables (declared with var) and then use them however you would like. The compiler tries to infer what is going on based on method signatures and warns you when what you’re doing won’t work out well.

This is really a compiler-friendly way of doing something we could always do. We could always define our variables as object – so making sure that we’re managing how we use the variable is on us. This works fine for all sorts of objects but represents a challenge with primitive data types, because, fundamentally, they’re not processed as pointers like every other kind of object is.

Pointers

In the land before time, when dinosaurs first roamed the earth, we worked with languages that weren’t as friendly as the managed languages we deal with today. We had to manually allocate blocks of memory for our object and then keep track of pointers to that information. These pointers were how we got to the objects we needed. This is abstracted for us in managed languages, so that we don’t have to think about it – because it was easy to get wrong.

The net, however, is that every object we work with is really a pointer. (Or, even more technically, a pointer to a pointer.) So, whether I’m working with a string or a date, I’m most of the time really working with a pointer that points to the value. That’s fundamentally different than the way we work with integers, floats (including doubles), and Booleans. These are native types, and mostly we use them directly. This makes them more efficient for loops and control structures.

It’s technically possible to refer to an integer or Boolean through a pointer. .NET will handle this for you, but it’s called boxing and unboxing, and, relatively speaking, it’s slow. So, the idea of using an object (or var) for a variable works well when we’re dealing with objects, but not so much when we’re dealing with primitive data types. (To make things more efficient but more complicated, with var, the compiler will sometimes optimize this to the real type for us, saving us the performance hit.)

Arrays, Lists, and Collections

Another way that you can do late binding in an early binding language is to use arbitrary arrays, lists, or collections. These collections of objects aren’t explicitly referenced and are instead referenced by location. More flexibility happens when we have name value pairs, called dictionaries, allow for name identified items. In this case, you can look up an item by its name and set or retrieve values.

JavaScript transparently converts a period (.) into a lookup into the dictionary, because JavaScript only has arrays and dictionaries. So, while C# and Java look in a specific place inside the object for a value when you use a dotted notation, JavaScript is really looking up that value in the collection.

What in JavaScript is written like object.valuea in C# is something like dictionary.getValue(“valuea”).

What This Means

In most cases, we don’t think about early or late binding, because it’s just a part of the environment. However, it becomes important in the scenarios like the above, where we want to create one test engine or one form engine that can be data-driven. We don’t know the names of the questions when we start. We only know the names after we’ve begun. It’s still not an issue if we can store the data in the database as a set of records for each question – but that isn’t the way that people want to see the data to do analysis. To do analysis, users want to see one record for the entire test. To do that, we need a way to convert late binding into early binding. In short, we need to flatten the abstract questions into a concrete test.

Mapping Classic to Modern Web Parts

One of the things we help people with is making the change from the way they used to do things to new ways of doing things. That’s why we created a mapping between classic web parts and modern web parts. The idea is that if you know how you used to do something, you’ll see how to do it today.

Community Support

In a few cases, there aren’t any out-of-the-box analogs to the classic web parts, but there are community contributions. We took the liberty of compiling them and making them available. If you’re looking for a script editor or a modern search web part, we’ve got them available for you. We ask that you complete a free transaction to get the web parts, so we can keep you updated whenever we update the compiled version on the site.

More to Come

As we get more modern web parts that are developed by the community – and new web parts out of the box in SharePoint – we’ll update the table, so you’ve got one place to go for a comprehensive reference for how to do in modern what you did in classic – and whether it’s available or not.

If you think we’re missing any, feel free to drop us a line.

Uploading Document Templates to Content Types on Office 365

We’ve had the ability to upload document templates to content types in SharePoint since SharePoint 2007. It’s been the way organizations that want to manage the forms used by employees would publish them. However, recent changes in Office 365 have broken this capability by default. There are a few workarounds to the problem – but none of them are particularly desirable.

Changes and Scripts

For some time, Office 365 has treated uploading a document template to a content type as “custom script.” In the tenant admin settings page, there’s a section for custom scripts:

We’ve had to tell customers to set this to “Allow” because of the impact it has on blocking document templates. However, a more recent change requires an action for every site collection that’s created.

There’s a new site collection level flag called DenyAddAndCustomizePages. When it’s set, you can’t upload custom documents to content types. If you’re still using the classic SharePoint administration, this flag isn’t set, and you’re fine. However, if you are using the new SharePoint administration, site collections you create get this flag set. To resolve it, you must connect to your tenant and then do a set-sposite <url> -DenyAddAndCustomizePages 0. This releases the flag and allows you to upload the document template. This works as long as you are a tenant administrator or you can get the administrator to run the command for you – but for many people, this will prevent them from being able to do the best practice for managing document templates.

Workarounds

In addition to manually resetting the flag to zero, there are two workarounds. First, use the Content Type Hub (/sites/contenttypehub), which is still created without this flag. This works if you have access to this site collection. You can create and then publish the content type, which will get it into every site. That’s fine if you want to publish a content type to every site – but that may not be ideal for everyone.

The second approach is to fall back to SharePoint classic administration, because it doesn’t set this flag.

Path forward

If you want Microsoft to fix this, can I suggest that you up vote the suggestion at https://office365.uservoice.com/forums/264636-general/suggestions/33296125-cannot-upload-content-template-with-scripting-disa.

Is This SharePoint Page Published?

I was listening to my friend Sue Hanley speak on a user adoption panel, and she mentioned a problem. Users can’t easily see whether a page is published or not because of the way that versions work in SharePoint, and I realized there was a simple answer. In the process, I slammed into a defect, and it’s one that hasn’t been resolved. However, if you’re interested in a one-time snapshot of what’s published you can still use this trick. Skip down to the Calculating Published header if you don’t want the backstory.

Major and Minor Versioning

We’ve had major and minor versions in SharePoint since the beginning. Most document libraries have simple, major versioning enabled, which uses integers to differentiate one version from the next. The latest version is the version with the highest number. If you want to know what the users see by default, it will always be the highest numbered version.

Major and minor versioning is enabled for pages libraries, and it uses a floating-point number to represent the version. Everything to the left of the decimal (whole numbers) is the major version and everything to the right are the minor versions. The challenge comes in that users who have read access don’t get the highest numbered version. They get the highest version with no decimals (i.e. the largest version that ends in .0). This causes confusion, because anyone with editor status will see the highest number – including minor versions. So, a user calls and says they can’t see something that the editor or creator can see.

When a content manager publishes a page, it’s converted from a minor version to a major version and they can see it. However, it’s not easy to see whether pages have been published or not. You can display the version, but you must remember that only major versions are seen by users. If only there were a column that let you know whether the page was published or not.

Calculating Published

SharePoint’s support for calculated columns allows us to do simple operations, and we can take advantage of some Boolean logic to create a column named “Is Published” that will tell us if the item is published. We do this with a simple formula:

(Version-Int(Version))=0.0

We’re subtracting the integer portion of the version number from the rest of it, leaving us with only the remainder. If that is equal to 0, then the version is a major version and thus the page is published.

Here are the steps to add the column to your Pages library – and the default view:

  1. Navigate to the Pages (or Site pages) library of your site.

Figure 1: The Site Pages Library

  1. In the upper right-hand corner of the page, click the gear icon to open the Settings pane.
  2. Click Library settings. The library’s Settings page will open.

Figure 2: The Site Pages Settings Page

  1. In the Columns section, click Create column. The Create Column page will open.

Figure 3: The Create Column Page

  1. In the Column name field, give a name to your column, such as Is Published.
  2. For the column type, select Calculated (calculation based on other columns). The page will refresh to show additional options in the Additional Column Settings section.
  3. In the Formula box, type (Version-Int(Version))=0.0.
  4. For the data type returned from the formula, select Yes/No.

Figure 4: The Configured Formula and Selected Data Type

  1. Make sure Add to default view is checked, then at the bottom of the page, click OK. The column will be created, and you’ll be returned to the library’s Settings page.
  2. To return to the library, at the top of the page in the breadcrumb bar, click the name of your pages library. You’ll be returned to the default view, where you will see the new calculated column. (We’ve also included a Version column to indicate that drafts are listed as No and published pages are listed as Yes.)

Figure 5: The New Calculated Column in the Site Pages Library

  1. First, we’ll edit a draft page, but we’ll save it as a draft instead of publishing it. Click the name of the page to open the page in a new tab. In the command bar, click Edit, then make any changes as needed. When you’re finished making changes, in the command bar, click Save as Draft. The page will be saved as a draft, but not published.

Figure 6: The Save As Draft Button

  1. Return to the pages library. The calculated column should read No, because it isn’t published – but it doesn’t. This is the defect. The calculated column isn’t getting updated when the version is changing.

Figure 7: The Calculated Column

Value Today

For now, you can create the field when you need a snapshot. Hopefully, Microsoft will fix the defect soon, and we’ll be able to have a simple column that shows whether a page is published or not. If you want to support Microsoft fixing the issue, upvote the User Voice suggestion at https://office365.uservoice.com/forums/264636-general/suggestions/38413258-calculated-columns.

Using InfoPath Today (Not Just Say “No”)

My friend Mark Rackley sent a note out a few weeks ago asking for a video saying “no” to InfoPath. I politely told him no – to the request. Not because I think InfoPath is an up and coming technology, but because I don’t like what I’ll call “grumpy old men” posts. (His post is Seriously, It’s Time, Just Say “No” to InfoPath.) My hope with this post is to find a more balanced view – and to work on a path forward rather than shaming you into believing that you’re somehow bad because you have InfoPath forms in your environment.

I’ve been trying to help people do the right things with SharePoint (and associated technologies) since 2008. That’s when we released the first SharePoint Shepherd’s Guide. I think that getting off InfoPath is the right path. At the same time, I want people to know the path forward. I want there to be a way to learn how to create forms in new technologies that do the same or similar things that InfoPath does.

Creating vs. Using

The first point of balance is the distinction between creating new forms and having users fill out old forms. These are two different things. Users filling out existing forms is just a matter of converting the form to a newer technology when it’s appropriate. The end of life for InfoPath is set. In 2026, support will end. That still seems like a long way off, and it is. That isn’t to say we shouldn’t start the process of migration from InfoPath, it’s saying that the sky isn’t falling.

Certainly, if you’re creating new forms in InfoPath, you’re creating technical debt. You’re creating more work you’ll need to do in the future. That’s why, if you’re trying to kick an InfoPath habit, the first place to start is with new forms. The second place to go is to update the forms to a new forms technology when you must revise them. I’ll come back to both of these scenarios in a moment, but for now, let’s address the cost of technical debt.

The Cost of Technical Debt

Mark quotes another good friend, Sue Hanley, as saying the cost of technical debt increases over time, so you should start to work on it immediately. As a software developer and in a software development world, this is true. However, the role of InfoPath isn’t exactly that. Certainly, if you continue creating forms, you’re creating greater technical debt. However, if you don’t create or revise existing forms, your technical debt is actually going down – but only slightly.

First, let’s do an analogy. Let’s say that you can borrow money at 4% interest (say on a house), and you can reasonably expect an 8% return on an investment (say in the stock market). In that case, you should really keep as large of a mortgage as possible and invest the money in the stock market. From a sheer numbers point of view, you’re money ahead. Of course, there’s risk and uncertainty, but over the long term, keeping a mortgage and money in the market at the same time is financially profitable – at least slightly. Few people recommend this kind of a strategy even though it’s financially a sound practice.

In the case of InfoPath, the longer you wait – up to a point – the greater number of features you used in InfoPath will be available in other ways, the better the usability of the new tools will become, and the better the education will become. The net effect of this is that your cost to convert – if you’re not adding to your existing forms – will be smaller. That being said, it may not be enough to justify the risk that you’ll run out of time if you wait too long.

There Isn’t a Migration Strategy

There’s not going to be a magic wizard that will convert all your forms into another Microsoft technology. PowerApps, the “heir” to the forms legacy, isn’t built the same way, so there’s no one-to-one mapping between what we did in InfoPath and how it’s done in PowerApps. If you’re planning on staying on Microsoft technology for forms, you’re going to have to do the heavy lifting of converting your forms by hand.

As Mark points out, there are a few third parties that have InfoPath converters already. It’s a big market, and there may be more forms vendors that want a piece of this market. In the worst-case scenario, you might be able to defer the cost of changing your forms until near the end of support, and then use the automated conversion to another technology. The risk here is that the converter technology won’t handle the tricks you used with your complex forms. It’s another possibility for deferring the investment – but it’s not one that I’d recommend unless you’re absolutely backed into a corner.

It’s a Modern World

SharePoint’s modern pages are beautiful and responsive in ways that the classic interface could never be. If you’re delivering your InfoPath forms via the browser and InfoPath Forms Services, you’ll never get the beautiful modern experience, because InfoPath Forms Services isn’t going to get an upgrade to modern. This can be an issue once you’ve made the change to all modern, but if you’re still working with an on-premises server, it’s likely that you’ve not yet made the switch.

The good news is that the forms will continue to work – they’ll just have a classic interface.

Creating New Forms

The real rub for the InfoPath end of life comes for those organizations that are still creating new InfoPath forms because they know how to do it – and they don’t know how to do the same things in PowerApps. In most cases, it’s time to bite the bullet and learn how to accomplish the same objective in PowerApps rather than creating more technical debt with an InfoPath form.

Even if you’re just modifying an InfoPath form, it’s time to consider your other options. It may be that the form is simple, and you can use a SharePoint list form to capture the data, or a very lightly modified PowerApps form attached to a list. If that’s the case, then make the change today. Where you’re going to have to touch the form, you might as well see if you can get it converted quickly.

The big problem comes in the form of situations where there’s no clear answer as to how to convert an InfoPath form to PowerApps, because there’s no published guidance on how to do what you used to do in InfoPath inside of PowerApps or some other forms tool.

InfoPath Feature to PowerApps Conversion

Here’s where I get to be a shepherd again. First, we’re building a list of things you used to do in InfoPath (features, techniques, approaches) and the way to do them in PowerApps. The InfoPath to PowerApps conversion list is on the SharePoint Shepherd site. Go there and see if the thing you want to do is already listed.

Second, if you don’t see what you need on the list, send us an email at [email protected], and we’ll see if we can understand what you’re doing in InfoPath and how it might be done in PowerApps. Please feel free to send us an example of what you’re doing (but please don’t send your actual forms).

Finally, Laura Rogers has excellent resources for PowerApps training. If you’re interested, she’s got a PowerApps Basics course, or you can click here to see all the courses she has to offer.

Now Available: SharePoint Site Collection Security Strategy White Paper

Some of you may be familiar with a reference sheet that we mention often: our SharePointSecurityMatrix. While we’ve used this in the past to show the various permissions and permission levels in SharePoint, we haven’t really discussed what to do with this knowledge.

We’ve assembled the “SharePoint Site Collection Security Strategy” white paper to give you some more context. In this white paper, we explain how right assessment happens in most computer systems and how to view these basic principles through the lens of SharePoint security. We then talk about some ways to make security simple. We’ve also included step-by-step instructions for implementing the suggestions we offer. All you have to do is click the link below.

Get the SharePoint Site Collection Security Strategy white paper

Living the Legacy: Legacy Auth in Office 365

Recently I discovered a problem with a client’s tenant. All the sudden, the authentication that I’ve used for a decade to get my command line utilities to authenticate to work wasn’t working. But it was just this tenant. No other clients had the problem, so it was a mystery as to why things were happening. Getting to the answer caused me to fire up some old neurons and get some clarity on the way things worked.

Joining the WS-Federation

Many moons ago, when claims-based authentication was still new in SharePoint, I was speaking about claims-based authentication and how it worked. I was the contract CTO for a startup who was trying to solve the authentication problem in K12. I was also helping write some of the guidance for authenticating in SharePoint with this new approach. See Remote Authentication in SharePoint Online Using Claims-Based Authentication. So, this isn’t something that’s new to me, but it is something I haven’t focused on for a while.

As I was warming up the old neurons, I began to remember that the way we bounce from location to location and server to server is a standard called WS-Federation. It’s a “passive” authentication flow where the browser bounces from place to place to authenticate a user. Ultimately, the browser gets the user to a site that authenticates them, and the site issues a ticket. This is passed back through a chain of sites until you get back to the site that originally requested authentication of the user, all the while reissuing tickets. The article above explains the process in substantially more detail.

Ultimately, it’s all about one site (the relying party) trusting another site (the issuing party) to authenticate the user That’s all fine, but what do you do when you want to authenticate in a program instead of a web browser? Well that requires WS-Trust.

A little bit of WS-Trust

A different approach, an “active” flow, is needed to take care of programs that want to authenticate on behalf of a user but can’t follow a series of redirects. Think about the program that’s calling an API: it expects the results, not a series of redirects, so WS-Federation won’t work. The good news is that WS-Trust performs the same function as WS-Federation except that the server for the API makes the request for authentication on behalf of the user. The bouncing around is handled as the servers negotiate between each other where to go and whether the authentication succeeds.

The WS-Trust standard accommodates the normal case of a username and password to authenticate a user – but it has some serious limitations in a world where we’re beginning to use multifactor authentication.

Modern Authentication

Modern authentication, according to Microsoft and others, doesn’t rely on usernames and passwords. The idea is that we’re moving to a more secure platform where users need to authenticate with something more than a username and password. This is fine, except what do you do about authenticating programs that need to take action on their own behalf or on behalf of the user? The answer is effectively a username and password.

Some will argue that the shared secrets we give to applications aren’t passwords – after all, they’re called shared secrets, or keys, or something else. However, they amount to a password, but a substantially longer password than any user could ever manage. We’ve addressed the security problem by making the password sufficiently long.

In any case, we’re moving towards greater security, which includes multifactor authentication – and that can’t be accomplished in a username/password combination way. The result is that we call the simple username/password situation “legacy.”

When Legacy isn’t Legacy

Microsoft introduced a switch that you can turn off to disable “legacy” authentication. It makes sense at some level. There’s a new modern authentication that we want people to use, and, until recently, you needed to actively enable modern authentication. So, what do you call the old approach? Well, you call it legacy.

The problem is that legacy conveys that it’s old and should be replaced or disabled. And that’s what this client did. However, most utilities that allow for a user identity associated with the results created by the tool. When they disabled legacy authentication, they broke an entire class of applications.

Modern Application Authentication

In defense, there are new ways to authenticate applications into Office 365. However, what the labeling doesn’t make clear is that those modern authentication approaches only work for a subset of the APIs. Thus, there are some places where you don’t have a choice but to use the “legacy” authentication approach.

Certainly, should we be moving to modern authentication for our applications? Yes. However, it needs to happen when the APIs we need to access work with the new authentication. In this case, the new APIs would work – if we recode the tool we are using.

So at least in this case, “legacy” may mean today –even if we’re new to the platform.

Recent Posts

Public Speaking