Skip to content

PowerApps

Data Driven Apps – Flattening the Object with PowerApps, Flow, and SharePoint

The scenario we started to explore in Data Driven Apps – Early and Late Binding with PowerApps, Flow, and SharePoint was one of a test engine: we had tests in which we didn’t want to have to code every question as its own form – or even two different tests with two different applications. We left the problem with a set of rows in the table that each represented a separate answer to a question.

The User Experience

The need for flattening these multiple rows into a single record is to make it easier for users to work with. It’s not easy in the user tools – like Excel – to collect a series of rows and to generate an aggregate score. It’s easier to score a single record that has columns for the individual questions and then score that one record.

That’s OK, but the question becomes how do we take something that’s in a series of rows and collapse it into a single record using PowerApps, Flow, and SharePoint? The answer turns out to be a bit of JSON and a SharePoint HTTP request.

JSON

JavaScript Object Notation (JSON) is a way of representing a complex object, much like we used to use XML to represent complex object graphs. Using JSON, we can get one large string that contains the information in multiple rows. From our PowerApp, we can emit one large and complex JSON that contains the information for the test taker and for all the questions they answered.

This creates one item – but it doesn’t make it any easier for the user to process the values. For that, we’ll need to use Flow to transform the data.

We can write this JSON into a staging area in SharePoint and attach a Flow to the list, so any time a row is changed, the Flow is triggered. The Flow can then process the item, create the properly formatted row, and delete the item that triggered the event.

The SharePoint HTTP Request

The power to do this transformation comes from the ability for Flow to call SharePoint’s HTTP endpoints to perform operations. While most of the time, Flows use the built-in actions, the “Send an HTTP request to SharePoint” can be used to send an arbitrary (therefore late-binding) request to SharePoint to take an action. In this case, we’ll use it to put an item into a list. This request looks something like this when completed:
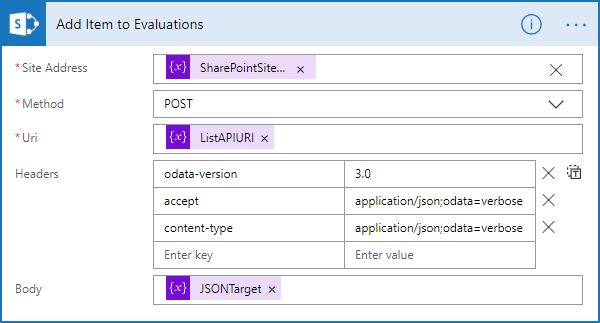
You’ll notice a few things here. First, it requires the SharePoint site URL. (Which you can get by following the instructions in this post.) In this example, the value comes from the SharePointSiteURL variable.

The next thing you’ll notice is that we’re using the HTTP method POST, because we’re adding a new item. URI (the endpoint we want to call) is coming from the variable ListAPIURI, which is being set to:

_api/web/lists/GetByTitle(‘Evaluations’)/items

The title of the list we want to put the item into is ‘Evaluations’, thus the URL. It’s possible to refer to the endpoint a few different ways, including by the list’s GUID, but most of the time accessing the list by title works well, because it’s readable.

The next configuration is to set the headers, which are essential to making this work. You can see that odata-version is set to 3.0, and both accept and content-type are set to application/json;odata=verbose.

Finally, we have the JSON, which represents the item. This is largely a collection of the internal field names from SharePoint – but it has one challenging, additional field that’s required.

__metadata

In addition to the internal fields you want to set values to, you must also set an item “__metadata” to the collection of { “type”: “SP.Data.ListItem” } – unless you’re using SharePoint content types. In that case, you’ll have to figure out what the API is referring to the content type as. We’ll cover that in the next post.

Internal Names of Fields

For the most part, we don’t pay much attention to the internal name of the field. It’s noise that SharePoint uses to handle its business. However, when you create a field, an internal name is created as the name of the field you provide with special characters encoded. Mostly people use spaces when they’re creating names, so “My Field” creates an internal name of My_x0020_Field. You can determine the field’s internal name by looking in the URL when you’re editing the field. The name parameter will be the field’s internal name. (With one exception: if you used a period in the name, it won’t show as encoded in the URL but will be encoded in the name as _x002e_)

Processing the Questions

To get the JSON to send to SharePoint, we need to have three segments that we assemble. There’s the initial or starting point with the __metadata value, there’s a middle with our questions, and there’s an ending, which closes the JSON.

To make the construction easy, we’ll use the Compose data operation action to create a string and put it in a variable. The initial segment we’ll set and then assign to the variable (Set Variable). For the other two segments, we’ll use the Append to string variable action. The result will be a variable with the entire JSON we need.

So, the start looks something like:

After this, we can set a specific field that we want to set. Once this action is done, we use its output to set to our end variable, like this:

Now we get to the heart of the matter with JSON Parsing that we’ll use to do the flattening.

JSON Parsing

There’s a Data Operation called Parse JSON that allows us to parse JSON into records that we can process in a loop. We add this item, and then, generally, we click the ‘Use sample payload to generate schema’ to allow us to create a schema from the JSON. Flow uses this to parse the JSON into the values we can use. After pasting JSON in and allowing the action to create the schema, it should look something like:
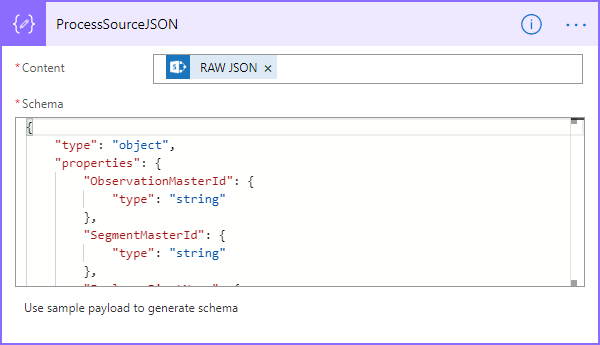
Next, we can use a loop and use the questions variable from the parse operation as our looping variable and move directly into parsing the inner JSON for the question.
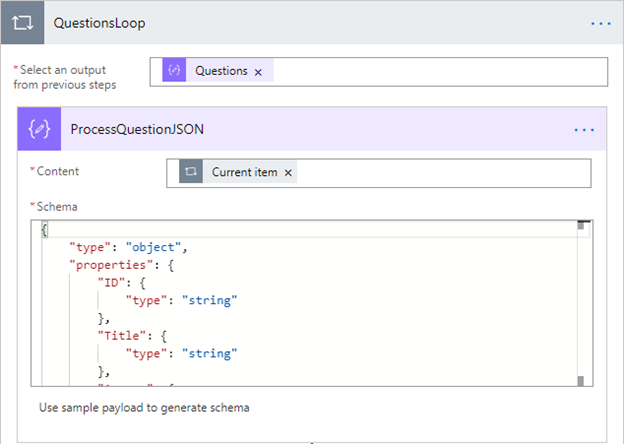
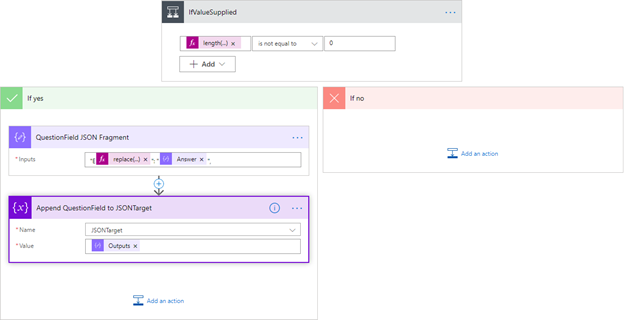
From here, we’ve got our answer, but it’s worth making one check. If, for some reason, they didn’t answer a question, we’ll create a problem, so we do a check with a condition:

length(body(‘ProcessQuestionJSON’)?[‘Answer’])

If this doesn’t make sense, you may want to check out my quick expression guide, but the short version is that it’s checking to make sure the answer has something in it.

If there is something in the answer, we create a fragment for the field with another compose. In our case, we prefixed numeric question numbers with an E. Because the questions also had periods in them, we had to replace the period with _x002e_. The fragment ends with a comma, getting us ready for the next item. The fragment is then appended to the JSON target.
The Closing

We’re almost done. We just need to add an end. Here, because we ended with a comma before, we need to just include at least one field and the closing for our JSON. In our case, we have an ObservationMasterID that we use – but it can literally be any field.

This just gets appended, and then we call our SharePoint HTTP that we started with, and we get an item in our list with all our questions flattened into the record.

Data-Driven Apps – Early and Late Binding with PowerApps, Flow and SharePoint

Most of the time, if I say, “early and late binding,” the response I get is “huh?” It doesn’t matter whether I’m talking to users, developers, or even architects. It has a design impact, but we usually don’t see that it’s happening any more than a fish knows it’s in water. In this post, I’m going to lay out what early and late binding is, and I’m going to explain a problem with designing data-driven apps with PowerApps, Flow, and SharePoint. In another post, I’ll lay out the solution.

The Data-Driven Application

Every organization has a set of forms that are largely the same. The actual questions are different, but the way the questions are responded to is the same. One way to think about it is to think of quizzes or tests. Most test questions fit the form of pick one of four answers. They are this way, because those are the easiest kind of questions to psychometrically validate. The content of the questions changes, but the format doesn’t.

Imagine for a moment you’ve got a test for chemistry and a test for physics. Would you want to create two different apps for them? Do you want to hardcode every screen? Or would it be better to have it be data-driven, with a table for questions and the tests they belong to, and then an application that reads this data and allows you to enter data for each of the questions based on the same template? Obviously, the latter is better, but it does create a data structure problem. Instead of having everything in one row, there will be numerous rows of data for the same quiz.

That makes it hard for you to score the quiz and record all the answers into one row for the student. In fact, because of early binding, you can’t directly create a PowerApp that will write to fields that are added after the PowerApp is published. That is, let’s say you have five questions with individual fields in a row for the answers. If you add a new, sixth question and column, you’ll have to go in and refresh your Data Connection in PowerApps and then write code to write the value out into that column. That’s okay if you don’t make many changes, but if the questions change frequently, this isn’t practical.

Early Binding

Languages like C# and Java are type-binding languages. The type of the variable is determined by the developer before the execution begins. Integers, Booleans, floats, and so forth are set out in the code, and the variables used make sure the data matches the type of the variable.

Though both languages now offer type-flexible variables that can accommodate many actual types, and both have always supported arbitrary name-value pairings, they demonstrate a bias towards knowing what you’re going to get and the compiler validating it.

In contrast, JavaScript is a type-less language. Everything is basically just an arbitrary collection of objects. The good news is that you can readily expand or extend JavaScript. The negative is that simple typos or capitalization errors can create problems that are very difficult to debug. The compiler won’t help you identify when one part of a program sends data that another part of the program doesn’t know how to deal with.

In short, type binding and early binding helps us ensure that our programs are more reliable and reduces our cost to develop – most of the time.

Late Binding in an Early Binding Environment

If you’ve done much development with C# or Java, you realize that, even though the language fundamentally wants to do early binding, you can structure your code in a way that’s data-driven. You can use type-less variables (declared with var) and then use them however you would like. The compiler tries to infer what is going on based on method signatures and warns you when what you’re doing won’t work out well.

This is really a compiler-friendly way of doing something we could always do. We could always define our variables as object – so making sure that we’re managing how we use the variable is on us. This works fine for all sorts of objects but represents a challenge with primitive data types, because, fundamentally, they’re not processed as pointers like every other kind of object is.

Pointers

In the land before time, when dinosaurs first roamed the earth, we worked with languages that weren’t as friendly as the managed languages we deal with today. We had to manually allocate blocks of memory for our object and then keep track of pointers to that information. These pointers were how we got to the objects we needed. This is abstracted for us in managed languages, so that we don’t have to think about it – because it was easy to get wrong.

The net, however, is that every object we work with is really a pointer. (Or, even more technically, a pointer to a pointer.) So, whether I’m working with a string or a date, I’m most of the time really working with a pointer that points to the value. That’s fundamentally different than the way we work with integers, floats (including doubles), and Booleans. These are native types, and mostly we use them directly. This makes them more efficient for loops and control structures.

It’s technically possible to refer to an integer or Boolean through a pointer. .NET will handle this for you, but it’s called boxing and unboxing, and, relatively speaking, it’s slow. So, the idea of using an object (or var) for a variable works well when we’re dealing with objects, but not so much when we’re dealing with primitive data types. (To make things more efficient but more complicated, with var, the compiler will sometimes optimize this to the real type for us, saving us the performance hit.)

Arrays, Lists, and Collections

Another way that you can do late binding in an early binding language is to use arbitrary arrays, lists, or collections. These collections of objects aren’t explicitly referenced and are instead referenced by location. More flexibility happens when we have name value pairs, called dictionaries, allow for name identified items. In this case, you can look up an item by its name and set or retrieve values.

JavaScript transparently converts a period (.) into a lookup into the dictionary, because JavaScript only has arrays and dictionaries. So, while C# and Java look in a specific place inside the object for a value when you use a dotted notation, JavaScript is really looking up that value in the collection.

What in JavaScript is written like object.valuea in C# is something like dictionary.getValue(“valuea”).

What This Means

In most cases, we don’t think about early or late binding, because it’s just a part of the environment. However, it becomes important in the scenarios like the above, where we want to create one test engine or one form engine that can be data-driven. We don’t know the names of the questions when we start. We only know the names after we’ve begun. It’s still not an issue if we can store the data in the database as a set of records for each question – but that isn’t the way that people want to see the data to do analysis. To do analysis, users want to see one record for the entire test. To do that, we need a way to convert late binding into early binding. In short, we need to flatten the abstract questions into a concrete test.

Using InfoPath Today (Not Just Say “No”)

My friend Mark Rackley sent a note out a few weeks ago asking for a video saying “no” to InfoPath. I politely told him no – to the request. Not because I think InfoPath is an up and coming technology, but because I don’t like what I’ll call “grumpy old men” posts. (His post is Seriously, It’s Time, Just Say “No” to InfoPath.) My hope with this post is to find a more balanced view – and to work on a path forward rather than shaming you into believing that you’re somehow bad because you have InfoPath forms in your environment.

I’ve been trying to help people do the right things with SharePoint (and associated technologies) since 2008. That’s when we released the first SharePoint Shepherd’s Guide. I think that getting off InfoPath is the right path. At the same time, I want people to know the path forward. I want there to be a way to learn how to create forms in new technologies that do the same or similar things that InfoPath does.

Creating vs. Using

The first point of balance is the distinction between creating new forms and having users fill out old forms. These are two different things. Users filling out existing forms is just a matter of converting the form to a newer technology when it’s appropriate. The end of life for InfoPath is set. In 2026, support will end. That still seems like a long way off, and it is. That isn’t to say we shouldn’t start the process of migration from InfoPath, it’s saying that the sky isn’t falling.

Certainly, if you’re creating new forms in InfoPath, you’re creating technical debt. You’re creating more work you’ll need to do in the future. That’s why, if you’re trying to kick an InfoPath habit, the first place to start is with new forms. The second place to go is to update the forms to a new forms technology when you must revise them. I’ll come back to both of these scenarios in a moment, but for now, let’s address the cost of technical debt.

The Cost of Technical Debt

Mark quotes another good friend, Sue Hanley, as saying the cost of technical debt increases over time, so you should start to work on it immediately. As a software developer and in a software development world, this is true. However, the role of InfoPath isn’t exactly that. Certainly, if you continue creating forms, you’re creating greater technical debt. However, if you don’t create or revise existing forms, your technical debt is actually going down – but only slightly.

First, let’s do an analogy. Let’s say that you can borrow money at 4% interest (say on a house), and you can reasonably expect an 8% return on an investment (say in the stock market). In that case, you should really keep as large of a mortgage as possible and invest the money in the stock market. From a sheer numbers point of view, you’re money ahead. Of course, there’s risk and uncertainty, but over the long term, keeping a mortgage and money in the market at the same time is financially profitable – at least slightly. Few people recommend this kind of a strategy even though it’s financially a sound practice.

In the case of InfoPath, the longer you wait – up to a point – the greater number of features you used in InfoPath will be available in other ways, the better the usability of the new tools will become, and the better the education will become. The net effect of this is that your cost to convert – if you’re not adding to your existing forms – will be smaller. That being said, it may not be enough to justify the risk that you’ll run out of time if you wait too long.

There Isn’t a Migration Strategy

There’s not going to be a magic wizard that will convert all your forms into another Microsoft technology. PowerApps, the “heir” to the forms legacy, isn’t built the same way, so there’s no one-to-one mapping between what we did in InfoPath and how it’s done in PowerApps. If you’re planning on staying on Microsoft technology for forms, you’re going to have to do the heavy lifting of converting your forms by hand.

As Mark points out, there are a few third parties that have InfoPath converters already. It’s a big market, and there may be more forms vendors that want a piece of this market. In the worst-case scenario, you might be able to defer the cost of changing your forms until near the end of support, and then use the automated conversion to another technology. The risk here is that the converter technology won’t handle the tricks you used with your complex forms. It’s another possibility for deferring the investment – but it’s not one that I’d recommend unless you’re absolutely backed into a corner.

It’s a Modern World

SharePoint’s modern pages are beautiful and responsive in ways that the classic interface could never be. If you’re delivering your InfoPath forms via the browser and InfoPath Forms Services, you’ll never get the beautiful modern experience, because InfoPath Forms Services isn’t going to get an upgrade to modern. This can be an issue once you’ve made the change to all modern, but if you’re still working with an on-premises server, it’s likely that you’ve not yet made the switch.

The good news is that the forms will continue to work – they’ll just have a classic interface.

Creating New Forms

The real rub for the InfoPath end of life comes for those organizations that are still creating new InfoPath forms because they know how to do it – and they don’t know how to do the same things in PowerApps. In most cases, it’s time to bite the bullet and learn how to accomplish the same objective in PowerApps rather than creating more technical debt with an InfoPath form.

Even if you’re just modifying an InfoPath form, it’s time to consider your other options. It may be that the form is simple, and you can use a SharePoint list form to capture the data, or a very lightly modified PowerApps form attached to a list. If that’s the case, then make the change today. Where you’re going to have to touch the form, you might as well see if you can get it converted quickly.

The big problem comes in the form of situations where there’s no clear answer as to how to convert an InfoPath form to PowerApps, because there’s no published guidance on how to do what you used to do in InfoPath inside of PowerApps or some other forms tool.

InfoPath Feature to PowerApps Conversion

Here’s where I get to be a shepherd again. First, we’re building a list of things you used to do in InfoPath (features, techniques, approaches) and the way to do them in PowerApps. The InfoPath to PowerApps conversion list is on the SharePoint Shepherd site. Go there and see if the thing you want to do is already listed.

Second, if you don’t see what you need on the list, send us an email at [email protected], and we’ll see if we can understand what you’re doing in InfoPath and how it might be done in PowerApps. Please feel free to send us an example of what you’re doing (but please don’t send your actual forms).

Finally, Laura Rogers has excellent resources for PowerApps training. If you’re interested, she’s got a PowerApps Basics course, or you can click here to see all the courses she has to offer.

Toggling Checks in a PowerApps List

Sometimes you want to allow users to take actions on multiple items at the same time. One way to do this in an application is to include checkmarks next to the items in a list; however, doing this in PowerApps isn’t straightforward – and there’s a quirk around selecting checkboxes that you must work around. In this post, we’ll show you how to create a list where the checkmarks toggle on and off.

Collection of Items

To make this work, we’re going to need a collection of items. To make it simple, I’ve added the following to the OnStart of the first screen in the app:

ClearCollect(MyListOfItems,

{Key:“SSheep”, Description: “Sam Sheep”, Update: true},

{Key:“LLamb”, Description: “Lola Lamb”, Update: false},

{Key:“EEwe”, Description: “Ellen Ewe”, Update: false})

This gives us a simple collection to work with. There are two keys to this collection. First, there is a key field that we can use to look up an item. Second, there’s a Boolean flag that we can use to control visibility of the check.

One important thing: in the designer, OnStart won’t rerun after you’ve initialized the designer. Close out your form and reopen it in designer so that you get your collection.

Gallery

The next step is to create the Gallery. You can do this by selecting Insert and Blank Vertical Gallery. When the Data pane appears, select your collection of items – in my case, MyListOfItems – and go ahead and select a Layout of Title. This will give you a basic structure to work with.

Next, drag the label for title and make some space to the left of it for a checkmark. With the field still selected, from the Insert menu, select Icons and Check. This will put a check icon in the item template for the gallery.

Move to the property selector and select Visible. Then set the Visible property equal to ThisItem.Update

Now the checkmark will show for Sam – because update is true – but not for Lola or Ellen. To allow the Update property to be toggled, we’ll need to change the OnSelect event for the Gallery. Select the Gallery and then the OnSelect property from the selector. Note that we do this at the Gallery, because all the controls in the Gallery pass their selection up by setting their OnSelect to Select(parent).

Update Two-Step

Updating should be as easy as setting the property in the row – but it’s not. We need to signal to PowerApps that the data has changed. To do that, we’ll use Patch() – but of course, it needs a row in the item, which we don’t have, so we’ll look it up. Getting an item is as simple as

Lookup(MyListOfItems, Key =
Gallery1.Selected.Key)

The other consideration is toggling the update. That’s easy. Just use the Not() function around the existing value.

Putting the Patch() command together, we get:

Patch(MyListOfItems, Lookup(MyListOfItems, Key =
Gallery1.Selected.Key), { Update: Not(Gallery1.Selected.Update)})

Press run, and you’ve got a Gallery that supports toggling a checkbox.

ForAll

The last little bit is doing something with the data. For that, we use the ForAll() method. The first parameter is the collection to process. The next parameter is the code to run for each row in the data. Here we can evaluate the current row and decide what to do. For our sample, we’ll add a button that clears all the checkmarks.

Unfortunately, you can’t make changes to the data source or collection that ForAll() is operating on from inside of it – so we have to play a bit of a shell game. First, we’ll define a collection for our keys and then clear it out with:

ClearCollect(CheckClear, { Key:“Value”});

Clear(CheckClear);

Next, we’ll put the keys in the collection that we need to clear with:

ForAll(MyListOfItems,

If (MyListOfItems[@Update],

Collect(CheckClear, {Key: MyListOfItems[@Key]})));

Notice that we access a field in the collection with brackets and an at (@) sign. For each record where Update is set, we add an item in to our CheckClear collection. Next, we just have to process that collection to clear the items:

ForAll(CheckClear,

Patch(MyListOfItems, Lookup(MyListOfItems, Key = CheckClear[@Key]), { Update: false }))

There you have it. A list you can toggle and some help with what to do with the data when you get it.

Conflicts exist with changes on the server, please reload. Server Response: ETAG mismatch

The PowerApp was working just fine… until it wasn’t. Customers were reporting that they were getting errors in the form of a red bar at the top of the screen. The problem appears to be trying to do two updates to a record too quickly.

The Scenario

The scenario we were hitting was one where we had a form that included a set of fields from a record – but not all of them. In this case, I needed to update some flags based on values and what had changed. I didn’t want these controls on the form, because the user didn’t need to see them and certainly shouldn’t change them.

Think about it this way: I needed to set a “dirty bit” on the record to indicate that something important had changed, so another process could pick up the item and take some actions. You don’t want a user seeing that the record is “dirty.” While it’s standard IT parlance, it doesn’t give customer a warm and fuzzy feeling.

In this scenario, I had a form bound to a context variable called Order, which came from the Orders collection/data set. So, when I went to update the form and the dirty bit, I had code that was effectively:

Patch(Orders, Order, {IsDirty : true});

SubmitForm(frmOrder);

The problem is that, when I did this, the SubmitForm() would fail with the ETAG mismatch. Swapping the order of the operations didn’t help; in that case, the patch would fail.

The Solution

The solution turned out to be something I already had written for transitions between screens. I looked up the order and reloaded it in the context variable:

UpdateContext({Order: LookUp(Orders, OrderNumber = Order[@OrderNumber])})

This forced the reload of the context variable. Obviously, in this case, the primary key of the dataset is the OrderNumber field, so I can use that to force a reload of the item. One last swap was to move the patch after the SubmitForm(), so I didn’t clear the form when I reloaded the context variable. I ended up with:

SubmitForm(frmOrder);

UpdateContext({Order: LookUp(Orders, OrderNumber = Order[@OrderNumber])})

Patch(Orders, Order, {IsDirty : true});

That sequence works, because I effectively force the context variable to be reloaded right before I make the patch.

bad apple

PowerApps Forms: Bad and Too Many Updates

One of the current defects with PowerApps is that it sometimes thinks there are changes when there aren’t changes. This problem manifests itself when users accidentally save changes from one record on to another record – and it can be problematic when you’re trying to determine if a user has made changes.

The Problem: Phantom Updates

At the core the problem we’re fighting is that PowerApps thinks something has been updated when, in fact, it has not been updated. This shows up both in the Form.Unsaved property – which indicates that the form has changes – and in the Form.Updates property collection, which contains the unsaved changes to the item the form is attached to.

Form.Updates is supposed to only contain values where there is an update to make to the item; however, for some forms and some sources, this set of properties has values it shouldn’t have.

Unintended Corruption

The first way the problem surfaces is where values from a prior record are visible in a new record. When the user subsequently saves the form, those changes from the previous record are written into the data source.

The good news is that this is relatively easy to fix. First, the Form.Item property should be bound to a variable – rather than directly getting the item. Second, after the item variable is set, simply call ResetForm() with the name of the form. Technically the problem happens, but then it immediately is resolved by ResetForm().

There are two ways that this can be handled. If you’re navigating to a new screen, you can use OnVisible on the screen to reset the form. So if you’re selecting an order from a gallery of orders, you might set the OnSelect to:

Navigate(scnOrder, ScreenTransition.UnCover, { Customer: Customer, Order: glyOrders.Selected})

On the OnVisible on the scnOrder screen, you would do:

ResetForm(frmOrder)

When the form is on the same page as the data you’re selecting, you can simply do the update then the reset. For instance, if you have a variable called OrderLine, you can UpdateContext to the selected line, then do your ResetForm() immediately afterwards.

UpdateContext({OrderLine: glyOrderLines.Selected}); ResetForm(frmOrderLine)

Double Checking Flags

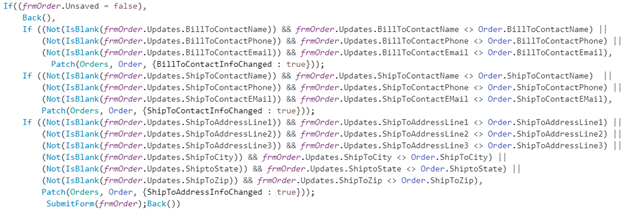
The second way that this problem occurs is when you are checking the updates to determine whether to set a flag. In my application, I need to set a flag to signal some secondary processes when the user changes some values. I was checking to see if the value in Form.Updates was not blank. However, in some cases, it wasn’t blank –though it should have been. So I simply added a secondary check, testing the value in the item and the value in the Form.Updates property collection:

It’s tedious – in both cases – to have to work around the defect, but it’s not too unwieldy.

PowerApps

Updating PowerApps Screens and Forms Programmatically

PowerApps is a powerful form generation platform –but the data-flows-centric model can be more than a bit quirky to use if you’re used to more programmatic approaches to form generation, whether that’s in InfoPath, Microsoft Access, WinForms in Visual Studio, or some other technology. The expectation is that you can assign a value to a control or to a field in the data source and the screen will automatically update to reflect your changes. However, this doesn’t work in PowerApps. Instead, you must make the updates to the record and then reload the record. Let’s look at how this works.

Forms

Forms in PowerApps are the way to connect a part of the screen to a data source explicitly. Forms can be either be a view or an edit form. Strangely, these aren’t different display modes of the same control. Edit forms have different capabilities than display forms, so generally you want to use an edit form if you expect you may ever want to edit some of the data – so that you don’t have to recreate the form.

Forms come with two important design time only properties: DataSource and Item. These properties are design time, because they can only be set in the designer. You cannot – while the form is running – change these values.

DataSource is set to one of the data sources setup for your PowerApp. This defines the structure of the data and helps inform the designer what fields should be available. The second property, Item, is more interesting.

The Item property can be set to the result of a function – such as Lookup() – or it can be set to a variable. Generally, it’s a good idea to set the Item to a variable, so that you can control the behavior of the variable separate from being the result of a static function.

Variables

There are two kinds of variables inside your PowerApp. First, there are global variables, which are established with the Set() function. The second are screen-level context variables, which are either passed into the screen through the parameter of the Navigate() function or are established by use of the UpdateContext() function.

Other than the fact that the variables are updated with Set() for global, and UpdateContext() for context variables, either will function just fine to help us update the screen.

Data Cards

Forms are containers for a set of data cards. These data cards are the templates for the display of each of the individual fields from the data source. The wizard prompts you to select which fields you want to have on your form and the general layout. The importance is that each data card is associated to a field in the data source, so when the data field is updated, the display updates.

The problem is that the data card doesn’t have a property that you can set to update the property programmatically – and get that to display on the page. As a result, you have to update the form’s data item and then let the data flow from the record down to the screen.

Text Fields

Before we continue with the discussion of forms, it’s important to note that the approach that we’re explaining here works just fine with regular text fields which are on the screen – even though they aren’t in a form. If you set a text field’s .Text property to the value of a field in an item, this will only be updated when you update the item. If you attempt to programmatically set the .Text property during runtime, your changes won’t be reflected on the screen. However, if you update the variable that the text field is bound to, it will update the text field for you automatically.

To be specific, you must update the record. Updating the individual property in the variable isn’t enough to cause the data flows to fire and update the text field. So, whether we’re doing a form field or a field we want to display on the screen, we need to update the variable and allow that to cause the data flows to fire to update the screen.

Creating Records

Creating a blank record in a PowerApp can be done by calling NewForm() when you have a form; however, doing this doesn’t allow you to set any starting data. In the case where you want to create records that are specific to the customer, but you don’t want the customer number to be in the form, you’re forced to precreate the record, then display it in the form.

Precreating a Record

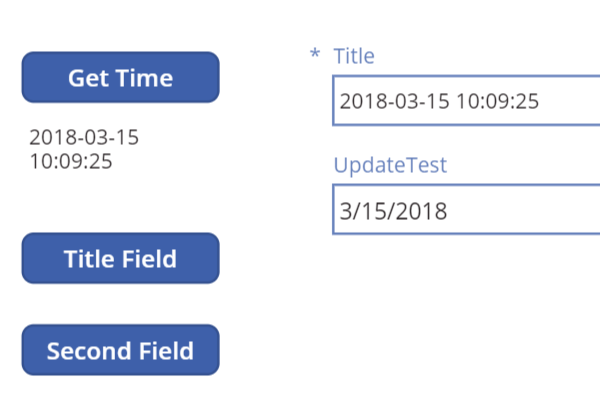
To create the record, we’re going to use the Patch() function. This takes the data source, the item, and the updates. The data source is easy. It’s the same data source as we’re using for the form. The item is the potentially challenging part. We need to create an item with all the defaults for our data source. To do that, we call Defaults() with the parameter of our data source. This gets an item with all the defaults for the item. To that we add anything that we need to initialize the record. For instance, let’s call our data source “Sample” and assume we need to initialize a field called “Title” to the current date. The code looks like this:

Patch(Sample, Defaults(‘Sample’), { Title: Text(Now(), “[$-en-US]yyyy-mm-dd hh:mm:ss”)})

The call to the Text() function is just to convert the data/time value from the Now() function into a string. Not that we’re calling Patch() with our data source, our item, and what we want to change in the record. Defaults() is used to get a new item with the right defaults.

After this call, we have a new record in our database.

Selecting the Precreated Record

With the new record, we need to get it to display on the form or as a part of the screen. To do this, we update the variable that we have our form set to. In our example, it happens that Patch() returns our updated record, so we can put that inside of a Set() for a global variable or a UpdateContext() for a context variable. If we were to call our variable SampleItem as a global variable, the code would look like:

Set(SampleItem, Patch(Sample, Defaults(‘Sample’), { Title: Text(Now(), “[$-en-US]yyyy-mm-dd hh:mm:ss”)}))

If the variable SampleItem was a context variable, we’d do:

UpdateContext({SampleItem: Patch(Sample, Defaults(‘Sample’), { Title: Text(Now(), “[$-en-US]yyyy-mm-dd hh:mm:ss”)})})

In both cases, the new record will be reflected on the screen whether the fields are in the form or the text field.

Updating Records

That’s fine for new records, but how do you make an update to an existing record? It’s the same process – except instead of specifying the defaults for the patch, you specify the existing variable. It looks like this:

Set(SampleItem, Patch(Sample, SampleItem, { Title: Text(Now(), “[$-en-US]yyyy-mm-dd hh:mm:ss”)}))

That’s a Wrap

It may not be the way you’d typically think about the process in a more traditional form building tool – but it’s effective.

Recent Posts

Public Speaking