Skip to content

SharePoint

Book Release: Secret SharePoint

We interrupt our normal schedule of book reviews to announce that we’ve released our latest book – Secret SharePoint. We’ve been leaking some content from the project for months on our blog, through a free subscription to an email series, and through partners like SPTechCon. This has been in preparation for our launch of the Secret SharePoint book – and that launch is today!

The book is over 200 pages of special tips that I’ve learned over the last 18 years of working with SharePoint. It’s solutions to hard problems, and they work whether you’re using SharePoint on-premises or SharePoint Online.

From birthday calendars and navigation to search and Word Quick Parts, Secret SharePoint has the solutions you need for the problems you’re facing.

More than that, we’re still offering the free email course that you can sign up for to get part of the content from the book and a newly-released, self-paced online course. Both of these offer not only the written text but videos and screen casts that walk you through the entire process of building the solutions that we’ve created for other customers.

As a special thank you for following us, you can get the book directly from us for $15 + Shipping. That’s half the retail price. Order yours today.

Microsoft Flow, SharePoint, 429, and Throttling a Workflow to Death

We’re here to mourn the death of many a workflow instance at the hands of SharePoint’s HTTP throttling. Except it’s not SharePoint’s throttling that is the true killer. SharePoint’s just the accomplice in this crazy dance that will get your workflows killed. Though it’s possible to protect your workflow instances from being throttled to death, it isn’t as easy as it might seem. In this post, we’ll talk about what happens every day and then what strategies you can use to protect your workflow.

Request Throttling

Before we can explain how a flow gets throttled to death, we first must understand a bit about throttling. Web servers are under constant assault from well-intended users, the code written by bumbling idiot developers (of which occasionally I am one), and malicious people. One of their defenses is to respond with “I’m too busy right now, come back later.” This comes back as the code HTTP status code 429. Sometimes these responses are kinder and will indicate when the person should come back. “Hey, I should be able to take care of that request for you after seven seconds” tells the program when it should retry the request – and here’s the kicker – expect that it will be able to be serviced.

The problem is that, when you’re dealing with so many different users and so many variables, it’s sometimes difficult to predict when the server will be willing or able to service a request.

Automatic Retries

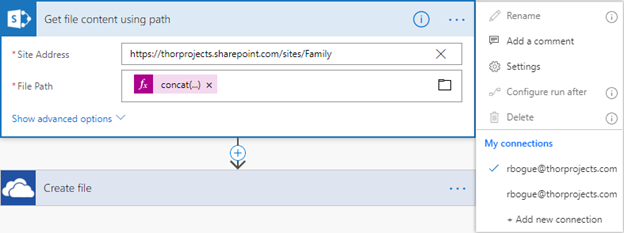
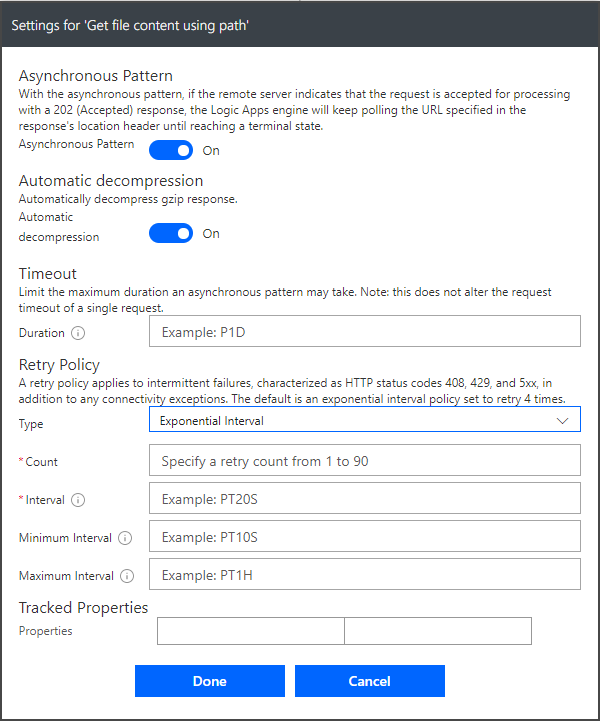
Because a server may respond with a 429, most programs know to retry the request. The strategies vary but the default answer is an exponential interval. The first time you get a 429, you stop for a period of time – say four seconds – and then each time you retry, you square the interval. So, four seconds becomes sixteen on the second retry, and 256 seconds on the second interval. Flow allows you to follow the default policy, which is described as exponential, or explicitly set the interval to exponential. To do this, click the ellipsis at the right of the action and select Settings.

The action’s space in the flow will change to the settings view, where you can explicitly set the retry policy to exponential – which will further change the view to provide spaces for a maximum retry count, an interval, minimum interval, and maximum interval.

The default settings, however, are supposed to do exponential waiting on retries and four retries. So that seems like a good place to start. The default is implemented as one try plus three retries. That is how they get to four retries.

Retry Schedule Conflicts

What happens when there is a conflict between the provided retry schedule and what the server responded with as a part of its 429 response? The good news is that Flow will use the larger of the two numbers. In theory, at least, you’ll never hit a retry more than once or twice. Sure, the server could make a mistake with its guidance once but surely not twice. Unfortunately, that’s not always the case. Sometimes the response from the server – and the default exponential interval – will be too small, and you’ll exhaust the three retries and end up failing your request. This typically happens when you have multiple flows running at the same time.

Parallelism

Any given Flow may not be making that many requests, but what happens when there are many Flow instances running at the same time? If you do work on a queue that information is dropped into, you can’t necessarily control how many items will come in at the same time. With the scalability of the Flow platform, what’s to stop you from running hundreds or thousands of Flows at the same time – against the same poor server that’s just trying to cope?

If you have 100 Flows all starting in a relatively short time talking to the same back end server, it may be getting thousands of requests from Flow every minute. Even if each Flow is told to retry later, even the server telling the consumer to retry later may cause the server to need to push off work even further. The result is that every Flow gets throttled to death – until so few remain that they can be handled inside of the capacity of the server.

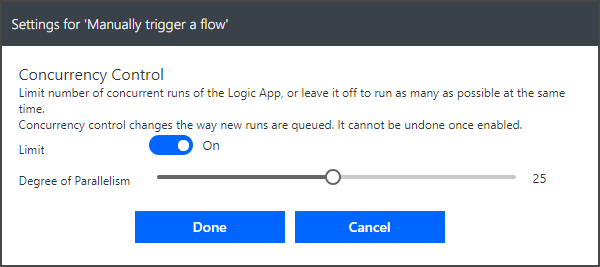
Luckily, Flow offers a technique for limiting the number of active flows at any time. This can be done by going to the ellipsis and then Settings for the trigger. This changes the trigger to its settings display, which allows you to limit the number of concurrent Flow instances – or the degree of parallelism.

SharePoint Request Throttling

Generic request throttling is fine but how does my favorite server – SharePoint – do it? Well, the answer isn’t clear. Microsoft published an article “Avoid getting throttled or blocked in SharePoint Online“, which says that they won’t publish the rules – because they’re changing them.

At the same time, they make clear that some of the criteria being used to manage the workflow are things like user agents, accounts, and App IDs. However, when it comes to Flow, we have some limitations.

Flows always run as the user that created the Flow – not as the user initiating the request. So, from the point of view of SharePoint, one user is making all the requests – and they’re making them from the same application, Flow. This makes Flows a high target for throttling, even when you consider it’s a well-known and well-trusted application.

It turns out there’s more to it than that. There’s an interface layer that the connectors – including the connector to SharePoint – use.

Connectors and Infrastructure

Many of Microsoft’s new offerings like Flow, PowerApps, and PowerBI need access to the same service data inside of multiple tenants. As a result, the connectors use a common architecture that allows multiple services to interact with Microsoft’s online service offerings. This architecture has its own throttling built in. It’s designed to protect the back-end services and has its own rules for throttling requests that’s more aware of the uniqueness of each of the fixed number of Microsoft internal consumers.

One of the things that this infrastructure can use to manage throttling is the connection to the service. In the first figure, you’ll notice two connections in the settings menu – with the same identity. This is one way that you can help the infrastructure avoid throttling you.

Multiple Connections

When there aren’t many things to differentiate requests on, the connection is one. It’s got its own identifier. Because of that, it’s easy for the back end to see which connection a request is associated with – and throttle too many requests from a single connection. Thus, if you want to help your Flow avoid getting throttled, you can make multiple connections to the same data source. This allows your requests to get spread across different thresholds and for more to get through.

The Fingerprints Match

For my case, the Flows were getting throttled not by SharePoint directly but through the infrastructure hub. I set the maximum degree of parallelism and assigned every action in the flow to a different connection, but it wasn’t enough. I didn’t set the retry settings manually, and the default settings continued to allow my poor Flows to be throttled to death by the infrastructure.

In the end, to spare more Flows from being throttled, we moved some of the data to Azure SQL. However, we saved many Flows just by adjusting the retry strategy and concurrency and creating multiple connections.

columns

Setting Default Column Values

This solution will discuss how default column values to make it easier to enter metadata. By setting these default column values on a folder-level, it means any document added to that folder will get the same value in the column as the folder. We’ll walk you through how this works, first by setting up a library with some folders, then adding a column that will hold the desired information, and finally configuring the default column value settings on individual folders.

Task 1: Set Up the Library App

This task will lay the groundwork for default column value settings. We need to set up a library and create a couple of folders in the library.

1.    In a web browser, navigate to the SharePoint site where you want to create the library. The site’s home page will open.

2.    In the Suite bar, in the upper-right hand corner of the page, click the gear icon. The actions menu will open.

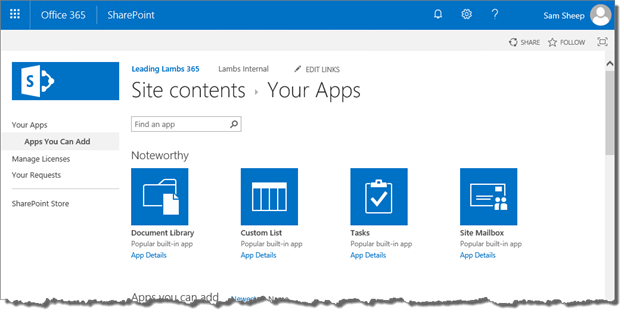
3.    Click Add an app. The Your Apps page will open.
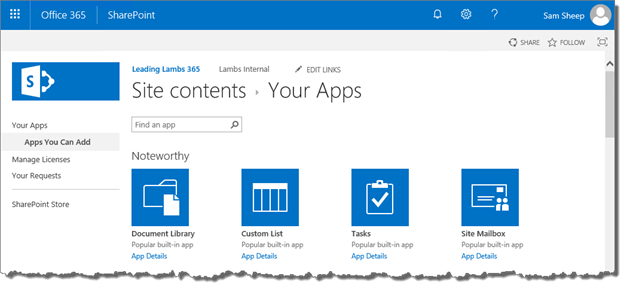
Figure 1: The Your Apps Page

4.    Click on the Document Library tile. This is normally found under Noteworthy, but you can search for it as well. Click the “Find an app” search box, type library, then press Enter. Matching results for “library” will appear. You can then click Document Library. The Adding Document Library dialog box will appear.

5.    In the Name field, type a name for the library app. For this example and for the rest of the document, we’ll use the name Sales.

Figure 2: The Adding Document Library Dialog Box with the Sales Name

6.    Click Create. The Sales library will be created, and you’ll be taken to the Site Contents page.

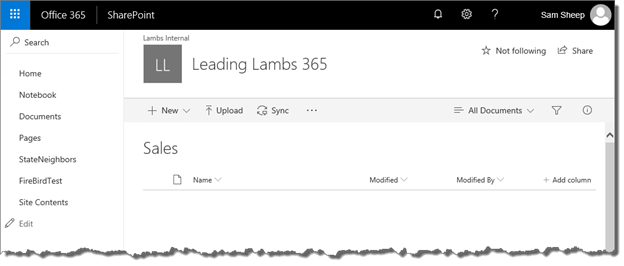
7.    In the site contents listing, click Sales. The Sales library’s default view will open.

Figure 3: The Sales Library’s Default View

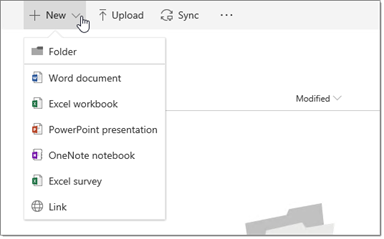
8.    In the command bar, click New. The New menu will appear.

Figure 4: The Expanded New Menu

9.    Click Folder. The Folder dialog box will appear.

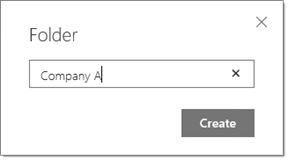
10.    Type a name for your new folder. For this example and for the rest of the document, we’ll use Company A.

Figure 5: The Folder Dialog Box with the Company A Name

11.    Click Create. The Company A folder will be added to the Sales library.

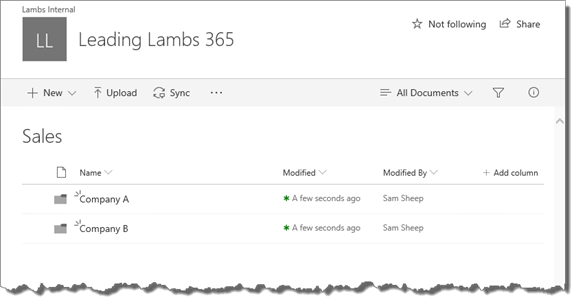
12.    Repeat steps 8-11 to create another folder. For this example, we’ll use the name Company B. The Company B folder will be added to the Sales library.

Figure 6: The Company A and Company B Folders in the Sales Library

Task 2: Associate Site Columns to the Sales Library

Now that the library is set up, we need to create a column that will hold our metadata. For this example, we’ll use a custom site column we’ve already created. For more guidance on creating site columns, please see the SharePoint Shepherd’s Guide for End Users task, “Create a Site Column.”

1.    On the Sales library’s default view, in the Suite bar, click the gear icon to open the actions menu.

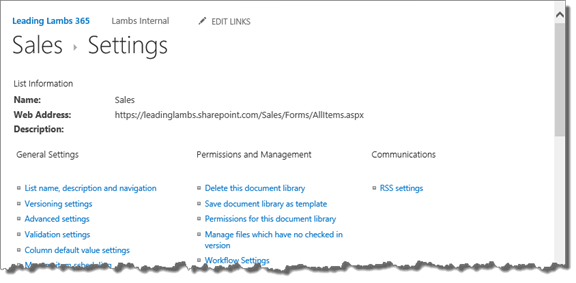
2.    Click Library settings. The Sales library’s settings page will open.

Figure 7: The Sales Library’s Settings Page

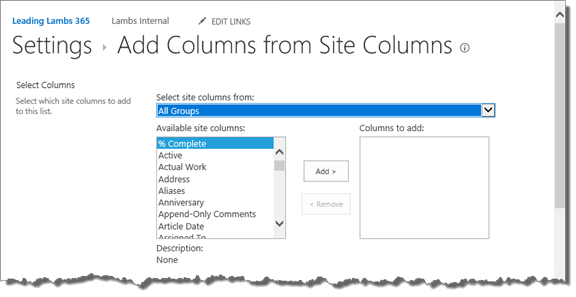
3.    Towards the bottom of the page in the Columns section, under the list of columns, click Add from existing site columns. The Add Columns from Site Columns page will open.

Figure 8: The Add Columns from Site Columns Page

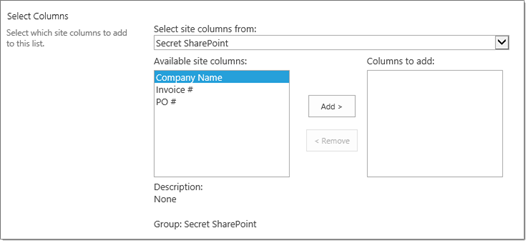
4.    In the Select Columns section, under Select Site columns from, select the site column group that your site column is categorized as. For this example, we’ll select the Secret SharePoint site column group.

Figure 9: The Site Columns in the Secret SharePoint Group

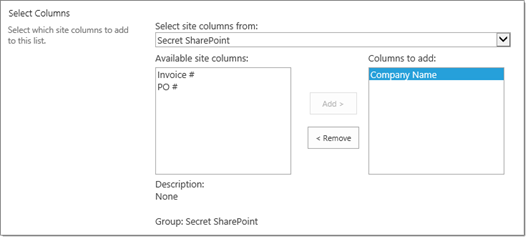
5.    Under Available site columns, select a site column to add to the library. For this example, we’ll select Company Name. Then click Add. The site column will be added to the Columns to add box.

Figure 10: Company Name Selected as a Column to Add

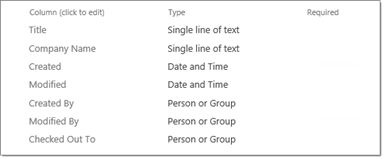
6.    At the bottom of the page, click OK. The site column will be added to the Sales library, and you’ll be returned to the library’s settings page. In the Columns section, the Company Name site column will be listed along with the library’s default site columns.

Figure 11: The Company Name Site Column in the Columns Section

Task 3: Set Default Column Values

Now that we have the column and the folders set up in the library, we can set the default values for the column.

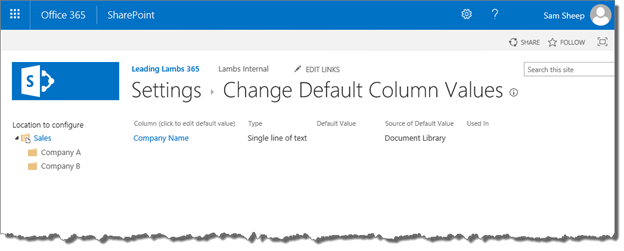
1.    On the Sales library’s settings page, under General Settings, click Column default value settings. The Change Default Column Values page will appear.

Figure 12: The Change Default Columns Values Page

2.    On the left side of the page is the menu Location to configure. Under Sales, the folders Company A and Company B are listed. Click the Company A folder. The page will refresh, and the breadcrumb bar will show Company A.

Figure 13: Company A Selected to Configure Default Column Value Settings

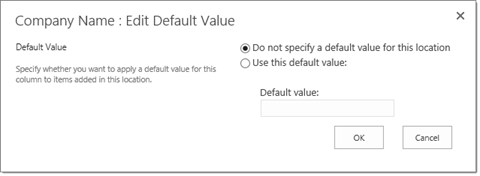
3.    Under Column (click to edit default value), click Company Name. The Edit Default Value dialog box will appear.

Figure 14: The Edit Default Value Dialog Box

4.    In the Default Value section, click the radio button for Use this default value.

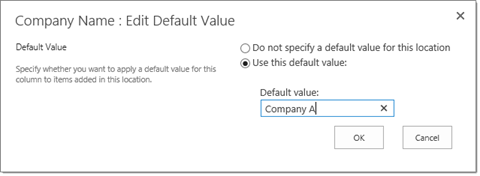
5.    Under Default value, type the desired default value for this column. For this example, we’ll type Company A.

Figure 15: The Default Value Set to Company A

6.    Click OK. The Edit Default Value dialog box will close, and the page will refresh. Now, whenever a document is added to the Company A folder, the Company Name column will automatically get the value Company A.

Figure 16: Company A’s Company Name Set to Default Value “Company A”

7.    Repeat steps 2-6 for Company B. On step 5, type Company B. When you’re finished, whenever a document is added to the Company B folder, the Company Name column will automatically get the value Company B.

Figure 17: Company B’s Company Name Set to Default Value “Company B”

8.    In the breadcrumb bar, click Settings. You’ll be returned to the Sales library’s settings page.

9.    In the breadcrumb bar, click Sales. You’ll be returned to the Sales library’s default view.

Task 4: Add Documents the Sales Library

Now that we’ve added the default values to the column for the Company A and Company B folders, we’ll add a couple of documents to the folders. We won’t worry about the document names for this example, but you can direct users to follow these steps when adding documents to the library.

1.    On the Sales library’s default view, click Company A. The contents of the Company A folder will appear.

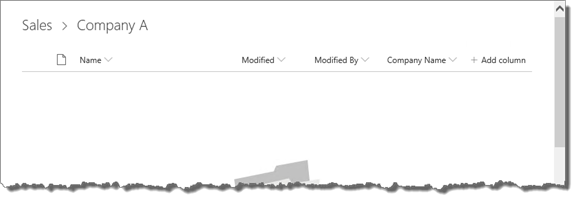
Figure 18: The Company A Folder

2.    In the command bar, click New. The New menu will appear.

3.    Click Word document. Depending on your library’s settings, Microsoft Word will launch, and a blank document will appear. Your settings may also cause Word Online to launch.

4.    Since we’re just showing how metadata is populated, we don’t need to change anything about the document. Return to the Company A folder. If Microsoft Word launched, close the document. If Word Online launched, in the Suite bar, click Company A. You’ll be returned to the Company A folder.

5.    The new document will be visible in the item listing of the Company A folder. In the Company Name column, the value will be automatically populated with Company A.

Figure 19: The New Document with Company Name Populated with “Company A”

6.    Return to the root folder by clicking Sales in the breadcrumb bar. The Sales library’s default view will appear.

7.    On the Sales library’s default view, click Company B. The contents of the Company B folder will appear.

8.    Repeat steps 2-4 to create another document in the Company B folder. When you return to the Company B folder, the new document will appear in the item listing, and Company B will be automatically populated in the Company Name column.

Figure 22: The New Document with Company Name Populated with “Company B”

cookie production

Using Word Quick Parts with a Custom Content Type

This solution walks you through the process of adding Quick Parts to the default template of a custom content type. This way, anyone who selects that content type from the library will create a new form with those Quick Parts added already. By filling out the Quick Parts fields, the metadata for that document will also be filled out in the corresponding SharePoint columns.

The step-by-step will assume you already have a library and custom document content type prepared. For more information on associating content types to a library, please see The SharePoint Shepherd’s Guide for End Users tasks “Create a Library App” and “Edit List or Library App Content Types.” For our example, we’ll use a library called Resources with the content type Invoice, which uses site columns Invoice # and PO #.

Task 1: Create a Content Type Template

This task walks you through drafting and editing the default template for your content type. In our example, our content type is for invoice forms, and we already have the form designed. We just need to add the Quick Parts, then save the document as a template. We’ll save it locally, which will allow us to access it when we edit the content type’s default template later.

1.    In a web browser, navigate to the SharePoint library that has your content type. For our example, we’ll go to the Resources library. The library’s default view will open.

2.    In the command bar, click New to open the drop-down menu.

Figure 1: The Expanded New Menu

3.    Select the custom content type. For our example, we’ll select Invoice. Depending on your library’s settings, Microsoft Word will launch.

Note: Depending on your settings, Word Online may launch. At the top of the Word Online window in the ribbon, click Edit in Word. The We’re opening this in Microsoft Word… dialog box will appear, and Microsoft Word will launch.

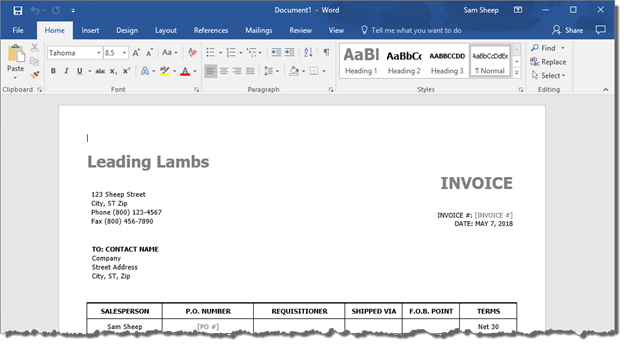
4.    If it isn’t already designed, design your form or copy and paste in the contents of an existing form. For our example, we already have our invoice form prepared, so we’ll copy and paste it in.

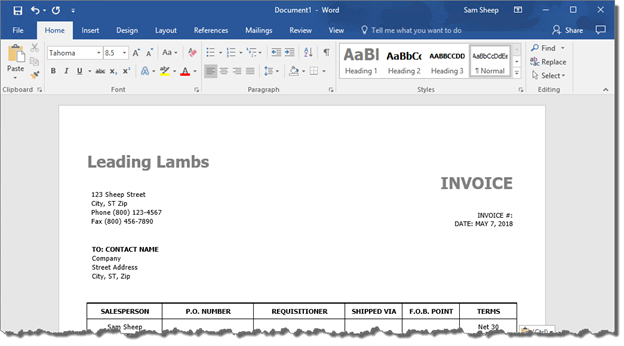
Figure 2: The Invoice Form in the New Document

5.    Click the Insert tab to open the Insert ribbon.

6.    Find a location on the document that will contain the information you want to send to SharePoint. For our first example, we’ll use Invoice #, which is found in the upper-right corner of the form. Because we want to place invoice numbers to the right of Invoice #, click the area to the right of Invoice # to move the insertion point there. If there is existing placeholder text, delete it now.

Figure 3: The Insertion Point to the Right of Invoice #

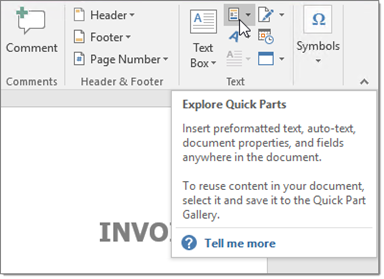
7.    In the Insert ribbon’s Text section, click the Explore Quick Parts icon. The icon looks like a page that has multiple boxes of content in different colors. The Quick Parts menu will appear.

Figure 4: The Explore Quick Parts Icon

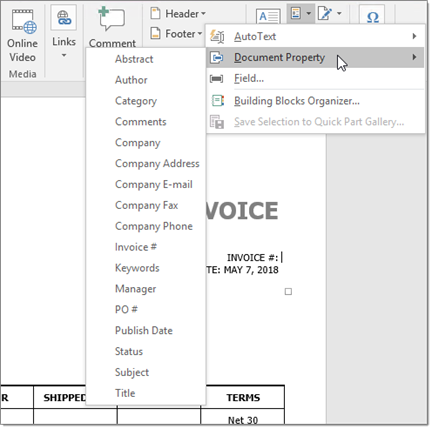
8.    Hover over Document Properties, and a list of the document’s properties will be displayed. You should see both the default document properties, such as Author, Title, and Tags, as well as the names of the site columns associated to the content type.

Figure 5: The Document Property Menu

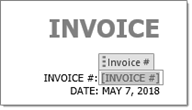
9.    Select the site column you want to add as a Quick Part in the document. For our example, we’ll select the Invoice # site column. The Invoice # site column will be added to the form as a Quick part. It’ll be displayed as a gray text box with the site column’s name in square brackets, such as [Invoice #].

Figure 6: The Invoice # Quick Part in the Template

10.    Repeat steps 6-9 to add other Quick Parts to the form in the desired locations. For our example, we’ll also add the PO # site column. Our location for purchase order numbers is in the table on the middle of the page, under PO#, so we’ll click the blank table cell, then select PO # from the Quick Parts menu. This will add the PO # Quick Part to the form.

Figure 7: The PO # Quick Part in the Template

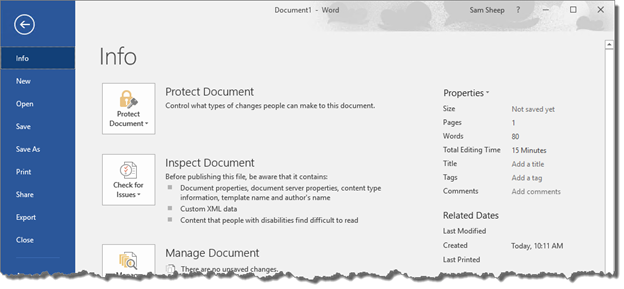
11.    When you’re finished adding Quick Parts to the template, click the File tab to open the Info screen.

Figure 8: The Info Screen

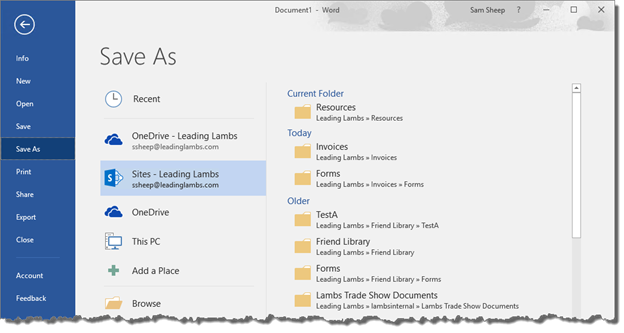
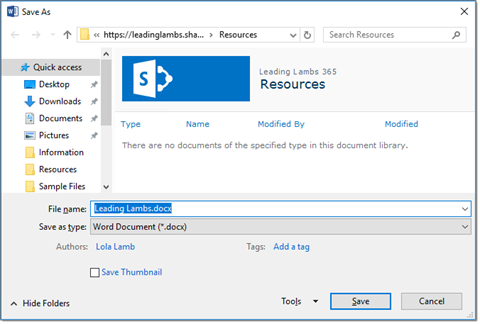
12.    Click Save As. The Save As screen will appear.

Figure 9: The Save As Screen

13.    Click Browse. The Save As window will appear.

Figure 10: The Save As Window

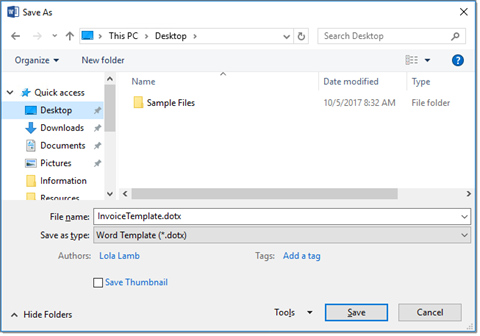
14.    Give an identifiable name to the form. For our example, we’ll save it as InvoiceTemplate.

15.    In the Save as type field, click the drop-down menu, then select Word Template. The file type will change to .dotx. The Save As window will automatically change to show the Custom Office Templates folder on your PC.

16.    In the Navigation menu, click Desktop. You can usually find the desktop in the Quick Access menu. The contents of the desktop will appear in the Save As window.

Figure 11: The Invoice Template Ready to Be Saved on the Desktop

17.    Click Save. The Save As window will close, and the new form template will be saved to the desktop. You can now close the Word document.

18.    In your browser window, return to the library app’s default view, if it’s not already visible.

Task 2: Edit the Content Type’s Default Template

Our next step is to update the content type’s default template and use the new template we created with Quick Parts.

1.    On the library’s default view, in Suite bar, click the gear icon to open the actions menu.

2.    Click Site settings. If Site Settings isn’t visible, you may need to navigate to the Site Contents page first, then in the command bar, click Site Settings. The Site Settings page will open.

Figure 12: The Site Settings Page

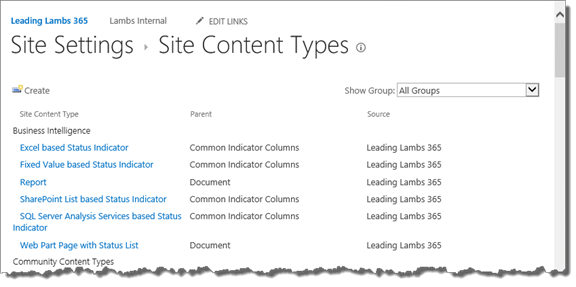
3.    On the Site Settings page, under Web Designer Galleries, click Site content types. The Site Content Types page will open.

Figure 13: The Site Content Types Page

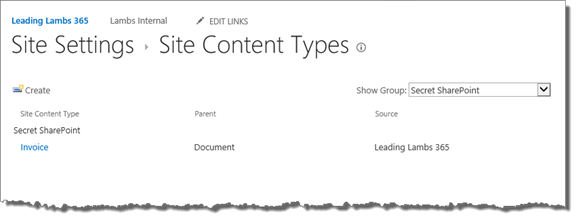
4.    On the right side of the page, next to Show Group, click the drop-down menu and select the site content type group that has your content type. For our example, our Invoice content type is found in the Secret SharePoint site content type group, so we’ll select Secret SharePoint. The Site Content Types page will refresh to show only the site content types in the selected site content type group.

Figure 14: The Secret SharePoint Site Content Type Group

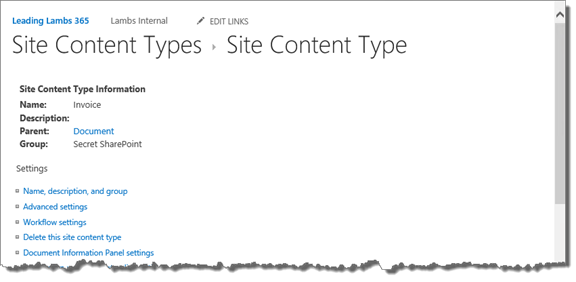
5.    Click the custom content type. For our example, we’ll click Invoice. The Site Content Type page will open.

Figure 15: The Site Content Type Page for Invoice

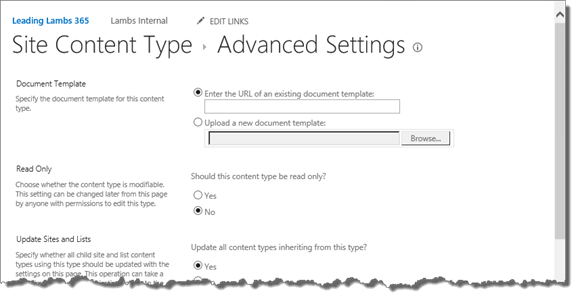
6.    Under Settings, click Advanced settings. The Advanced Settings page will open.

Figure 16: The Advanced Settings Page

7.    In the Document Template section, select the Upload a new document template option. The Upload field will become enabled.

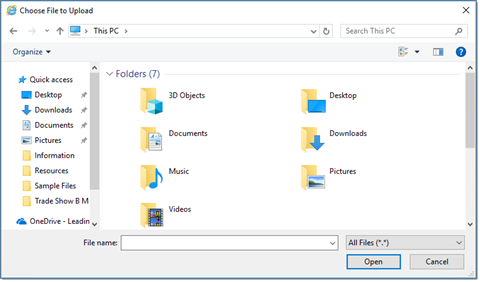
8.    Click Browse. Your browser’s file upload window will open.

Figure 17: The File Upload Window

9.    Navigate to the desktop, then click the name of the form template, such as InvoiceTemplate.dotx. The file name will appear in the File name field.

10.    Click Open. The file upload window will close, and the file path will appear in the Upload a new document template field.

Figure 18: The New Template Ready to be Uploaded

11.    At the bottom of the page, click OK. You’ll be taken back to the Site Content Type page. The new form template’s file will be uploaded as the default template for the custom form content type. Every time a user selects the content type from the New menu in the library, a new document will be created based on the form template with the Quick Parts added.

Task 3: Populate Metadata Using Quick Parts

This final task will show you how information added to the Quick Parts will be added to SharePoint without typing the information twice. You can instruct users to use these steps whenever they fill out their form.

1.    If you aren’t already on the library’s default view, navigate to the library now. For our example, we’ll navigate to the Resources library.

2.    In the command bar, click New. The New menu will appear.

3.    Click the name of your content type. For our example, we’ll click Invoice. Depending on your library’s settings, Microsoft Word will launch, and the default document template will open.

Note: Depending on your library’s settings, Word Online may launch. At the top of the Word Online screen, click Edit in Word. The We’re opening this in Microsoft Word… dialog box will appear, and Microsoft Word will launch.

Figure 19: The New Invoice

4.    Fill out the fields of your form.

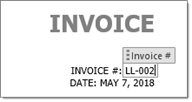
5.    When you get to a field that contains a Quick Part, you’ll see a gray text box with the name of the field in square brackets, such as [Invoice #]. To fill out these fields, click into the Quick Part, then type the information. For the Invoice # example, we’ll type LL-002.

Figure 20: The Invoice # Quick Part with LL-002

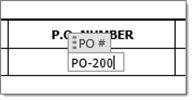
6.    Repeat step 5 for every Quick Part in the form. For our example, we’ll also fill out the P.O. Number field. We’ll click the Quick Part, then type PO-200.

Figure 21: The PO # Quick Part with PO-200

7.    When you’re finished filling out the fields, save your document. Click the File tab to open the Info screen.

8.    Click Save As. The Save As screen will appear.

9.    Under Current Folder, click Resources. The Save As window will open.

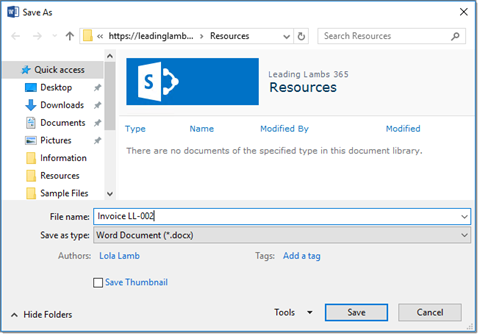
10.    In the File name field, give a unique name to your document. For this example and for the rest of the document, we’ll use the name Invoice LL-002.

Figure 22: Invoice LL-002 Ready to Be Saved

11.    Click Save. The document will be saved to the Resources library, and the information you entered into the Quick Parts will now be added to the site columns of the document library as properties of the document.

12.    Close the Word document. If Microsoft Word was initially launched instead of Word Online, your browser window should show the library’s default view.

Note: If Word Online was originally launched, you should see the Word Online window instead of the library’s default view. To navigate back to the library app, in the Suite bar to the left of the document’s name, click Resources. You’ll be returned to the library app’s default view.

13.    Your document will appear in the item listing with the metadata populated in the columns. For our example, you’ll see the Invoice # field contains LL-002 and the PO # field contains PO-200.

Figure 23: Invoice LL-002 with the Populated Metadata

managing controlled documents

Now Available: Managing Controlled Documents in SharePoint White Paper

Controlled documents have been with us for a long time.  Whether there’s a legal, regulatory, or internal political reason to maintain control of documents, they’re an important part of any content strategy.  We found that we were helping clients understand the core requirements for controlled documents – and how SharePoint could support those requirements.  We decided to gather our discussions into a white paper, “Managing Controlled Documents in SharePoint.”  It distills what you need to know about controlled documents into a few pages.  Whether you’re an old hand at controlled documents or you’re new to the idea, you’ll find a better understanding in this white paper.

Get the Managing Controlled Documents white paper

Reenabling Home Page / Web Page Views for Outlook Folders

One of my favorite tricks for making it easier for folks to use SharePoint is to set the view of a folder in Microsoft Outlook to a page so that users see the page instead of the contents of the folder. This creates a quick link inside of Outlook to SharePoint. However, the October 2017 updates broke this functionality. See Outlook Home Page feature is missing in folder properties for more on what they changed and why. Fortunately, the blog post has a way to reenable the functionality. I’ve put together a quick .reg file that you can run to get the functionality back. It’s in this ZIP file. You’ll have to extract it and double-click it. The standard legal disclaimers apply.

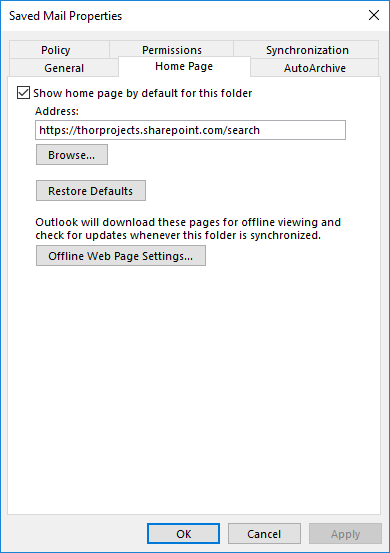
Once you’ve run the file you can right-click a folder, from the menu that appears select properties, then select the Home Page tab. On the Home Page tab, you can click the ‘Show home page by default for this folder’ and enter the URL of the site that you want to have displayed when you select the folder. Finally, click OK.

In this case, I’ve got my Saved Mail folder set to open the SharePoint Search site for my Office 365 tenant.

while you were out form

Adding Quick Parts to Your Form Template

This step-by-step will help you add Word Quick Parts to your existing form template. This will allow your users to fill out the fields on the form and have those fields filled out in the corresponding SharePoint library. Users will still fill out the fields they always do when completing the form, but they won’t have to add the same information in again back in SharePoint.

This solution will change the default document template of a library. In this case, we’ll use an invoice form. This solution is good if you have a single library that holds a single type of form. If you want a library to hold many kinds of forms, you can still take advantage of Quick Parts, but you’ll want to take a look at the solution, “Using Word Quick Parts with a Custom Content Type.”

Task 1: Set Up the Library

The first step is to make sure the library is set up. Our example library will exclusively hold invoices. This is important to know, as the content we want to store here will influence the site columns we’ll need to add in the next task.

1.    In a web browser, navigate to the SharePoint site where you want your library to be. The site’s home page will open.

2.    In the Suite bar, in the upper-right hand corner of the page, click the gear icon. The actions menu will open.

3.    Click Add an app. The Your Apps page will open.

Figure 1: The Your Apps Page

4.    Click on the Document Library tile. This is normally found under Noteworthy, but you can search for it as well. Click the “Find an app” search box, type library, then press Enter. Matching results for “library” will appear. You can then click Document Library. The Adding Document Library dialog box will appear.

5.    In the Name field, type a name for the Library app, such as Invoices. We’ll use the name Invoices for the rest of this document to refer to this new library.

Figure 2: The Adding Document Library Dialog Box with the Invoices Name

6.    Click Create. The Invoices library will be created, and you’ll be taken to the Site Contents page.

7.    In the site contents listing, click Invoices. The Invoices library’s default view will open.
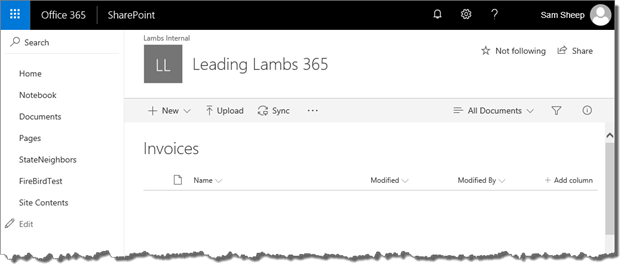
Figure 3: The Invoices Library’s Default View

Task 2: Associate Site Columns to the Invoices Library

Now we’ll add some site columns to the library. This is important, because Word Quick Parts can only populate properties when they’re associated with site columns. When opened in Word, the site columns will be displayed as “properties” of the document. This example will use custom site columns that we’ve already created. For more guidance on creating site columns, please see the SharePoint Shepherd’s Guide for End Users task, “Create a Site Column.”

1.    On the Invoices library’s default view, in the Suite bar, click the gear icon to open the actions menu.

2.    Click Library settings. The Invoices library’s settings page will open.
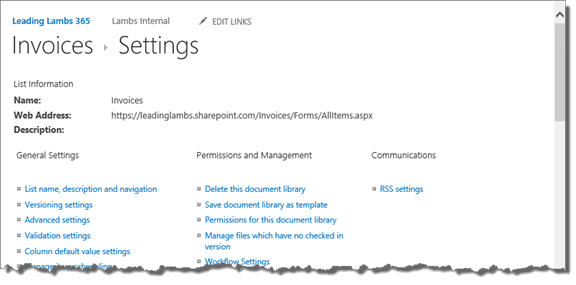
Figure 4: The Invoices Settings Page

3.    Towards the bottom of the page in the Columns section, under the list of columns, click Add from existing site columns. The Add Columns from Site Columns page will open.
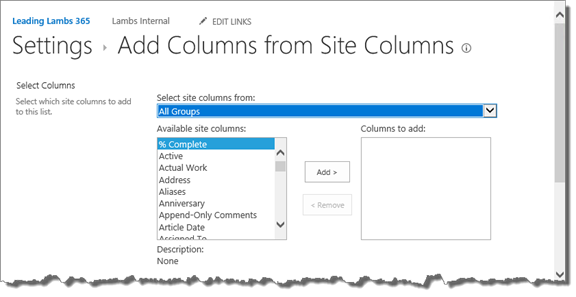
Figure 5: The Add Columns from Site Columns Page

4.    In the Select Columns section, under Select site columns from, select the site column group that your site column is categorized as. For this example, we’ll select the Secret SharePoint site column group.
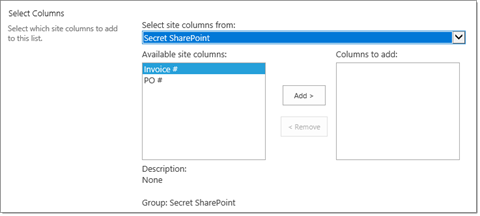
Figure 6: The Available Site Columns in the Secret SharePoint Site Column Group

5.    Under Available site columns, select a site column to add to the library. For this example, we’ll select Invoice #.

6.    Click Add. The site column will be added to the Columns to add box.

7.    Repeat steps 5-6 to add more site columns. For this example, we’ll also add the site column PO #.
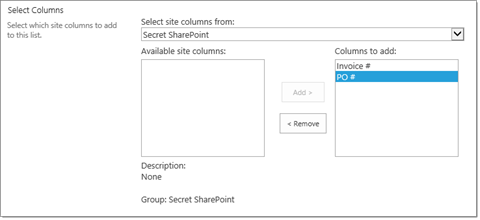
Figure 7: The Site Columns Selected to Add to the Invoices Library

8.    When you’re finished adding site columns, at the bottom of the page, click OK. The site columns will be added to the Invoices library, and you’ll be returned to the library’s settings page. In the Columns section, the selected site columns will be listed along with the library’s default site columns.
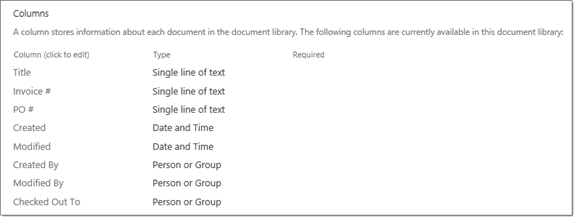
Figure 8: The Site Columns in the Columns Section

Task 3: Edit the Default Document Template

This task now walks you through editing the Invoices library’s default document template. If you already have a form designed and prepared, you can copy and paste the contents of the form into the blank Word document. Then we’ll show you how to add the Quick Parts to the template. Remember, any site columns we added to the library app will be called “properties” in Microsoft Word.

1.    On the Invoices library’s settings page, under General Settings, click Advanced settings. The Advanced Settings page will appear.
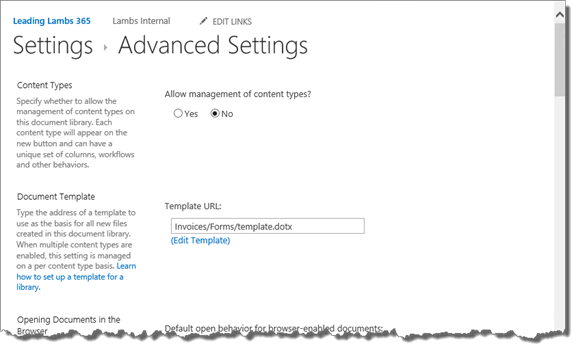
Figure 9: The Advanced Settings Page

2.    In the Document Template section, under Template URL, click (Edit Template). Microsoft Word will launch, and a blank Word document will appear.
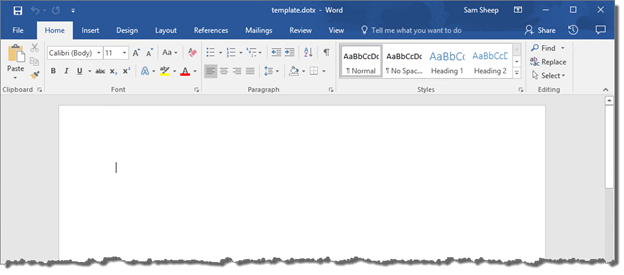
Figure 10: The Blank Template Open in Microsoft Word

3.    Design your form or copy and paste in the contents of an existing form. For our example, we already have our invoice form prepared, so we’ll copy and paste it into the blank Word document.
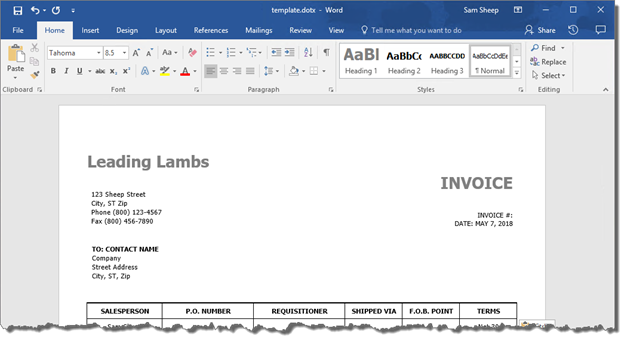
Figure 11: The Invoices Form Pasted into the Template

4.    Click the Insert tab to open the Insert ribbon.

5.    Find a location on the document that will contain the information you want to send to SharePoint. For our first example, we’ll use Invoice #, which is found in the upper-right corner of the form. Because we want to place invoice numbers to the right of Invoice #, click the area to the right of Invoice # to move the insertion point there. If there is existing placeholder text, delete it now.

Figure 12: The Insertion Point to the Right of Invoice #

6.    In the Insert ribbon’s Text section, click the Explore Quick Parts icon. The icon looks like a page that has multiple boxes of content in different colors. The Quick Parts menu will appear.
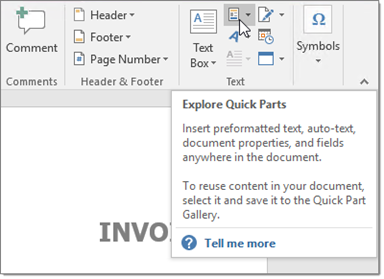
Figure 13: The Explore Quick Parts Icon

7.    Hover over Document Property, and a list of the document’s properties will be displayed. You should see both the default document properties, such as Author, Title, and Tags, as well as the names of the site columns that we just associated to the library.
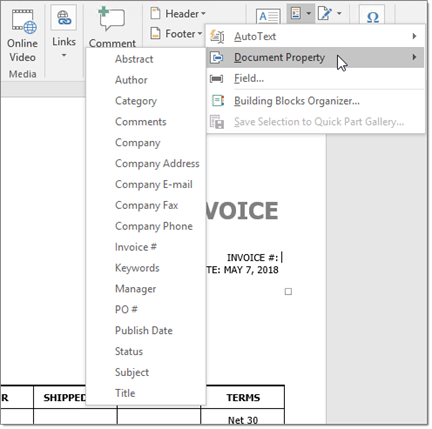
Figure 14: The Document Property Menu

8.    Select the site column you want to add as a Quick Part in the document. For our example, we’ll select the Invoice # site column. The Invoice # site column will be added to the form as a Quick Part. It’ll be displayed as a gray text box with the site column’s name in square brackets, such as [Invoice #].
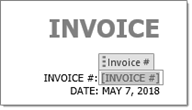
Figure 15: The Invoice # Quick Part in the Template

9.    Repeat steps 5-8 to add other Quick Parts to the form in the desired locations. For our example, we’ll also add the PO # site column. Our location for purchase order numbers is in the table on the middle of the page, under PO#, so we’ll click the blank table cell, then select PO # from the Quick Parts menu. This will add the PO # Quick Part to the form.

Figure 16: The PO # Quick Part in the Template

10.    When you’re finished adding Quick Parts to the template, save the template. If you’re using SharePoint Online, you must save the template as a new name. Start by clicking the File tab to open the Info screen.
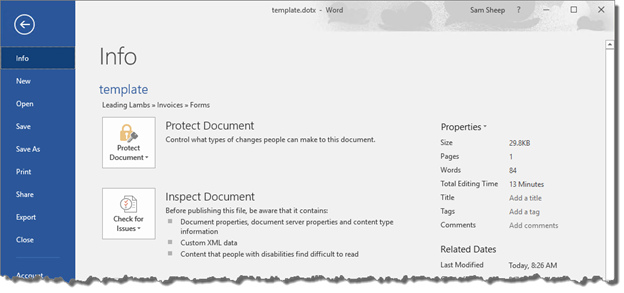
Figure 17: The Info Screen

11.    Click Save As. The Save As screen will appear.
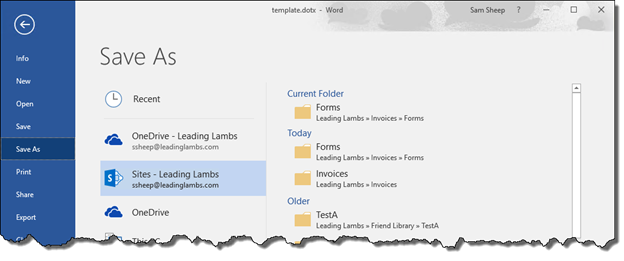
Figure 18: The Save As Screen

12.    Under Current Folder, click Forms. The Save As window will open.

13.    In the File name field, give a new name to the template. For this example, we’ll use the name Invoice.

14.    Click Save. The Save As window will close, and the template will be saved in the Forms library.

15.    Now we need to set our new template as the library’s default template. Close Microsoft Word.

16.    The Advanced Settings page should still be visible in your browser window. In the Document Template section, under Template URL, delete template and replace it with the new name you just gave to the template. The Template URL field should read something like Invoices/Forms/Invoice.dotx.

Figure 19: The New Document Template

17.    At the bottom of the Advanced Settings page, click OK. You’ll be returned to the Invoices library’s settings page.

18.    To return to the Invoice’s library’s default view, at the top of the Invoices library’s settings page, in the breadcrumb bar, click Invoices. You’ll be returned to the Invoices library’s default view.

Task 4: Populate Metadata Using Quick Parts

This final task will show you how information added to the Quick Parts will be added to SharePoint without typing the information twice. You can instruct users to use these steps whenever they fill out their form.

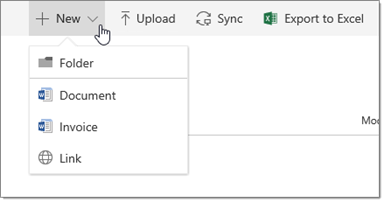
1.    On the Invoices library’s default view, in the command bar, click New. The New menu will appear.
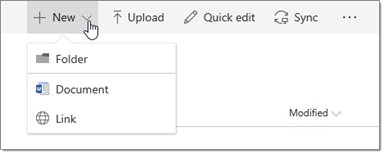
Figure 20: The Expanded New Menu

2.    Click Document. Depending on your library’s settings, Microsoft Word will launch, and the default document template will open.

Note: Depending on your library’s settings, Word Online may launch. At the top of the Word Online screen, click Edit in Word. The We’re opening this in Microsoft Word… dialog box will appear, and Microsoft Word will launch.
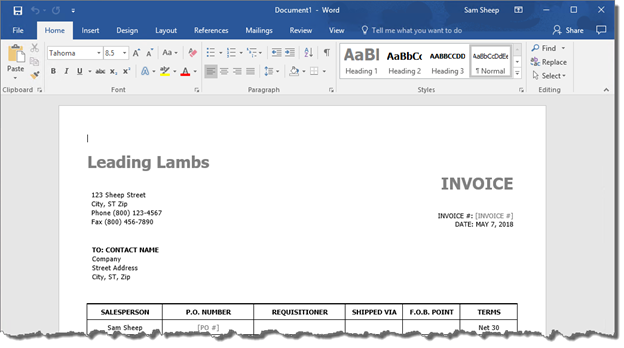
Figure 21: The New Document Open in Word

3.    Fill out the fields of your form.

4.    When you get to a field that contains a Quick Part, you’ll see a gray text box with the name of the field in square brackets, such as [Invoice #]. To fill out these fields, click into the Quick Part, then type the information. For the Invoice # example, we’ll type LL-001.
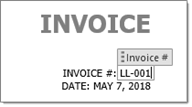
Figure 22: The Invoice # Quick Part with LL-001

5.    Repeat step 4 for every Quick Part in the form. For our example, we’ll also fill out the P.O. Number field. We’ll click the Quick Part, then type PO-100.

Figure 23: The PO # Quick Part with PO-100

6.    When you’re finished filling out the fields, save your document. Click the File tab to open the Info screen.

7.    Click Save As. The Save As screen will appear.

8.    Under Current Folder, click Invoices. The Save As window will open.
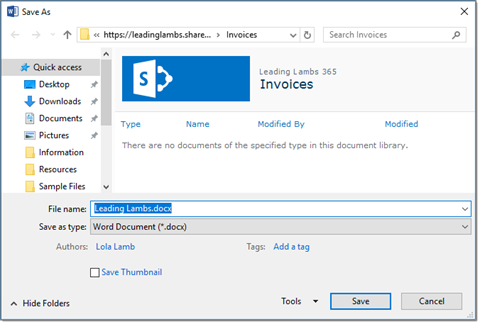
Figure 24: The Save As Window

9.    In the File name field, give a unique name to your document. For this example and for the rest of the document, we’ll use the name Invoice LL-001.

10.    Click Save. The document will be saved to the Invoices library, and the information you entered into the Quick Parts will now be added to the site columns of the document library as properties of the document.

11.    Close the Word document. If Microsoft Word was initially launched instead of Word Online, your browser window should show the library’s default view.

Note: If Word Online was originally launched, you should see the Word Online window instead of the library’s default view. To navigate back to the library app, in the Suite bar to the left of the document’s name, click Invoices. You’ll be returned to the library app’s default view.

12.    Your document will appear in the item listing with the metadata populated in the columns. For our example, you’ll see the Invoice # field contains LL-001, and the PO # field contains PO-100.

Figure 25: Invoice LL-001 with the Populated Metadata

Path

Using the Copy Link Feature

There are various ways to send a link in SharePoint. This step-by-step will walk you through the process of creating a link to a folder. We want to send this link to people who already have access to the folder but might not remember where it is or how to get there.
1.    In a web browser, navigate to the SharePoint site with the folder you want to share. The site’s home page will open.

2.    In the Suite bar, in the upper-right hand corner of the page, click the gear icon. The actions menu will open.

3.    Click Site contents. (If available, you can also navigate to Site Contents by clicking Site Contents in the Quick Launch.) The Site Contents page will open.

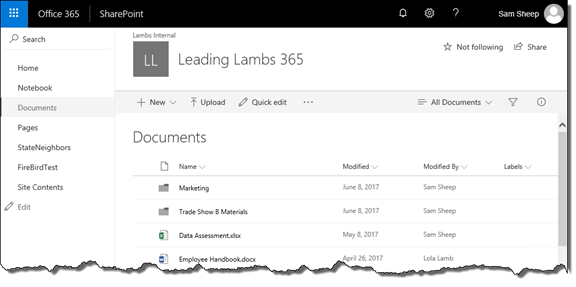
4.    Click the name of the library that has the folder you want to share. The library’s default view will open.

Figure 1: The Library App’s Default View

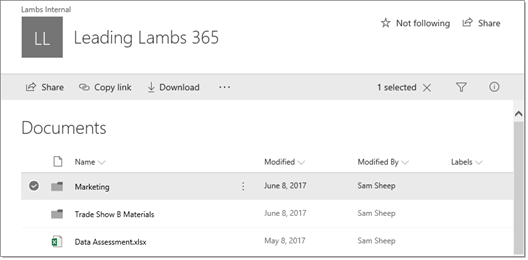
5.    To the left of the folder you want to share, click the checkmark. That folder will be selected.

Figure 2: The Selected Folder

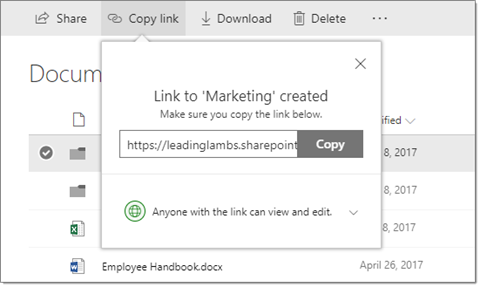
6.    In the command bar, click Copy link. You can also click the ellipsis control to the right of the item’s name to open the menu, then click Copy link. The Copy link menu will appear.

Figure 3: The Copy Link Menu

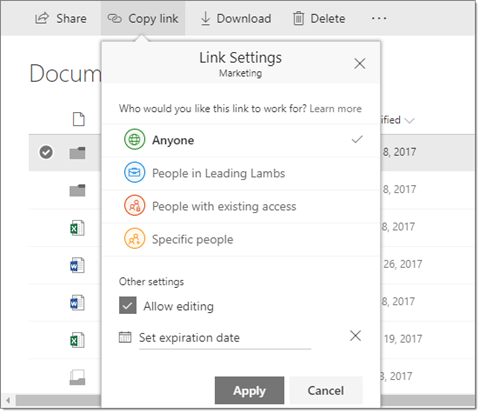
7.    By default, most sites are set up so that Anyone with the link can view and edit. (If guest access is not allowed for your site, the default permission will read People in [your organization] with the link can view and edit.) Click Anyone with the link can view and edit to change the permission settings. The Copy Link menu will change to show Link Settings.

Figure 4: The Link Settings Menu

8.    Because we need to send the folder’s link to people who already have permissions, click People with existing access.

9.    Click Apply. The Copy Link menu will collapse, and a new link will be created for people who already have access.

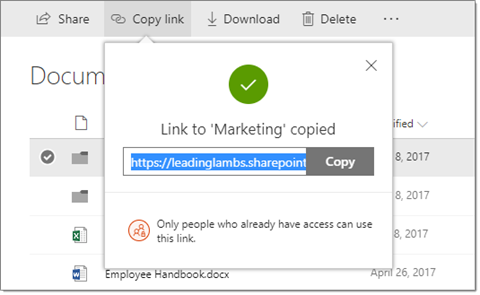
Figure 5: The Link for People Who Already Have Access Created

10.    Even though the link is automatically copied to your clipboard, you can click Copy to manually copy the link to the clipboard again. You can now paste the link in hyperlinks or in the body of documents or emails.

Rolodex

Now Available: Create an Azure Active Directory App White Paper

Even for those who are familiar with SharePoint, Active Directory, and Visual Studio, creating an app can be challenging. The difficulty isn’t always in designing the app itself; it’s in getting the programs to communicate with each other. We’ve created a white paper that walks you through the steps of creating an Azure Active Directory App that can read information from SharePoint. 

We discuss all the details, from packages and classes to keys and authentication, and we discuss some of the errors and mistakes you may encounter. In addition to the white paper itself, you’ll also get access to the screencast video, so you can get a live example of how to create an Azure AD application. 

Click here to get the white paper. When you sign up, we’ll send you an email with a link to download the document and follow along with the video. 

Security Pass

Set Browsers to Submit Credentials

This step-by-step teaches you how to configure a web browser to submit your login credentials for you. This task works for both the Internet Explorer and Google Chrome browsers.

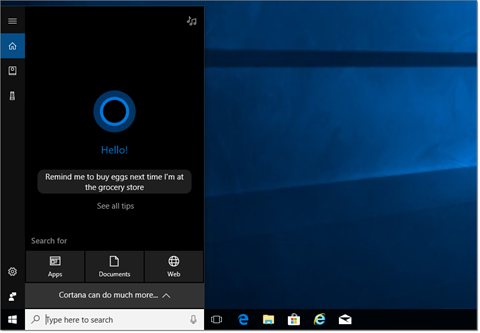
1.    Click Start or the windows key to open the start menu.

Figure 1: The Expanded Start Menu

2.    Type control panel. A list of matching results will appear.

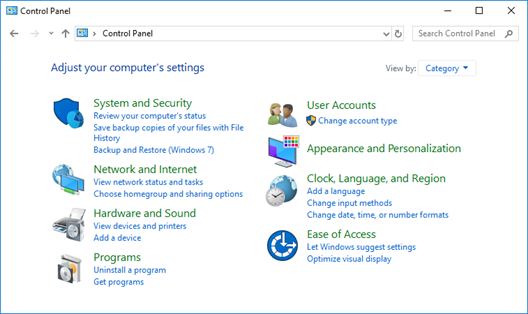
3.    Click Control Panel. The Control Panel will appear.

Figure 2: The Control Panel

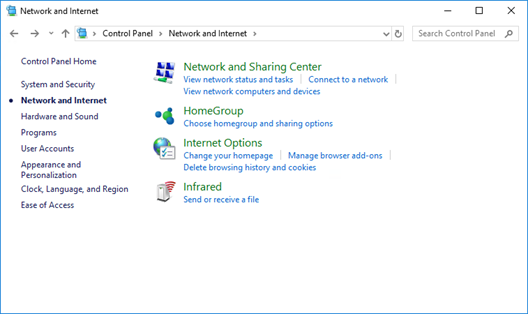
4.    Click Network and Internet. The network and internet options will appear.

Figure 3: The Network and Internet Options

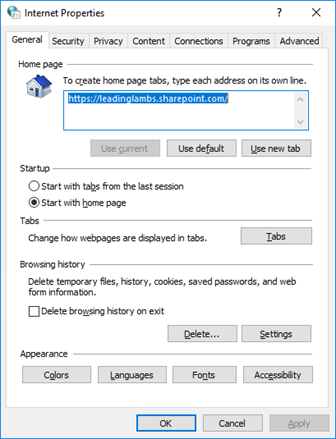
5.    Click Internet Options. The Internet Properties window will appear.

Figure 4: The Internet Properties Window

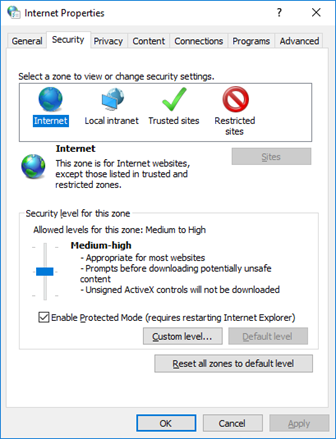
6.    Click the Security tab. The security settings will appear.

Figure 5: The Security Tab

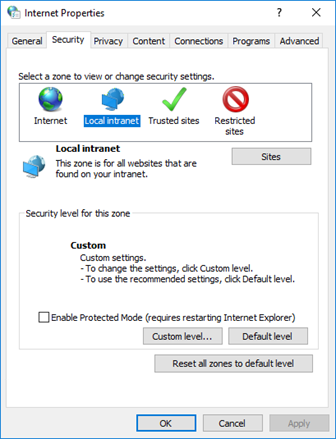
7.    Under Select a zone to view or change security settings, click Local intranet. The Local intranet zone information will appear.

Figure 6: The Local Intranet Zone

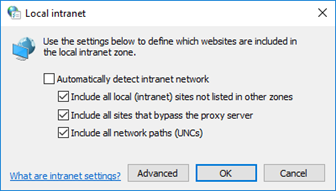
8.    To the right of Local intranet, click Sites. The Local intranet window will appear.

Figure 7: The Local Intranet Window

9.    Click Advanced. Another Local intranet window for adding and removing sites will appear.

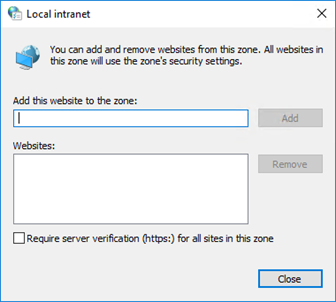
Figure 8: The Local Intranet Window for Adding Sites

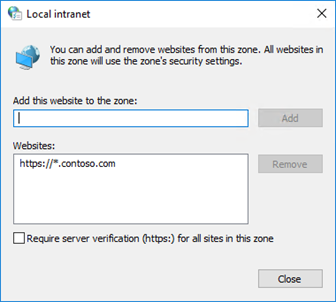
10.    Under Add this website to the zone, type the URL for your SharePoint domain. To make sure we capture all the sites in the domain, we’ll add an asterisk (*) before the domain name. It should look something like https://*.domain.com. For example, if our domain is contoso, the URL will be https://*.contoso.com.

11.    Click Add. The domain will be added to the local intranet list.

Figure 9: The Domain Added to the Local Intranet

12.    Click Close. The Local intranet window will close.

13.    To the right of Advanced, click OK. The original Local intranet window will close.

14.    At the bottom of the Internet Properties window, click OK. The changes will be saved, and the websites will be added as local intranet sites. The web browser will now submit credentials for you when you visit those sites.

Recent Posts

Public Speaking