Skip to content

SharePoint

chain

Setting Unique Permissions on a Links List


This step-by-step begins by creating a Links list. Links lists are specifically designed for housing links to internal and external web addresses. Once the Links list is created, we’ll add a few links to the list. Then we’ll learn how to break permission inheritance on individual items, which will allow us to change the permissions for that item.

Task 1: Create a Links List

First, we have to create a list that can hold our navigation links. Our example will use the name “Navigation Links” to identify this new list, but you can give the list any other appropriate name.

1.    In a web browser, navigate to the SharePoint site where you want to create a links list. The site’s home page will open.
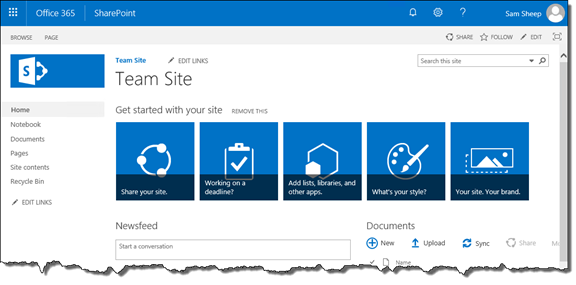
Figure 1: A Team Site’s Home Page

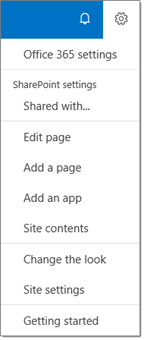
2.    In the Suite bar, in the upper-right hand corner of the page, click the gear icon. The actions menu will open.
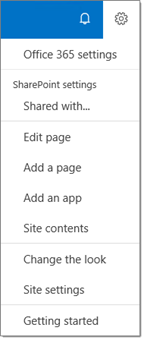
Figure 2: The Expanded Actions Menu

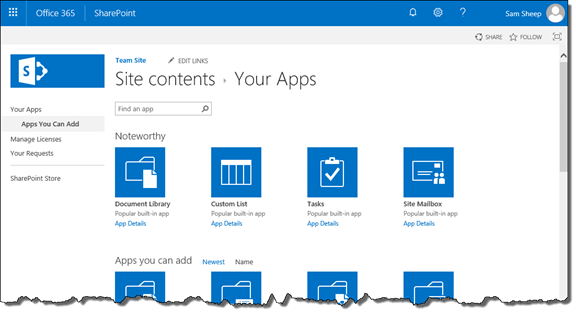
3.    Click Add an app. The Your Apps page will open.
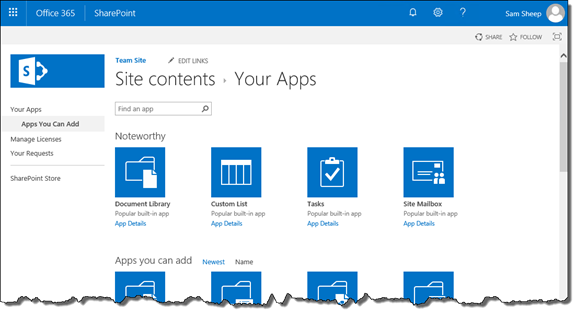
Figure 3: The Your Apps Page

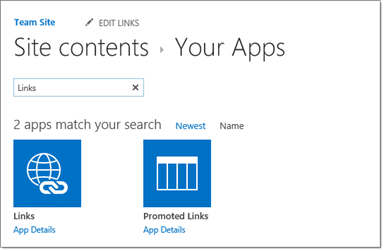
4.    Click on the Links tile. You can find this app by clicking on the “Find an app” search box, typing Links, then pressing Enter/Return. The Your Apps page will refresh to show matching search results for “Links”.
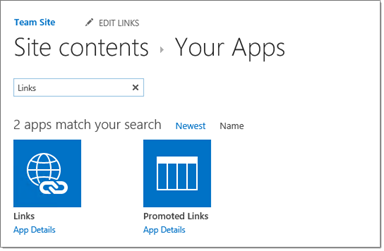
Figure 4: The Your Apps Page with Apps Matching “Links”

5.    When you click on the Links tile, the Adding Links dialog box will appear.

6.    In the Name field, type a name for your Links list, such as Navigation Links. We’ll use the name Navigation Links for the rest of this document to refer to this new list.

Figure 5: The Adding Links Dialog Box with the Navigation Links Name

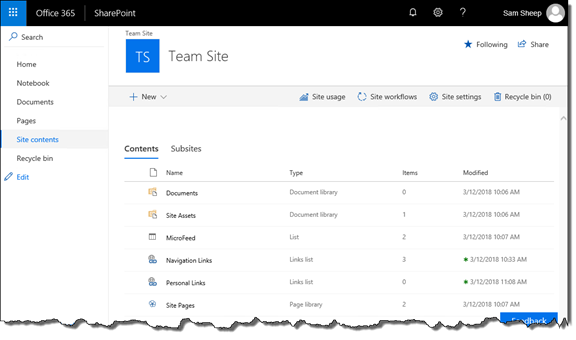
7.    Click Create. The dialog box will close, and you’ll be taken to the Site Contents page.
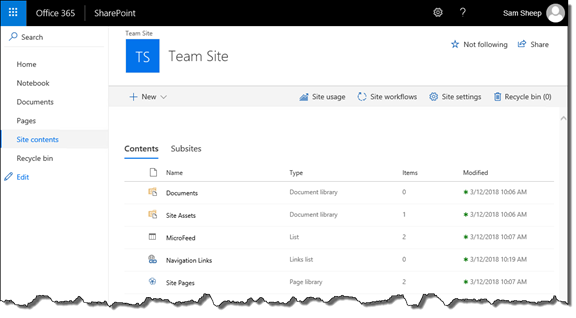
Figure 6: The Site Contents Page

8.    In the site contents listing, click the Navigation Links list. The Navigation Links list will open.
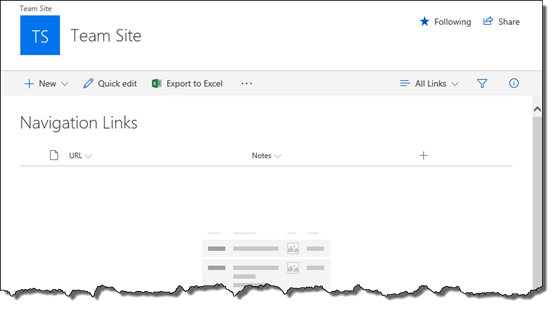
Figure 7: The Navigation Links List’s Default View

Task 2: Create Links in the Navigation Links List

Now that the Navigation Links list has been created, we need to start adding links to the list. Because these will be featured on the home page of your site later on, make sure these links are useful to the viewers of the list.

1.    In the command bar, click New. The New menu will expand.
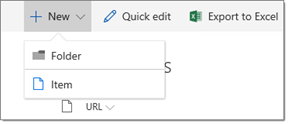
Figure 8: The Expanded New Menu

2.    Click Item. The New item pane will appear.
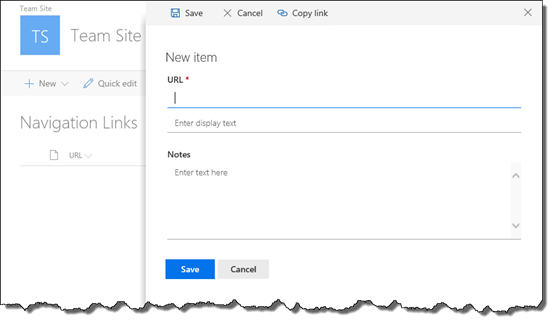
Figure 9: The New Item Pane

3.    In the URL field, on the top line, type the URL (or web page address) of the desired web page.

4.    On the Enter display text line, type a display name for the web page.
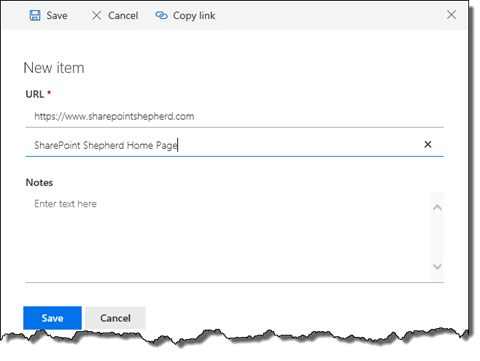
Figure 10: The Configured SharePoint Shepherd Home Page Link

5.    Click Save. The New Item pane will close, and the link will be added to the list. You may need to refresh the page to see the new link.
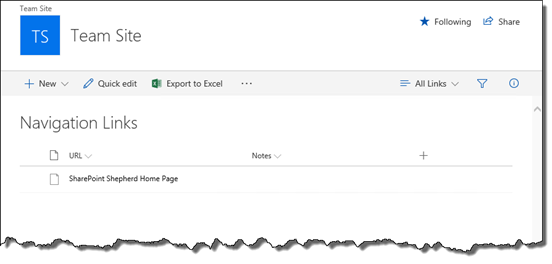
Figure 11: The New Link on the Navigation Links List

6.    Repeat steps 9-13 to add more links to the list as desired.

Task 3: Change Permissions for a Link

Now we’ll finally edit the permissions for the links. Some links might be useful for all of the visitors of your site. In this case, there’s no need to change those links’ permissions. However, you may wish to hide some links, such as links to sites that hold sensitive materials, from all but a select few users.

1.    Find a link you want to change permissions for. To the left of its name, click the checkmark to select that item.
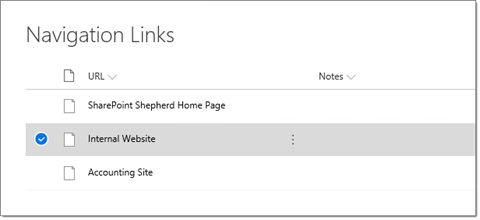
Figure 12: The Internal Website Link Selected

2.    In the command bar, click Share. The Send Link dialog box will open.
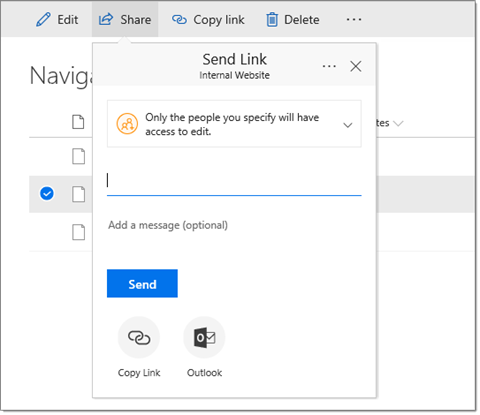
Figure 13: The Send Link Dialog Box

3.    To the right of Send Link, click the ellipsis control to show more options.
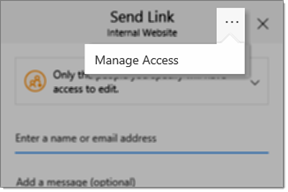
Figure 14: Additional Option in the Send Link Dialog Box

4.    Click Manage Access. The Manage Access pane will appear.
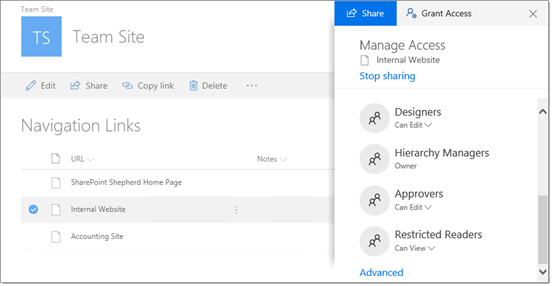
Figure 15: The Manage Access Pane with Advanced Visible

5.    At the bottom of the Manage Access pane, click Advanced. The Permissions page for the item will appear.
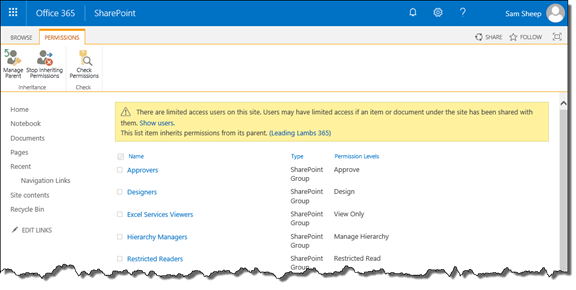
Figure 16: The Permissions Page for the Internal Website Link

6.    In the Permissions ribbon, click Stop Inheriting Permissions. A confirmation dialog box will appear.
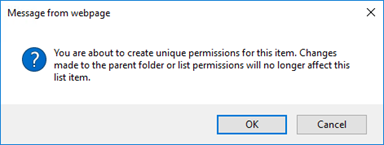
Figure 17: The Create Unique Permissions Confirmation Dialog Box

7.    Click OK. The Permissions page will refresh, and the item will now have unique permissions.
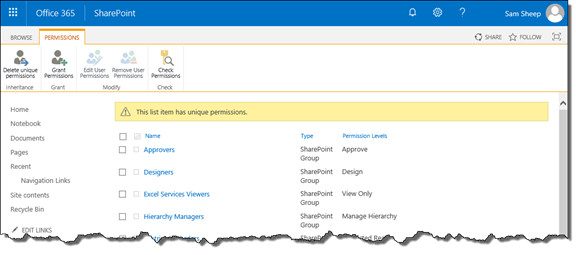
Figure 18: The Item with Unique Permissions

8.    We want to remove permissions for the Visitors and Members groups. To remove permissions for those two groups, click the checkmarks to the left of [Site Name] Members and [Site Name] Visitors. In the example below, the site name is Team Site.
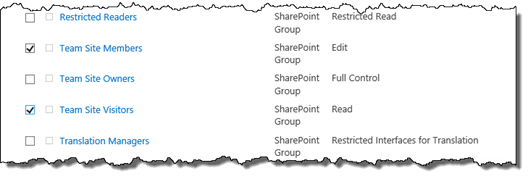
Figure 19: Team Site Members and Visitors Selected

9.    In the Permissions ribbon, click Remove User Permissions. A confirmation dialog box will appear.
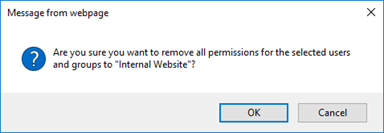
Figure 20: The Remove All Permissions Confirmation Dialog Box

10.    Click OK. Permissions will be removed for the Visitors and Members groups, and the Permissions page will refresh. The item will now no longer be visible for anyone in the Visitors or Members groups when viewing the list.

11.    To add individual permissions for individual users or groups, in the Permissions ribbon, click Grant Permissions. The Share dialog box will appear.
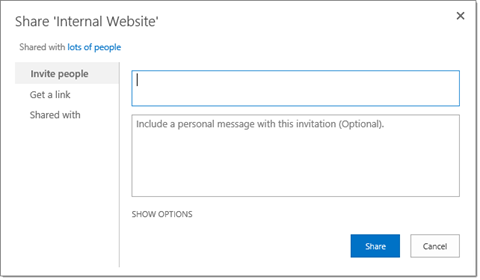
Figure 21: The Share Dialog Box

12.    Start adding the names of the groups you want to grant permissions to. As you type, a list of matching results will appear. You can click the name to complete the entry.

13.    Click Show Options. More options will appear.
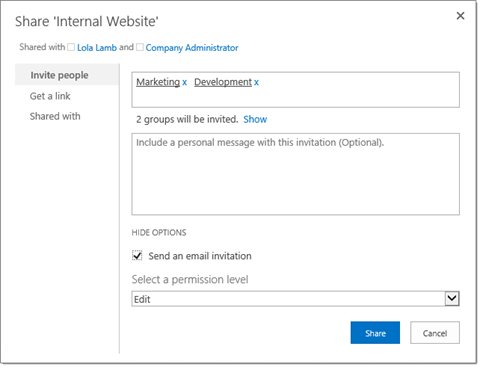
Figure 22: The Expanded Share Dialog Box

14.    Under Select a permission level, select the desired permission level from the list. By default, Edit is selected, but you can click the drop-down arrow to open the menu and select another permission level.
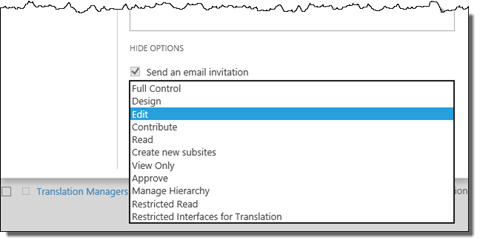
Figure 23: The Expanded Permissions Menu

15.    Click Share. The Share dialog box will close, and the item will now be visible for that group.

16.    To return to the Navigation Links list, click the Browse tab to close the ribbon.
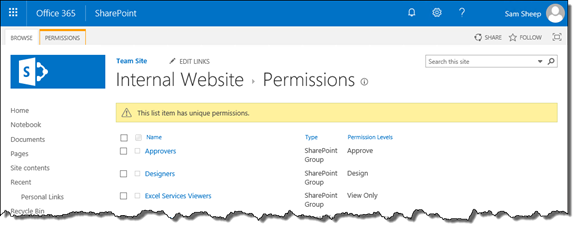
Figure 24: The Breadcrumb Bar Visible on the Permissions Page

17.    In the breadcrumb bar, to the left of Permissions, click the name of the item (in this case, you’d click Internal Website). You’ll be taken to the item’s properties page.
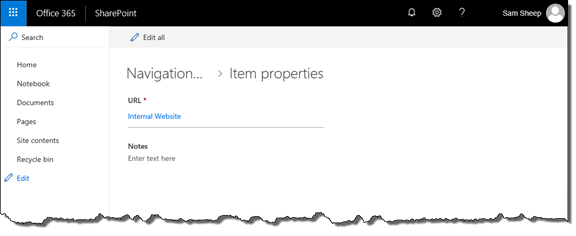
Figure 25: The Item Properties Page

18.    In the breadcrumb bar, to the left of Item properties, click Navigation Links (in the example, this is visible on screen as Navigation…). You’ll be taken back to the Navigation Links list’s default view.

19.    Repeat steps 1-18 to change the permissions for any other desired links.

Task 4: Add the Navigation Links Web Part to the Home Page

Finally, we’ll add these navigation links to the home page. We can do this by adding a web part to the page that shows a view of the list to users. The permissions that were set on the links apply to the view shown, so each person viewing the home page might see different navigation links depending on their own permission levels. Keep in mind that you won’t be able to add the desired web part to a modern site page, because the List (preview) web part does not support Links lists at the time of this writing.

1.    Return to the home page of the site. You can do this in the quick launch by clicking Home, or by clicking the site’s logo or name in the top navigation. The site’s home page will open.

2.    Follow the steps outlined in the SharePoint Shepherd’s Office 365 Guide task, “Add a Web Part to a Wiki Page” or “Add a Web Part to a Web Part or Publishing Page,” depending on the type of page you’re working on. To select the web part for the Navigation Links list, under Categories, click Apps, and under Parts, click Navigation Links. Then finish the steps of the task.
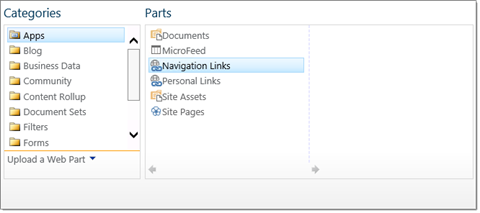
Figure 26: The Navigation Links List Ready to Be Added to the Page

train car hook coupler

Creating a Personalized Links List


These are step-by-step instructions for creating a links list that will only show the items individual users created. By using a web part, you can feature the most important links on the front page of a site. This task will walk you through adding a web part to the home page of your site. Because of the 5,000-item limit for views, if you have a very large organization, you may need to use a different solution if you think your organization will reach 5,000 links total or more.

Task 1: Create a Personal Links List

The first step is to create a list for users’ personal links. Our example will use the name “Personal Links” to identify this new list, but you can give the list any other appropriate name.

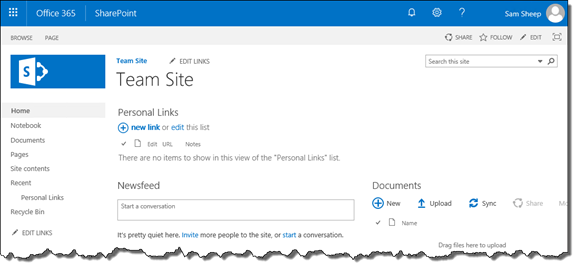
1.    In a web browser, navigate to the SharePoint site where you want to create a links list. The site’s home page will open.

Figure 1: A Team Site’s Home Page

2.    In the Suite bar, in the upper-right hand corner of the page, click the gear icon. The actions menu will open.

Figure 2: The Expanded Actions Menu

3.    Click Add an app. The Your Apps page will open.

Figure 3: The Your Apps Page

4.    Click on the Links tile. You can find this app by clicking on the “Find an app” search box, typing Links, then pressing Enter/Return. The Your Apps page will refresh to show matching search results for “Links”.

Figure 4: The Your Apps Page with Apps Matching “Links”

5.    When you click on the Links tile, the Adding Links dialog box will appear.

6.    In the Name field, type a name for your Links list, such as Personal Links. We’ll use the name Personal Links for the rest of this document to refer to this new list.

Figure 5: The Adding Links Dialog Box with the Personal Links Name

7.    Click Create. The dialog box will close, and you’ll be taken to the Site Contents page.

Figure 6: The Site Contents Page

8.    In the site contents listing, click the Personal Links list. The Personal Links list will open.

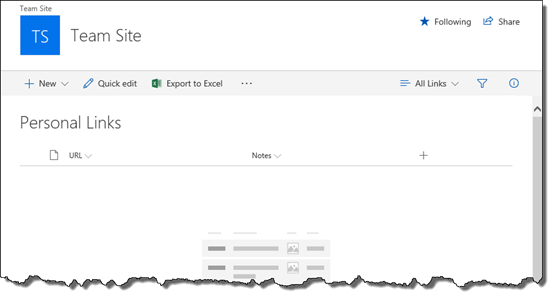
Figure 7: The Personal Links List’s Default View

Task 2: Change the Item-Level Permissions Settings

Now that the list has been created, we have to change the settings so that users will only be able to see and edit their own links. The easiest way to do this is by going into the Item-Level Permissions settings, which are found on the Advanced Settings page.

1.    In the Suite bar, in the upper-right hand corner, click the gear icon to open the actions menu.

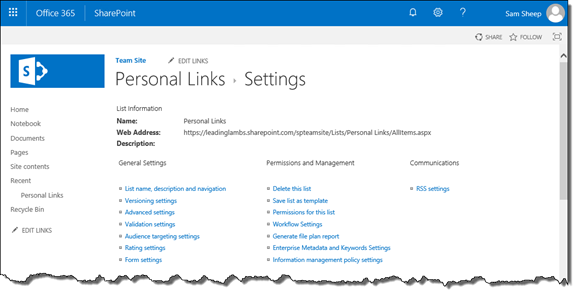
2.    Click List settings. The Personal Links settings page will open.

Figure 8: The Personal Links Settings Page

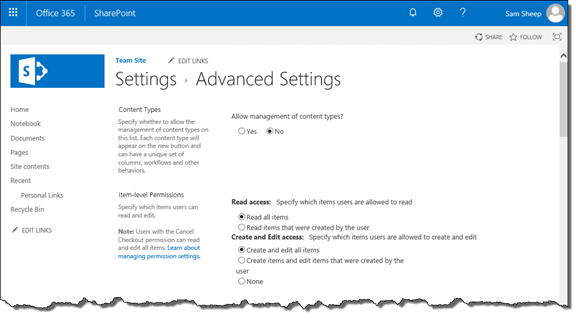
3.    Under General Settings, click Advanced Settings. The Advanced Settings page will open.

Figure 9: The Advanced Settings Page

4.    In the Item-level Permissions section, under Read access, click the Read items that were created by the user radio button.

5.    Under Create and Edit access, click the Create items and edit items that were created by the user radio button.

Figure 10: The Configured Item-level Permissions Section

6.    At the bottom of the Advanced Settings page, click OK. You’ll be returned to the Personal Links settings page.

Task 3: Add the Personal Links Web Part to the Home Page

Now we’ll add the personal links to your site’s home page. We do this by adding a web part to the page that shows a view of the list to users. This will enable users to quickly add links that are important to them directly from the home page of the site. Keep in mind that you won’t be able to add the desired web part to a modern site page, because the List (preview) web part does not support Links lists at the time of this writing.

1.    Return to the home page of the site. You can do this in the quick launch by clicking Home, or by clicking the site’s logo or name in the top navigation. The site’s home page will open.

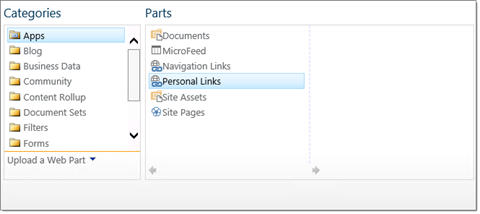
2.    Follow the steps outlined in the SharePoint Shepherd’s Office 365 Guide task, “Add a Web Part to a Wiki Page” or “Add a Web Part to a Web Part or Publishing Page,” depending on the type of page you’re working on. To select the web part for the Personal Links list, under Categories, click Apps, and under Parts, click Personal Links. Then finish the steps of the task.

Figure 11: The Personal Links List Ready to Be Added to the Page
Task 4: Add Links to the Personal Links List

Once you’ve followed the steps for adding the Personal Links web part to the page, you can now direct users to add their own links to the list. You don’t have to send them to the list itself to create their links – they can add them directly on the home page of the site. You can send them these instructions to add their links to the home page.

1.    Navigate to the home page of the site. You can do this in the quick launch by clicking Home, or by clicking the site’s logo or name in the top navigation. The site’s home page will open.

Figure 12: The Personal Links Web Part Visible on the Wiki Page Home Page

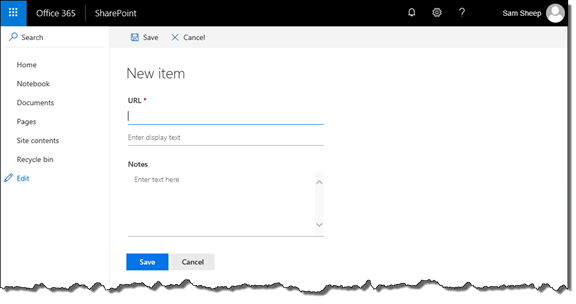
2.    Under Personal Links, click new link. The New item page will open.

Figure 13: The New Item Page

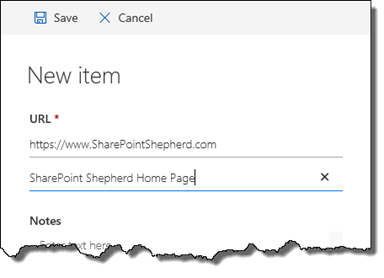
3.    In the URL field, on the top line, type the URL (or web page address) of the desired web page.

4.    On the Enter display text line, type a display name for the web page.

Figure 14: The Configured SharePoint Shepherd Home Page Link

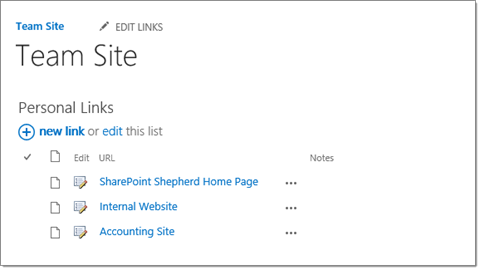
5.    Click Save. The item will be added to the Personal Links list, and you’ll be returned to the home page. The new link will appear under Personal Links. It will only be visible and editable for the user who created the link.

6.    Repeat steps 18-21 to continue adding links as desired.

Figure 15: New Personal Links Visible on the Home Page

squeeze

Sharing and File Placement – The House Model

With all the options for where to place files and share them on the Office 365 platform, it’s difficult to know where you should put files and how you should share them. If you use a house model for thinking about sharing documents, you can make it quick and simple for you – and your colleagues – to make good decisions on file placement.

The Office 365 Options

On the Office 365 platform, you get OneDrive, SharePoint, Groups, Teams, Exchange, and a host of other tools that can be used to share information. However, knowing which one to use when, can be challenging. (If you want to know more about the problem with choices, see The Paradox of Choice.) However, there’s some relatively straightforward guidance once you get past the noise.

The biggest area of confusion surrounds SharePoint, Office 365 Groups, and Teams. This can be simplified when you realize that Groups and Teams both use SharePoint for file storage. Some of the rough edges about these integrations and the ability to use the sites created for Groups and Teams directly as a SharePoint site are getting rounded off. Soon, the only visible difference between a site created for a group or a team will be just the appearance. With this simplification, we’re left with OneDrive, SharePoint, and Exchange. These can be thought of this way:

  • Exchange (and Outlook) – One-time exchange of a file. It’s a bad plan if there’s collaboration happening where multiple people will be modifying the file and creating multiple versions – but it’s the historical approach to share a file.
  • SharePoint – When you’re sharing files in a team or inside the organization to a few – or many people – SharePoint’s the first choice. It’s designed to be a space for collaboration.
  • OneDrive – OneDrive replaced the concept of personal or home drives on a network. OneDrive is intended to be personal space where you’re not routinely sharing information with others.

One complication is that there’s some difference between the kinds of sites that you have in SharePoint. Some sites are designed for team collaboration, and some sites are designed for organizational communication. Because you can have multiple SharePoint sites, and they can have different purposes, it’s important to realize that placing files on SharePoint means additional decisions about which site to place the file in.

The Doll House

Let’s think about the sharing options differently. Let’s think about them in the context of how you share your home with others. If you’re at least moderately social, you’ll invite people over to your house. However, even when you’re inviting others over, not everyone is invited to roam your house freely.

Consider that only a few people are invited into your bedroom – and typically only for a small set of reasons. Access to the bedroom is private space and therefore requires more trust, safety, and need. You may want to think about your personal OneDrive as your bedroom. You only invite people to be in (share) your bedroom in very narrow circumstances.

Kitchens tend to be the focal point of gatherings. There’s a tendency for your friends to hang out in the kitchen – probably not the least of the reasons being food. Kitchens are a place that friends and acquaintances are invited on a regular basis. SharePoint sites, like kitchens, are made for sharing, and invitations generally flow quickly.

Moving past friends to those that you know only remotely or casually, you would likely invite them into your foyer or entryway for a short time to get out of the rain or cold. When the neighborhood association president stops by, even if you don’t like them, you’ll typically invite them into the entryway of your home for at least a few moments before wishing them on their way. This is the kind of sharing accomplished via email. You don’t expect – or hope – that they’ll be back, and you have a level of trust that they’ll do the right thing with the document, but you don’t trust them more than that.

Despite the dizzying array of sharing options on the Microsoft platform, you can make informed decisions by considering just how far into your house you want to let people in – and for how long.

Implementing Information Management on SharePoint and Office 365

Announcing the Implementing Information Management on SharePoint and Office 365 Course

I’m pleased to announce that today my Implementing Information Management on SharePoint and Office 365 course went live on the AIIM web site. This project has been a long time coming both from the most recent development of the content and the history.

It was 2010 when I was meeting with the Microsoft product teams for the development of what would become the SharePoint ECM Implementers course. It was available for a few years internally and to partners and ultimately was available in its recorded version online. It’s long since been removed. It’s too bad, because, as I speak at conferences, I consistently find people who are struggling to leverage SharePoint as their enterprise content management system.

The opportunity came up to help translate the good work of AIIM’s ECM Master program into a pragmatic implementation guide for SharePoint and Office 365, and I jumped on it. I started from the conversations I’ve had with the product team – and with organizations looking for a way to implement SharePoint successfully – and created a brand new four-day instructor-led course. Then I took the course and recorded all the instruction and the labs to turn it into an online offering par excellence.

The online course includes a 715-page student/lab manual, 324 minutes of recorded instruction and 181 minutes of recorded labs. The course gives you everything you need to be successful with SharePoint and Office 365. It covers thorny topics like retention and records. It explains how to leverage search to create findability. It makes the use of site columns, content types, and content type hubs real. It even walks step-by-step how to manage security in the environment, how to create user experiences, and dozens of other important topics that are relevant whether you’re using SharePoint Online or you’re running SharePoint on your premises.

Contact us for more information on the Implementing Information Management on SharePoint and Office 365 course.

Merge sign

Merging from SharePoint Lists in Word with Images (via Access)

Recently, we were asked to create a cleaning book that has a set of materials on objects in rooms. There were a relatively small list of fabrics and a relatively small number of objects that used those fabrics, but we had to create a cleaning plan for each room, which included instructions for every object in the room. It was all relatively straightforward – until we had to insert the images for the objects and fabrics and include fields with multiple lines of text.

We started by thinking we’d just project the columns through lookup fields. This would allow us to enter the fabric cleaning information once and have it show up multiple times. Unfortunately, you can’t project fields of some types – including multi-line columns. No problem. We can do that in Microsoft Access. We link to the external lists and join them with a query and we get all the columns that we want. That was great until we realized that the report generator won’t allow you to get images dynamically from web URLs.

That’s OK – we can use Word and do a mail merge off the Access query with all the data. Except you can’t have an image as a merge field. Ultimately, we created the mail merge with the URLs getting dumped out in the report – and I wrote a quick VBA macro/script which converts the URLs into pictures.

The script is designed for our needs – so use at your own risk. It looks for the # markers that appear that the edges of the URL. It utilizes #http:// to find the start and then extends to the next #. If the user entered a label for the URL, it will appear before that, so we expand the selection before inserting the image. (An enhancement would save the label to add as alt text.) The script also doesn’t allow any of the images to exceed 2.5″ in height – so our cleaning instructions will stay on one page.

The script is below if you need something similar.

Sub InsertImages()
Dim url As String
Dim pic As InlineShape
Dim maxPicHeight As Integer
maxPicHeight = 2.25 * 72 ‘ Maximum size in points – 72 per inch
With Selection.Find
Selection.GoTo wdGoToLine, wdGoToFirst, 1 ‘ Go to top of file
.ClearFormatting
.Text = “#https://” ‘ Find URL start
.Execute
While .Found ‘ while we found a start
Selection.Extend “#” ‘ Extend to the end of the URL
url = Mid(Selection.Text, 2, Len(Selection.Text) – 2) ‘ get URL minus bumpers
Selection.Expand wdLine ‘ Get the rest of the line
Selection.End = Selection.End – 1 ‘ Don’t take the cell/paragraph mark
Set pic = Selection.InlineShapes.AddPicture(url, False, True) ‘ Insert Shape
If (pic.Height > maxPicHeight) Then ‘ If Larger than max height then scale
pic.LockAspectRatio = True ‘ Technically unnecessary, ensure that width and height scale together
pic.ScaleHeight = maxPicHeight / pic.Height * 100 ‘ Set scale of image to get to desired height
End If
.Execute ‘ Execute next search to see if we have more
Wend
End With
End Sub

It was amazing the number of blind paths we went down before being able to generate a report from SharePoint lists which had images, multiple lines of text, etc., and looked good when we were done.

cash register

SharePoint Calculated Column Field Formulas – Alphabetically

I’ve been working on some new course material and I wanted to verify the list of functions that could be used in a calculated column and realized that the list that was available from Microsoft wasn’t in a meaningful order – so I’ve alphabetized the list. I included it here for those who want it.

  • ABS() – Absolute. Remove the negative if present
  • AND() – Logical And. Return true if both clauses return true.
  • AVERAGE() – Average value. The average of all the provided parameters
  • CONCATENATE() – String concatenation. Concatenates every parameter provided and returns it as a single string.
  • COUNT() – Count the values. Returns the number of values provided.
  • COUNTA() – Count the non-null values. Returns the number of non-null values returned.
  • DATE() – Create a date. Given a month, day, and year return a date
  • DATEDIF() – Difference between dates. Given two dates, return the difference between them.
  • DAY() – Day of month. Given a date return the day of month.
  • EVEN() -Round up to the nearest even number.
  • EXACT() – Exact comparison. Given two values return true if they are exactly the same
  • FIND() – Find a string in another. Returns the position of the first string in the second or null if not found
  • HOUR() – Returns the hour of day. Given a date time column returns the hour of day
  • IF() – Return results based on a comparison. If the first parameter is true return the second parameter otherwise return the third parameter
  • INT() – Returns an integer. Given a number returns the integer portion.
  • ISERROR()- Is the parameter an error. Returns true if the parameter is an error and false if it is not.
  • ISNUMBER() – Is the parameter a number. Returns true if the parameter results in a number and false if not.
  • LEN() – Length of a string. Returns the number of characters in a string.
  • LEFT() – Left portion of a string. Returns from the first parameter the number of characters specified in the second.
  • LOWER() – Convert string to all lower case. Returns the string provided but in all lower case.
  • MAX() – Maximum. Returns the maximum of the provided parameters.
  • MEDIAN() – Median. Returns the number at the median of the provided set of parameters.
  • MIN() – Minimum. Returns the smallest of the provided parameters.
  • MINUTE() – Minutes after the hour. Returns the number of minutes after the hour from a provided date time parameter
  • MONTH() – Month of year. Given a date returns the month of year.
  • NOT() – Logical not. Returns true if the parameter results in false and false if the parameter results in true.
  • ODD() – Round up to the next odd number.
  • OR() – Logical Or. Returns true if either of the parameters result in true.
  • POWER() – Exponent. Raises the first number to the power (exponent) of the second.
  • PRODUCT() – Multiply. Multiplies the provided parameters
  • PROPER() – Proper case a string. Initial capitalize the string.
  • REPT() – Repeat character. Repeat the string provided in the first parameter the number of times specified in the second parameter.
  • RIGHT() – Right portion of the string. Return from the first parameter string the number of characters specified in the second parameter – from the end of the string.
  • ROUND() – Round. Round the number to the nearest whole number (up or down).
  • ROUNDDOWN() – Round down only. Round the number down to the nearest integer.
  • ROUNDUP() – Round up only. Round the number up to the nearest integer.
  • SECOND() – Seconds after the minute. Given a date time parameter, return the number of seconds after the minute.
  • SUM() – Arithmetic sum. Add the parameters together
  • TEXT() – Convert to string. Format the first parameter according to the format specification in the second parameter.
  • TRIM() – Remove spaces. Removes spaces from the front and end of a string.
  • UPPER() – Upper case string. Converts a string to all upper case.
  • WEEKDAY() – Day of Week. Returns the day of week for a date time parameter
  • YEAR() – Year. Returns the year for a given date time parameter

There you have it, the list of functions that are supported in calculated columns.

Comparing SharePoint On-Premises to SharePoint Online

Comparing SharePoint On-Premises (Apples) to SharePoint Online (Oranges)

I get asked about whether SharePoint on-premises or SharePoint Online is right for the organizations I work with – or whether they should leverage the power of “and” and use both. In this quick video (3:42), I cover the basics about why you should choose one vs. the other – or whether both is the right answer.

Take a look and see if this answers the questions that you have https://youtu.be/eFCAclzQIKU

If you need more information, feel free to reach out.

The SharePoint Shepherd's Guide for End Users Ultimate Edition DVD Face

The Making of The SharePoint Shepherd’s Guide for End Users: 2016

A few weeks ago, we launched the 2016 version of the SharePoint Shepherd’s Guide for End Users. This is our fourth build of the productivity aid and book since its 2007 release. Updating and delivering the content is something we know how to do. Our big achievement for this release wasn’t in the content – though it continues to get better – the big advancements this time was transforming the way the content looked when it was deployed to SharePoint.

Goodbye Wiki Version, Hello Publishing

We often spoke of the corporate edition by calling it the “wiki” edition. That was because the corporate edition deployed as a wiki library in the client’s SharePoint. This was convenient, because it allowed users to be able to modify the pages on their own. It also meant that we could sell the Shepherd’s Guide to users with Windows SharePoint Services or SharePoint Foundation and they would be able to use it because wiki libraries were available in every version of SharePoint.

However, times have changed. Microsoft is no longer offering a SharePoint Foundation version, and therefore every customer for SharePoint 2016 will have at least SharePoint Server Standard, which includes publishing pages. For us, this was great, primarily because it allowed us to solve some formatting problems that had plagued the content due to the nature of the wiki’s HTML processing (or mangling) engine.

If you read the book you saw that we had full-color highlights in the text to indicate which things you were supposed to click on. When we generated the HTML for the wiki, these were stripped by the HTML engine. We lived without these highlights that we had painstakingly put into the content because there wasn’t a solution. However, with the 2016 version and the migration to publishing pages, we could get them back in the corporate edition.

The use of the publishing feature allows us to structure the content better and improves some other handling, but the big value of this move is in how we allow you to customize your content.

Customizing Content

One of the hallmarks of the SharePoint Shepherd solution since its initial release has been the ability to customize the content. You can customize what we provide as well as adding new content of your own. None of the other help solutions for SharePoint allow you to do this. It’s been one of the things that customers have repeatedly told us was essential to their needs. They were using the Shepherd’s Guide to get a head start on their support for their users, and customizing was a big deal.

Historically, we’ve not needed to do many updates to the content once it was released. Microsoft started changing this in SharePoint 2013 when they changed SkyDrive to OneDrive post-release. The changes for SharePoint 2016 are anticipated to include the new modern UI. That meant we had to plan for situations where we were updating content and users were updating the same content. We needed an elegant way to manage updates in a more fluid way.

The switch to publishing allows us to do this. We track the version of the content we deploy. If the user changes the content, we detect this and we don’t overwrite their content. Instead, we post a non-major version of the content into the library. The impact of this is that editors can look for items which aren’t published as major versions to evaluate the content that we have updates for and decide whether to keep their changes our ours. It also means that the standard tools in SharePoint work to help you identify changes in the content.

In doing this we’ve delivered a way for you to both receive updates and to customize your content at the same time.

Multiple Versions

While listening to customers, we began to hear about organizations that were struggling with multiple versions of SharePoint. They had everything from SharePoint 2007 through Office 365 and the support staff was struggling to provide answers on how to do things no matter what the version of SharePoint. So, we added support for multiple versions of the Shepherd’s Guide content – including the ability to instantly shift from one version of the content to another – from every page.

If you’re looking at a task in the 2016 version, you can go back to the 2007 version of the guide because that’s the actual version you’re trying to use – or the user interface is stuck in that version. Users can find the version of the guide that matches their user interface and get the help they need.

The Ultimate Solution

While we still sell the Shepherd’s Guide by version as a one-time purchase, we’ve added a new way to get the guide. The Ultimate Guide includes every version of the guide we’ve published, including updates. As Office 365 continues to evolve, we’ll publish updates and provide them as a part of The SharePoint Shepherd’s Ultimate Guide for End Users. This subscription-based offering will allow you to have all the end user support content you need for your users no matter what version they’ve been on – or will be on.

The ultimate solution allows you to create your own content, edit ours, and stay up to date all at the same time. There’s no reason to build your own support content for SharePoint. We’ve got that covered.

Look at what we’re doing with the ultimate guide on the SharePoint Shepherd site at www.SharePointShepherd.com/Ultimate.

OneDrive Sync Offline

OneDrive Sync to a SharePoint Library with a Required Field

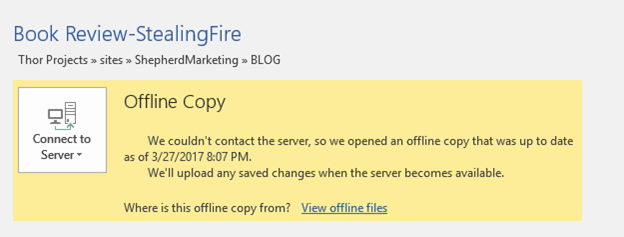
A few months ago, I upgraded to the next generation sync client for OneDrive for all my synchronization to SharePoint libraries, and one of my libraries – on all the computers I synchronize to – had a problem. When I would try to edit files from the library, Word was complaining that the files were read-only, or I was out of space. When I went to the back office, it showed me that the file was an offline copy.

In file explorer, I saw little green locks overlaying the document icon.

I couldn’t figure out what the issue was because check in/out wasn’t required, or even turned on, in the library. Approvals weren’t required and versioning was set for major versions. None of the files were declared as in-place records, nor were they on a legal hold. I ultimately disabled a workflow to find that it wasn’t an issue with workflows running on the library. I was mystified until I walked someone through every field on the list. I realized that one of the fields – status – was a choice field with a default set, but it was also set to required. As soon as I set the field to not required, every file in the library resynchronized and the lock icon disappeared and was replaced with a checkmark (indicating it had synchronized).

So, even though all of the documents had the required field, and a default was provided, OneDrive (the new sync client) refused to synchronize the library correctly with a required field. Because of the integration between OneDrive and the Office applications, they were refusing to sync files too.

If you’re wondering why you can’t save documents or why you have little green locks… perhaps all that’s required is to set the fields to not be required.

The End User's Guide to Manual Migration

Announcing: The End User’s Guide to Manual Migration

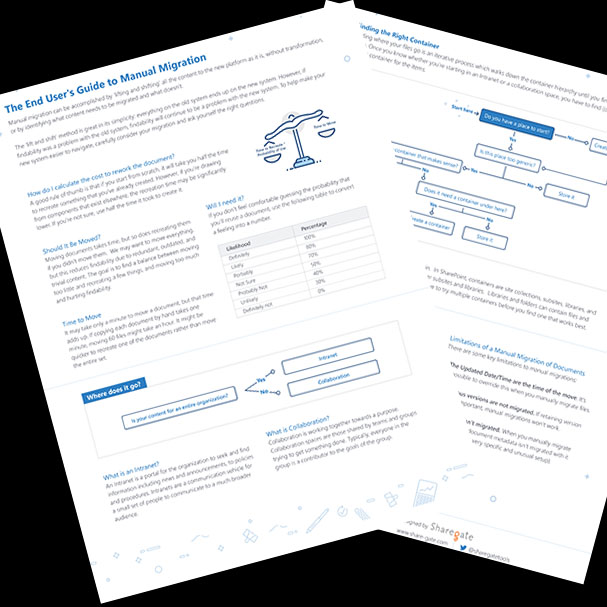
Over the years, I’ve helped numerous clients migrate from one implementation of SharePoint to another. Sometimes this was because of version upgrades, sometimes as they migrated to the cloud, and sometimes just because their first implementation was so “challenging.” Over the years, I picked up a few useful ways to think about the migration process when you’re asking a user to do it. I created a two-page guide (one sheet, double-sided) that we would share with every user as a part of the migration process. However, it didn’t look that good.

So, I partnered with Sharegate to help “make it pretty”. The result is available on their web site at https://get.share-gate.com/manual-migration-reference-guide. It may seem weird that an organization that sells migration tools would be interested in helping you know how to do it yourself. However, the truth is, they care about you getting to the new platform. In some cases, the right answer is their tools. In other cases, the right answer is for the users to migrate the content themselves. If you’re looking for a guide that you can share with your users, check it out.

Recent Posts

Public Speaking