Skip to content

SharePoint

Practical SharePoint Development for the Core Team and Beyond

If you’ve been reading my blog over the last several years you know that I’ve got a ton of technical posts including posts about both infrastructure issues (like claims, Kerberos, and performance) as well as development concerns. However, lately I’ve left the technical blog posts to some of my contemporaries. While I’ll occasionally blog (or log) my technical issues, their root causes and resolutions, I’ve been much more focused on the business and organizational issues of SharePoint. However, this post has to unify those views. Customers are coming to me and asking whether they should be doing SharePoint App development – and when. (Complicating the matters are that Microsoft has renamed SharePoint App development to Add-in development and has released another model for development for Office 365 applications.) While the answers are simple in some cases, they get complicated fast. However, there are answers to the questions.

In the Beginning

On the first day of SharePoint there was the SharePoint 2001 based on ASP (not ASP.NET) and it was not so good but we customized it to make it acceptable. On the second SharePoint Day we got SharePoint 2003 and the ability to use ASP.NET (and the SQL based file engine). It was good because we could customize it and add our .NET goodness to it. On the third SharePoint day we got SharePoint 2007 and the package solutions and it was too good. Suddenly everyone wanted to be able to develop their applications on the SharePoint platform. As a result many of the support calls Microsoft received were because of poorly performing code that customers had written. On the fourth SharePoint day we got SharePoint 2010 complete with its Sandbox for code we didn’t trust. The problem with this is that while it worked for corporations who had rogue development organizations internally that weren’t controlled by corporate IT, it didn’t work at the scale of the cloud. There were some things which couldn’t be protected against. On the fifth day of SharePoint we got SharePoint 2013 and the brand new model of development – Apps. From a hosting perspective, Apps are great. No code ever runs on the server and therefore it’s not possible for applications to bring down the server. (Again, Microsoft recently renamed this type of development to Add-ins.)

All would be good if Sandbox solutions and Apps could use the same skills the developers already had, the same coding styles, and could solve all the same problems. The problem is that this isn’t the case. Sandbox solutions had a set of limitations based on how they were implemented. For instance, you couldn’t access the page object to include script you needed. Apps are substantially different than solutions development – either full trust or sandbox. And that’s where the rub comes in.

Smart car or Semi-trailer Tractor

The problem is that the SharePoint solutions were a Semi-trailer Tractor. You could do anything with them. You can pull along branding, custom solutions, recurring timer jobs, configuration, etc. However, if someone fell asleep at the wheel it caused a multitude of problems from performance to stability and even in some cases data integrity. That’s why the Sandbox solution was designed. What if we could get folks into a big pickup truck? They couldn’t carry as much, they wouldn’t be able to do as much – but at least if they fell asleep at the wheel – or if they were malicious – they couldn’t do as much damage. The problem is that the available damage wasn’t tolerable at scale.

On the other end of the spectrum is something like a Smart car. When I see them on the street I tend to comment that there goes half a car. They’re efficient, small, and are quite capable of transporting two human beings from one location to another. Federal census data from 2009 indicates that 76% of American workers drive to work alone. If 3/4ths of the time you don’t need to have any passengers – let alone carry cargo, why would you drive around a big Semi Tractor and Trailer?

The way that you drive a Semi-tractor trailer is different than the way that you drive a half a car.

Differences

The car to semi analogy breaks down when we start to think about how they’re actually technically different. Certainly the capabilities are different and they’re optimized for different things. When used for what they’re designed for they’re both great answers. However, in that analogy both drive fundamentally the same way. There’s a steering wheel, gas, and a break. The Semi might have manual shifting and the Smart car an automatic transmission but fundamentally they behave the same. However, the way that Apps (and Add-ins) are designed and the way that traditional solutions were designed are substantially different.

Consider that there are two ways to balance a budget. One way is to increase your income from another job, a second job, or working more hours. The other way is to downsize your house, replace your car with a less expensive solution, cut out cable, and eat less expensively. Which approach is right? Both. They’re just two sides of the same coin. Both of these aren’t really equal, however, because it takes a disproportionate change in income compared to the same reduction in expenses. Said more plainly you have to change your income more dramatically than the same amount of savings. Why? Because of taxes and other ways that making more money doesn’t return 100% of the gain to your bottom-line budget.

Apps are a similar situation. There are some great new benefits but they come at a cost and they create new limitations.

Costs

Apps are more difficult to write. Full stop. They are. Both remaining paths to writing apps are. Some of that is due to skills and tooling but some of it is inherent in the additional complexity of Apps. Apps fundamentally come in two categories. The first category is a provider hosted which are hosted on another server somewhere and SharePoint just communicates with the other server. The second category is a SharePoint hosted application which is all client side scripting (JavaScript.)

Provider hosted applications can be built in whatever technology you want so in that sense there aren’t new skills to learn to build the application. However, the challenges exist in managing the communication with SharePoint which requires a deeper knowledge of Public Key Infrastructure (PKI), certificates, encryption, and identity management than most developers (SharePoint or not) have.

SharePoint hosted applications must be built with client scripting technologies – which effectively means JavaScript. Unfortunately, working in JavaScript is much slower and more difficult than working in a traditional server compiled language. The very dynamic nature of JavaScript means that it’s difficult to check for syntactic errors at compile time and so even seasoned developers find themselves spending more time debugging code than normal.

Somewhere around here I fully expect folks to tell me that developing in JavaScript is just as easy as developing in C# or that they’re as efficient at JavaScript as they are with a compiled language. I appreciate they believe this, however, the research and data as well as my personal observations don’t bear this out to be truth.

Limitations

SharePoint is a portal platform. Though portal was dropped from the name many editions ago, it remains a product that’s designed to bring resources from disparate sources together. On the super easy side this is done by placing links on the SharePoint page to the other applications that users need. However, in many cases this isn’t sufficient to get the kind of view that users need of their environment. In the past SharePoint web parts have been the windows to the information stored in other systems. Some amount of code would fetch information from a back end system and display it on a page. Several different web parts could be added to retrieve data from multiple back end systems. That’s great but it required code running on the server.

In the App world where this is no longer an option, you can’t directly fetch the information and add it to the page on the server. You can use client-side techniques to inject that content into the page but this has potential side effects. Or you can use technology we tried to eradicate in the 1990s – that is the humble IFRAME. IFRAMES are inline frames and have been a part of HTML for a long time. IFRAMEs have their own set of issues when used in a portal including communication between the host page and the IFRAME content, getting the consistency of look and feel, etc. Look and feel is interesting because IFRAMEs are outside of the processing for CSS and styles that are applied so it’s necessary to get the CSS into the IFRAME.

SharePoint App Parts are designed to handle some of these challenges including providing to the application the CSS used at the server. However, the problem of messaging to the host page of an app part isn’t fully resolved by the framework. As a result for dashboards and other situations where multiple parts on the page need to communicate and react to each other – like our old web part connections – App parts are problematic.

For provider hosted applications, you also have to make sure that the applications are accessible to the user wherever they are. If you’re hosting your own applications and users access SharePoint from outside your network – you’ll have to make the applications available.

Benefits

What benefits to Apps offer? Besides the obvious advantage of not having untrusted code running on the server, there’s the advantage of being able to develop in any language you want. Sure there may not be a pre-made Python or Ruby library for connecting to SharePoint as an application but it’s technically possible to do. If you’ve got an army of developers who write in Java and need applications to plug into SharePoint, Apps are the way to go.

If you’ve got a Java based system that you need to connect to and you have developers that understand that system the effort to make the app work in SharePoint may be less effort than trying to teach .NET SharePoint developers how to access the data and functionality in the Java system.

Which Way Do You Go?

Right now if you want to use office 365 you have to write a Sandboxed Solution or an App. Microsoft has said that the sandbox will be deprecated from Office 365 “soon” so it’s not an area to make further investments in. However, all of these statements apply to Office 365. If you’re going to be running SharePoint on premises then you can use full trust solutions, sandbox solutions, or Apps. So when you’re in an on premises environment it doesn’t matter which way you go. Leverage apps where you need to get cross-platform support.

Complicating this are Office 365 Apps which only work on Office 365 but provide a unified API across the Office 365 services. If you’re doing Office 365 these Apps are fundamentally similar in technology to SharePoint Apps – or add-ins – but use different APIs and are published differently. They’re published into the Azure AD that backs Office 365.

Complicating Factors

One of the complicating factors for deciding to develop Apps is that the application lifecycle management doesn’t really work. For SharePoint Apps (Add-Ins) you can’t migrate the configuration and data from environment to environment with Apps enabled. You have to reconfigure the apps in each environment. This can be problematic no matter how you manage your configuration. For provider hosted applications there’s the added issue that you compile an App package and it has a fixed URL endpoint so all of your SharePoint environments will point to one target provider application – in development, quality assurance, and production environments.

The work around to this is to leverage a build server that creates separate packages for each environment on the SharePoint site. However, this is more sophisticated than most software development organizations I’ve seen.

Office 365 Apps have some tricks that can be done with Azure hosted apps and deployment slots that allow you some level of control over which environments point to which versions of the App. However, these controls are still relatively minimal.

So basically this creates a fork in the road. If you’re going to be on premises you’ll want to continue full trust code. If you’re on Office 365 you’ll want to create Office 365 applications. If you’re walking the fence you may want to deliver SharePoint Add-ins that can run both on premises as well as in Office 365 – but this is a somewhat unique case – that I wouldn’t generally recommend.

Product Brief: Metadata Term Store Sync for SharePoint

One of the challenges that I face with my clients is how to help them manage a single taxonomy across multiple platforms. There are some tools that we use to develop and manage taxonomies but ultimately those taxonomies need to be something that users can tag in their work and that means getting the taxonomy into the tools they use to create and manage content. For most of my customers that means SharePoint.

That’s why I was excited that the team and I could help PremierPoint Solutions develop their TermSync solution. It takes any database – actually anything that can be connected to Business Connectivity Services (BCS) in SharePoint and synchronize it to a term set. So if you’ve developed a set of terms in Smartlogic’s Semaphore tools you can synchronize them with SharePoint.

The initial case for synchronization isn’t a difficult problem to solve. You can import a spreadsheet into the term store with a bit of massaging. However, it’s effectively not possible to operationalize the management of terms over time without some sort of a tool which can cope with new terms, renaming terms, new synonyms, users changing the term name in SharePoint, etc.

While it’s difficult for anyone to come up with a taxonomy – or more realistically a set of taxonomies – it’s even more difficult to maintain them over time. The benefits of focused thoughts and energy are lost in the sea of competing priorities. The clarity of the moment when the taxonomy was created was lost. The logistical challenges of pushing these changes through the systems connected to the taxonomy can be utterly exhausting – if you don’t have a tool to simplify it.

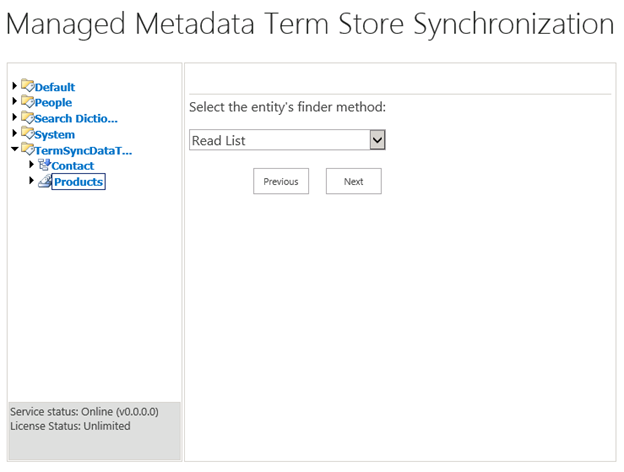
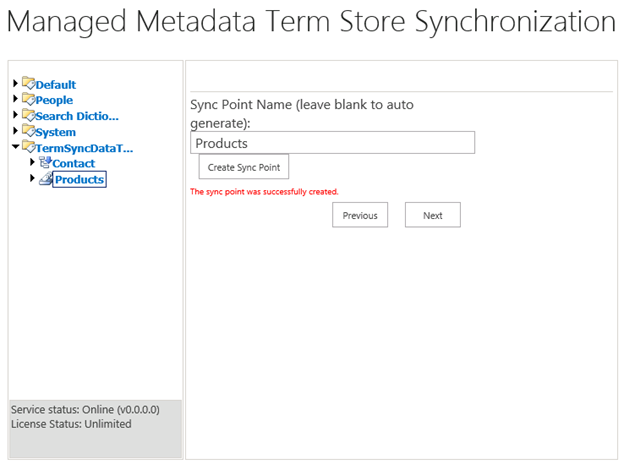
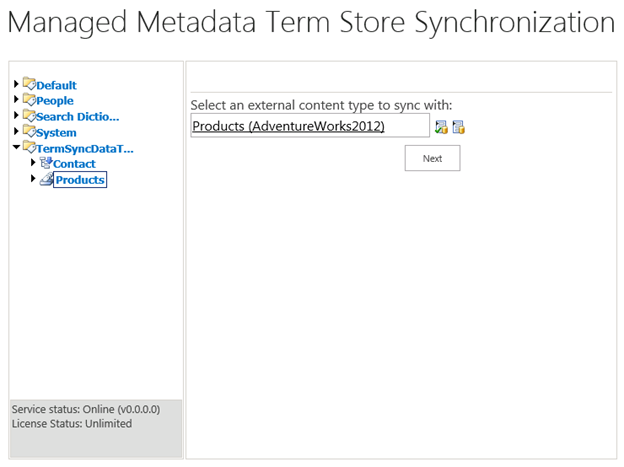
Configuring term sync is super-simple. You start by connecting your data source to SharePoint as a BCS source. SharePoint Designer effortlessly connects any database table or view to SharePoint. From there you simply connect a sync point – a place in the term set where you want the taxonomy to be placed. Take a look at the process in three steps…

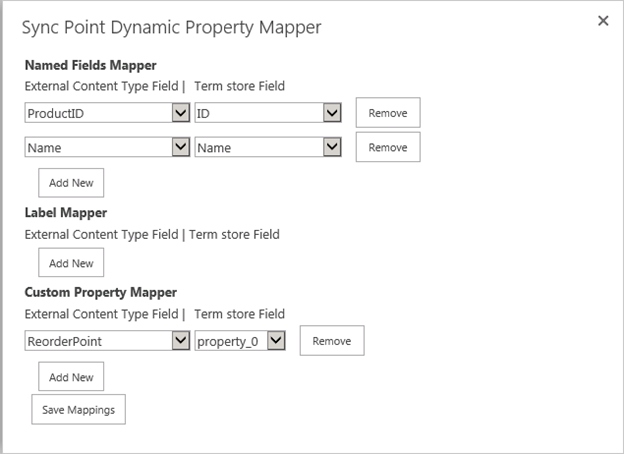
Once the connection is established you can map properties from the source to any term property – and even to extended properties. So you can even use TermSync to support your custom applications integration to your taxonomy. Take a look at the flexibility…

While we use TermSync to keep taxonomies synchronized there are other uses as well. For instance, consider mapping customers into a SharePoint TermSet so that sales can tag the customer to which a proposal belongs. Mapping products into a term set allows you to build bill of materials for new products in SharePoint. Mapping warehouses into SharePoint Term sets means that SharePoint users can attach warehouses to their lists, forms, and documentation as well.

You can sign up for a trial version of TermSync on the PremierPoint site.

SharePoint 2010 and 2013 Kerberos Unconstrained and Constrained Delegation

Implementing Kerberos is frequently considered painful by IT Professionals. It seems like there’s some magic incantation that has to be said over the network for things to work correctly. However, the components are relatively straight forward. In this post I’m going to walk through Kerberos setup front to back including delegation, how to get it working, and what doesn’t work. My goal is to distil a great number of blog posts with half-collected information and make it all fit together so you can implement Kerberos step by step.

Some folks talk about Kerberos as resolving the double-hop problem – though that’s relatively old terminology which is really talking about the fact that you’re not allowed to use the client’s NTLM credentials to access another source. Kerberos allows you to use pass-through authentication so the user’s credentials can be used for backend services – particularly for access to SQL data.

This post applies equally to SharePoint 2010 and SharePoint 2013. The biggest change is that in 2010 you could do unconstrained Kerberos delegation (explained later) if you continued to use Windows Authentication. Since 2013 practically eliminates this option and strongly encourages the use of claims, you can no longer do unconstrained Kerberos delegation and must implement constrained delegation which is a little bit more challenging to setup. Let’s start with getting users to be able to use Kerberos to login to the SharePoint site.

SharePoint Login via Kerberos

Getting Kerberos to login to the SharePoint site is the first step. This involves only two major steps. First, getting the service principle name correct in Active Directory. Second, you must configure SharePoint to accept Kerberos authentication. Let’s look at each of these in turn.

Service Principle Names for Kerberos

Kerberos is old in computer terms having come out of work at MIT and having been used for a long time. At its core, Kerberos requires mutual authentication. That is the server must identify itself to the client and the client identifies itself to the server. In Windows much of this is handled automatically as computers are automatically registered with their names in active directory. The problem occurs when a computer needs to host a site that’s not the same as its computer name. For instance, when www.leadinglambs.com is hosted on SP2013-DC and no changes have been made, a client wouldn’t allow Kerberos authentication because the name of the resource being accessed (www.leadinglambs.com) doesn’t match the name of the server providing the resource. This is fundamentally the same sort of protection that is used in SSL – the name of the certificate must match the name the client is using to access the resource. The solution to getting the names right is to setup a service principle name.

One added complication is that the service account (application pool account) and not the computer is the account in active directory which gets enabled for the URL. So your service account (say sp.svc) is what you register the target name to. Before we can set the name we need to understand the full service principle name and not just the URL component of it and that leads us to services and protocols.

Service classes and Protocols

One common mistake is to believe that you prefix the URL in a service principle name with the actual protocol that is being used. This isn’t correct. For instance, in SharePoint 2013 most URLs are going to be SSL or HTTPS URLs and yet the service principle name will start with HTTP/. The reason for this is that service principle names aren’t using literal network protocols. They’re service classes. As a result adding with HTTP/ enables the account to respond to both HTTP and HTTPs. The two service classes that are the most interesting to most folks are HTTP and MSSQLSvc which is used for SQL Server connections.

Port Shifting

Before leaving how to form SPNs, it’s important to talk about what happens when you port shift services – that is you make them available on a non-standard port. This isn’t a problem for Kerberos but you have to append a comma and the port number to the end of the SPN. So for example if you have www.leadinglambs.com running HTTPS on a non-standard port of 4443 (instead of 443) you’ll need an SPN of HTTP/www.leadinglambs.com,4443

Set SPN

The tool that you use for registering the SPN in AD is SETSPN and it comes on most servers – worst case you can run it from a domain controller which will surely have it. The format of the command you want is SETSPN –S <SPN> <account>. In our www.leadinglambs.com web site example on a standard port on the service account SP.SVC would look like this:

SETSPN –S HTTP/www.leadinglambs.com sp.svc

You may want to do a –L and the account name (SETSPN –L SP.SVC) to list out all the service principle names on the account to make sure you got it right after you’ve done the addition. Also, we recommend –S instead of the older –A because –S will ensure there are no duplicates. If you have two account registered with the same SPN – you won’t be able to authenticate via Kerberos to that service.

Enabling SharePoint for Kerberos

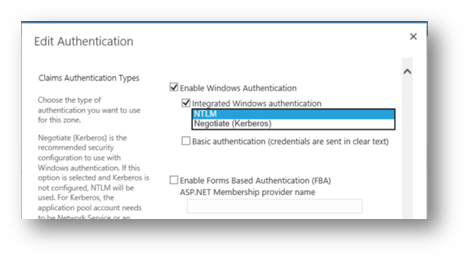
Enabling SharePoint to accept Kerberos for authentication is straight forward. You go into Central Administration, select Manage Web Applications, click in the whitespace to the right of the web application name you want and in the ribbon click the Authentication Providers option. From the Authentication providers dialog click on the default zone and in the Edit Authentication dialog select the drop down under Integrated Windows authentication and select Negotiate (Kerberos). Next scroll down and click the Save button.

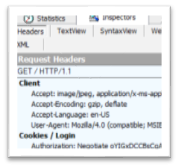
Now it’s time to test it. For that you’ll want to use the awesome and free Fiddler (www.fiddlertool.com). I won’t go into the details of how to setup Fiddler so it can decrypt HTTPS traffic. There are plenty of walkthroughs on how to do that. Once you have Fiddler running try to login to the site. The initial request will get a HTTP 401 response from the server (unauthorized). The browser will respond with authentication and you’ll see something like the following in the request:

This indicates that the browser authenticated with Kerberos.

Delegating Authentication via Kerberos

While logging in via Kerberos is a good start, you still can’t use the user’s credentials to access other resources until the account for the machine in Active Directory and the service account are trusted for delegation. There are two approaches to delegation – unconstrained and constrained. On the surface it would seem like unconstrained would be a better approach (less constraining). However, unfortunately in a claims mode implementation will require constrained delegation. However, let’s look at both options.

Unconstrained Delegation

When a user logs in with Kerberos it’s possible to trust a computer and a service account and use their Kerberos identity with back end resources – when the computer and service account are trusted for unconstrained delegation. With this setting they’ll be able to go to any backend service in the network using those credentials. This was the method we used in SharePoint 2007 and for SharePoint 2010 when not using claims. However, when we’re using claims we really don’t have a Kerberos login to pass along. The user logged into the web server with Kerberos and we generated a claims token from there on out we’ve been using the claims token to access local resources. So when we want to access remote resources we can’t just delegate the Kerberos ticket because we don’t have it any longer.

Behind the scenes SharePoint has been using the Claims to Windows Token Service to get a Windows token for a given user from the user’s identity claim. This works well for on-box resources but it’s not valid for remote resources when using unconstrained delegation because it didn’t originate from a user Kerberos login directly – claims is in the middle. What we need to be able to do is to do a protocol transition. That is we need to be able to use our claims based authentication protocol and transition to a Kerberos login which we pass along. (I’m purposefully avoiding the detailed technical language of Kerberos about Ticket Granting Tickets, etc., to minimize the complexity of the discussion.)

Constrained Delegation

Constrained delegation works like unconstrained delegation in that the service can reuse the credentials of the user except the credentials can only be used for prespecified services. When delegation is setup for the computer and service account the administrator specifies what services can be delegated to. Additionally, and importantly as previously mentioned, it’s possible to do protocol transition. This is essential. Constrained delegation requires that you specify the allowed service endpoints. Let’s looking at setting up constrained delegation in Active Directory Users and Computers.

Setting Delegation

Before setting up delegation the first step is to make sure that the service account used for the service that you want to be able to delegate has to have its service principle name setup too. So if you want to delegate to SQL server running on the default instance on the SP2013-SQ box running on the service account SQ.SVC you need to you’re the SETSPN command:

SETSPN –s MSSQLSvc/SP2013-SQ SQ.SVC

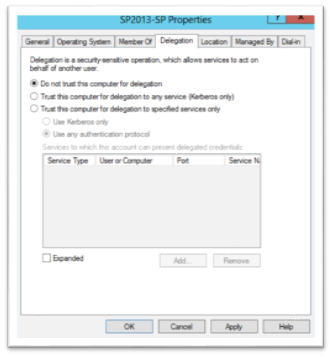
Once the service principle name for the service is setup, setting up delegation isn’t difficult. It’s a matter of bringing up the computer account and the service account and changing the settings on the delegation tab. Let’s start with the delegation tab of the computer account. Find the computer account (you can use Right-Click Find… if you want) and select properties then select the Delegation tab. It should look like this:

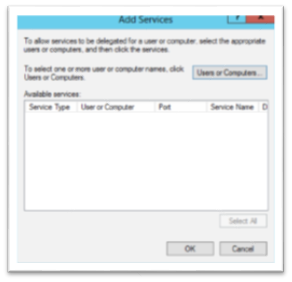
Click the Trust this computer for delegation to specified services only (which is constrained delegation). Then click the Use any authentication protocol radio button if it’s not already selected. Then Click the Add button to add the services that this computer can delegate to. The Add services dialog will appear like this:

Next Click the Users or Computers… button. Enter the name for the service account for the SQL server that you want to delegate to and click OK. The list of SPNs associated with the account will appear and you can click the services you want or click the Select All button – the dialog will look something like:

Click OK to close the Add Services dialog then OK again to close the computer properties. Find the SharePoint service account and do the same procedure for it. Note that if you haven’t already assigned the service principle name to the SharePoint service account the Delegation tab won’t even show up in the properties for the user – so you’ll need to make sure that you associate the SPN for the SharePoint web site first.

Special Considerations

There are some special considerations that can create problems with Kerberos that it’s worth mentioning here:

  • DNS CNAME – Kerberos doesn’t like DNS CNAMEs. If you have a CNAME setup instead of an A record for resolving the name of the server, you’ll want to setup the A record.
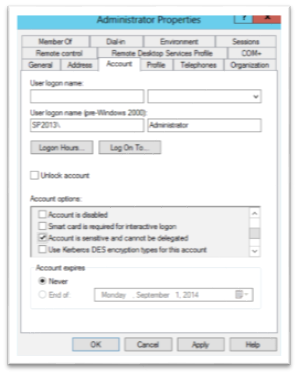
  • Sensitive Accounts – There’s a setting in the user account on the account tab which says “Account is sensitive and cannot be delegated” Accounts with this setting checked cannot be delegated and no delegation settings on the computer or service account will allow the account to be delegated. It looks like this:

  • Impersonate Client – The service account has to have one more right – which is set in the security policy for the computer. That is it needs the right ‘Impersonate a client after authentication.’ This right is normally granted through membership in the IIS_USRS local group. This group is – by default – assigned this right.

Troubleshooting

One of the hardest things with Kerberos is that testing your setup is very difficult and logging for what is wrong is effectively non-existent. However, there is a way that you can use out-of-the-box functionality to see if Kerberos delegation is working. You can setup an external content type with SharePoint Designer. Lightning Tools have step-by-step instructions at http://lightningtools.com/bcs/creating-an-external-content-type-with-sharepoint-designer-2013/ This will give you a quick way to test to see if your setup functions before using other tools.

One other additional troubleshooting idea that you may need to look into is enabling LSA Loopback if you’re testing on the server locally. You can find out more about how to set this up in the MS KB article 896861.

Additional Resources

If you’re interested in more background on this topic you can read the Microsoft provided Configure Kerberos authentication for SharePoint 2010 Products.

SharePoint 2013 Minimal Fault Tolerant Configuration

Microsoft offers some advice and guidance on different farm configurations, however, starting with SharePoint 2013 there seems to be a preoccupation with the number of VM hosts that are involved and how the virtual servers are deployed across these servers. Certainly managing the distribution of virtual servers across your physical virtual infrastructure is important, however, this adds a layer of complexity in trying to understand the number of virtual servers which need to be created which can be safely deferred until you’ve determined the virtual servers and the resources they need.

The more difficult challenge I find with my clients is how many virtual servers are needed for a fully functional fault tolerant environment. The Microsoft answers are incomplete because they fail to take into account the Office Web Applications and Azure Workflow Service infrastructures which are required to fully utilize SharePoint. The diagrams provided on the posters from Microsoft simply don’t make it clear how these pieces fit together and the number of virtual servers that you’ll need. My goal in this post is to clarify ambiguity about the number of virtual servers, to provide a model for a minimally fault tolerant environment, and to create a plan that can be expanded for scalability.

Fault Tolerance or Scalability

Before we begin it’s important to realize that with most of my clients we don’t end up with scalability concerns nearly as quickly as we identify fault tolerance as a goal. Even organizations with a few thousand employees are unlikely to need more than one front end web server from a scalability perspective. However, organizations of less than a thousand employees quickly find that SharePoint is a critical service offering that needs fault tolerance to support the service level agreements demanded by their organization.

With my larger clients we have scalability conversations – particularly as it relates to the search infrastructure – however, this is the secondary conversation after we cover fault tolerance. The model here is easily expandable based on scalability needs, but that’s not the focus.

Separation of Duties and Missing Pieces

Conceptually SharePoint has two types of farm-member servers – web front ends and application servers. The distinction between the two is largely which parts of the SharePoint infrastructure are running on each. Conceptually having them separate makes the conversations easier. This conceptual framework – between servers directly responding to users and servers responsible for services – is a well-established approach for delivering web applications. As a typical web application would, SharePoint has a set of non-farm member servers which are responsible for database services. On the surface this looks like a SharePoint installation would require only six virtual servers – two web front ends, two application servers, and two database servers. In fact, this was the configuration required for SharePoint 2010 and one could easily make the mistake that this is the right answer for SharePoint 2013 as well. However, there are two wrenches in this thinking.

The first missing piece is that Office Web Applications which used to be installed directly on the SharePoint farm can no longer be installed on a SharePoint farm member server. Office Web Applications are used by SharePoint to render previews of documents in search as well as allowing users to transparently work with documents even if they don’t have the full Office application suite installed on their PC. Making this service fault tolerant requires another pair of virtual servers for Office Web Application fault tolerance – bringing our number of virtual servers to eight.

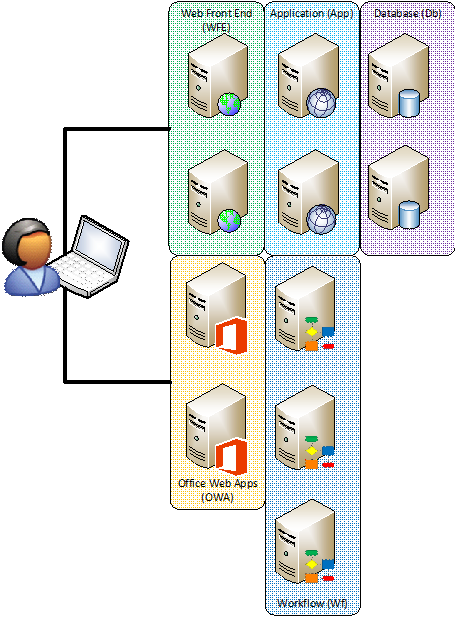
The second missing piece is Azure Workflow Services – the platform on which the SharePoint 2013 workflow engine is built. Typically this wouldn’t be a big deal — you would install these components on the application servers just like the host of other services that SharePoint offers directly. However, the challenge here is that Azure Workflow Services are built upon the Azure Service Bus and the Azure Service Bus requires three servers – not two servers – to be minimally fault tolerant. The net impact of this is that you have to either have three servers for running workflow or you need to scale out one of the existing layers to three servers. So a farm with Workflow on its own looks something like this:

Nine or Eleven Servers

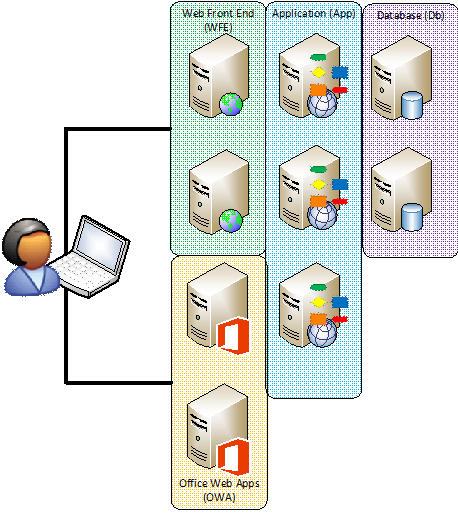
Deciding whether to have nine big servers or eight big servers and three tiny servers for workflow is based largely on preference. A virtual server running SharePoint is recommended to have 12GB of RAM and four CPUs. A workflow server, by contrast, can be tiny. 4GB of RAM is plenty for a workflow server. So you can add another server with 12GB of RAM or three smaller servers with 4GB of RAM each for workflow. If you stacked the Workflow services on top of application servers it would look something like this:

There’s some discussion about the best place to put the workflow services – whether they should be deployed with the application servers because the workload is more similar to the workloads of application servers. That is, that application servers typically don’t respond to time-sensitive requests from the user and are more frequently used to handle back end processing where it’s acceptable for a short delay – as is the case with workflow. However, the counter argument is that having extra capacity in the web front ends is more advantageous in most environments than having an additional application server. This is a decision that can be made on a case-by-case basis based on the workload of the farm.

However, I frequently recommend that clients run workflow on separate servers rather than scaling out the application or web front end layer of the farm due to separation of duties concerns. Most organizations prefer to keep distinct services on different tiers of hardware when doing so doesn’t unnecessarily increase complexity. For most environments, the net effective use of resources is very similar.

Scalability Again

Either of the above approaches to building a farm can be scaled out as needed to add additional capacity to the Office Web Applications, Search services on the application tier, or even additional database instances to support larger database needs. Those scaling decisions are based on stress points in the infrastructure. For instance, if none of the clients will have Office installed, it may be necessary to scale out the Office Web Applications. If you’re indexing a large amount of content on file shares it may be necessary to expand out the application tier to support greater search needs.

By beginning the planning by first looking into the fault tolerance requirements, it’s easier to add additional servers to meet scalability requirements. However, the performance of your virtual host infrastructure is an important consideration in scalability.

Virtual Host Infrastructure

The performance of virtual machines across different virtualization farms is vastly different based on the architecture of the virtualization environment. So a small number of servers on a well-functioning infrastructure can easily out perform more servers on poor performing virtualization environments. The typical concerns for performance including processing capabilities (CPU), memory availability (particularly overcommitted memory utilization), network (sufficient network bandwidth), and disk performance are all important considerations.

In addition to the fault tolerance considerations for the number and type of virtual servers, it’s also important to ensure that the virtual servers are spread out across at least two different physical host servers to ensure that a failure of the virtualization host won’t bring down the environment.

When considering scalability of a SharePoint farm, in a virtual environment it’s key to understand what the performance of the virtualization environment is – and will be.

Conclusion

While the appearance is that SharePoint can be installed in a fault tolerant configuration in as few as six virtual servers, this isn’t the case when the farm is intended to be fully functional. For a minimally fault tolerant configuration, not considering scalability concerns, requires at a minimum nine servers and often as many as eleven.

Article: SharePoint of the Future – Tales from the SharePoint Conference

Whether you’re in Venice or Las Vegas – or both – 10,000+ people is a lot. The number is staggering, particularly when you walk into the keynote hall and can’t see anything but a sea of chairs from wall to wall and wall to wall. The keynote stage seemed like it was in a different zip code than the back of the room. That might have been a good thing for one of the ad-hoc communities that sprung up around the conference who were trying to get their steps in to report their progress via FitBit.

The SharePoint community seems like one large community but at 10,000 people it’s more like a collection of communities than a single group. With folks running, walking, doing fitness, and doing drinks, there weren’t many places in the Venetian that you couldn’t find a few people connected to SharePoint – and talking about the new things that Microsoft announced at the conference.

http://www.sharepointbriefing.com/spother/sharepoint-of-the-future-tales-from-the-sharepoint-conference.html [Website removed]

Retro: Harness Properties in SharePoint Search

Originally published on 8/21/2005

Most users of SharePoint Portal Server rapidly become enamored with the ability to add new fields (containing meta data) to documents in the document library. All of the sudden it becomes possible to associate information to a file beyond the file name that we’ve been limited to since the beginning of the computing era. However, few users have the opportunity to understand how this meta data is used by SharePoint for searching. This leads to problems when users decide that it’s necessary to use SharePoint Portal Server Search to search on information contained in a field that they have added. In this article you’ll learn how SharePoint uses document library fields to create properties which are searchable and how to enable searching on those properties.

The Power of Properties

SharePoint Portal Server’s search facility really works in two different ways. First, there’s the full text search. This searches across all of the text in every document that is in the index. This search is what most people think of when they think of SharePoint’s search capability.

Second, there is the property search. During the indexing process, the IFILTERs which extract the text out of the documents put property information into special property buckets which are kept separate in the index so they can be searched separately. This allows you to set properties in your Office documents such as department, project number, author, keywords, etc., and then you’ll have the ability to search on those fields individually. You can use the search engine in SharePoint to search for documents where the department is engineering and the project is 123. Where a full text document search for engineering and 123 may find hundreds of entries because the words engineering and the number sequence 123 appears in many documents, a search via properties may yield the 10 or so documents that are truly relevant to your search.

Properties are what most people believe that they are creating when they create a new field in a document library. That’s not actually true. The meta data fields in a document library don’t have anything to do with properties directly.

Office Does a Slight of Hand

However, during the edit process Office perform a little slight of hand. It takes the information you enter in the meta data fields for the document library and makes corresponding custom properties in the document. The net effect is that although you’ve only created fields in a document library, you’re documents now have custom properties.

These custom properties are picked up by the indexing process (more specifically the IFILTER for Office documents) and they are placed into the search index. You can then use those properties by making them available via the advanced search page in SharePoint.

However, this also means that non-Office documents don’t share the same relationship between fields in the document library and the properties of the document itself. So if you’re trying to develop a searching mechanism for documents like TIF documents or PDFs you’ll find that setting up a meta data field for those document libraries won’t allow you to search for those documents directly via their properties. You’ll still be able to organize the information

Setting up a test

Now that we understand the basic mechanisms of how SharePoint uses meta data and properties let’s demonstrate how it works. Here’s what you need to do to set up the demonstration.

  1. Create a site. For instance, I used /Sites/Test.
  2. Open the Shared Documents library by clicking on the Quick Nav Bar link to Shared Documents.
  3. Click on the Modify Settings and Columns link in the left bar.
  4. Click on the Add a new column link
  5. Enter a name in the Column name box. You can select any name you would like, I used Rob, Try, and IntranetJournal as my field names.
  6. Click the OK button.
  7. Repeat steps 4-7 for any additional columns you want to create. I repeated the process two additional times to get my two additional fields in.
  8. Click the Go Back to “Shared Documents” link to return to the Shared Documents Library.

Putting it to work

Now that you have a document library with custom fields, you can create a few new documents. Here’s what to do:

  1. Click the New Document button on the task bar.
  2. Enter some basic text in the document. (This text can be anything you would like.)
  3. Click File-Save.
  4. Give the document a name and click the Save button.
  5. Enter the meta data into the fields which are displayed. You should consider entering different text than the text you used in the document.
  6. Click the OK button.
  7. Close Word.
  8. Verify that the text that you entered is visible in the new fields on the document library.
  9. Click the document you just created in the document library list and click OK to the warning dialog if necessary.
  10. Click File-Properties. Notice that the meta data properties from the document library appears.
  11. Click the File Properties button. The standard Word document properties dialog is displayed.
  12. Click the Custom tab.
  13. Note that the meta data that you entered for the document library also exists as a custom property of the document.
  14. Click OK to close the properties dialog.
  15. Close Word.

Now you have a document in SharePoint with properties so you can go setup the search for them.

Ensure that the Document is Indexed

Before you can search on your new property you have to first ensure that SharePoint has indexed the document. This is done from the Portal by following this procedure:

  1. Open the SharePoint Portal
  2. Click on Site Settings in the navigation bar on the top of the window.
  3. In the Search Settings and Indexed Content section, click the Configure search and indexing link.
  4. In the Content Indexes section, click on the Manage content indexes link.
  5. Hover over the Non_Portal_Content link, drop down the menu via the arrow on the right, and click Start Full Update.
  6. Wait for the Last Update Status for the Non_Portal_Content index to display the word Idle. The page will automatically refresh itself.

Set up the Properties for Search

We had to ensure that the document was indexed so that the new properties would appear. During the indexing process the IFILTER which processes Word files automatically created new entries in the SharePoint Search Property list for the properties which were discovered in the document we just uploaded. The final set of steps are to enable the properties on the advanced properties page. To do this follow these steps:

  1. Open the SharePoint Portal.
  2. Click on Site Settings in the navigation bar on the top of the window.
  3. In the Search Settings and Indexed Content section, click the Manage properties from crawled documents.
  4. Click the plus sign to the left of urn:schemas-microsoft-com:office:office.
  5. Scroll down to one of the names of the fields you added to the list above (and verified became a property). Click the property from the list.
  6. Check the Include this property in Advanced Search options checkbox.
  7. Click the OK button.
  8. Click the Return to Portal link at the top of the page.
  9. From the Start Menu select Run and then type in IISRESET and press return.
  10. Click the magnifying glass to the left of the drop down list containing the text All Sources.
  11. Expand the drop down underneath the Search by properties: label to see that your new property is available to be searched.

You can now search SharePoint Portal Server for just the field you added in the list . Of course, as you have seen, you’re actually searching the property that was added to the Word document, but the effect is the same since Office is managing the transition to the document properties.

Retro: Drawing a Target on Your Users with SharePoint

[I’m reposting a handful of articles which are no longer available on the Internet as blog posts so that they’re not lost forever.]

Originally published on 6/10/2008

One of the challenges with most portals, including Intranets is maintaining relevancy of the information that the user sees and interacts with. You’ll hear a ton about search relevancy but relatively little is said about what is displayed on the home page. Some organizations approach the home pages as simple landing pages, a place for links to other places. Others try to serve up relevant content but all too often there are substantial portions of a corporate intranet home page that just aren’t relevant. If you’re in Indianapolis, how important is the company picnic taking place in New York?

In our information overload culture we’ve gotten adept at blocking out advertising and other non-content items on a page and still ad blocking software is in widespread use. We can filter information ourselves but the more we can filter information for users the better they like it. The more focused we can make our content the better the user experience. Luckily SharePoint has several ways that we can deliver customized content to users and groups.

One Size Fits All

Perhaps in some things one size does fit all. Golf balls are regulation size so in that sense one size does fit all. However, in most things we want to be unique, expressive, and interesting. If you don’t believe me walk into mall and notice the wide array of mobile phone covers that are available. There’s enough face plates that you can have any color that you want. That’s not all. Your mobile phone should be unique like you so there’s holographic screen protectors, and other kinds of “bling bling” to make it unique.

While I can’t advocate putting “bling bling” on the home page of your portal, one cannot ignore that individuals are just that – individual. They need different information at different times and for different reasons. Part of developing a portal is focusing on development of a solution that adapts to the major groups of users and tries to meet their specific needs.

In SharePoint there are three basic ways of accomplishing this as discussed in the following sections.

In-Part Personalization

Perhaps the easiest way to manage personalization is to have the web parts that you include on your page manage the personalization themselves. Whether it’s a web part for the weather that asks for your ZIP code and remembers it from visit-to-visit or a web part that remembers your search preferences, web parts in SharePoint can have personalized information that allows users to personalize their unique preferences – if the web parts support it.

Although the easiest to manage In-part Personalization does have the disadvantage that the web part itself must be coded to support the personalization – it’s not something that you can add in later. The out of box personalization support in SharePoint means that support for personalization in the web parts that you develop is transparent. Literally, there’s only one attribute that changes to make a property of a web part work for user level personalization.

In part personalization is great for web parts that you create – however, it simply doesn’t work for some third party solutions and some of the out of box web parts. It also can negatively impact performance if there are a large number of users customizing a larger number of web parts on a page. As a final note, this is truly personal personalization, meaning that it must be done on a user-by-user basis and it must be done by the user. That means most users won’t take advantage of the functionality unless the web part makes this process very easy.

Peacock of Parts

A somewhat more challenging approach, but one that offers the ability to layer on personalization no matter who wrote the web part or when they wrote it, is the targeting engine in SharePoint. Targeting in SharePoint is best known through the MOSS audiences implementation. Audiences are compiled groups of users to which web parts and information can be targeted to. The implementation of audiences is on top of a public interface called IRuntimeFilter2. Without going into too much detail, it allows you to add additional editing controls in the editor zone and supports the events necessary to make sure that these extra editing controls receive their data back when the properties are saved. They can then be validated.

Once targeting is enabled (through having a value in the correct property) the IRuntimeFilter interface (which is a part of the IRuntimeFilter2 interface) is called to determine whether the web part should be displayed on the page.

The net effect of the personalization framework is that SharePoint can show or hide web parts to individual users or groups of users. This means that you can have a web part that is only displayed to operations team members (even if the rest of the organization has access to the data). Similarly you can surface or hide information based on the time of day, or any other criteria that can be tested.

This is a great strategy when you have a way that you want to be able to filter all of the web parts in the system. So showing different things based on location, time of day, or other criteria will work great. If you need to change what information is displayed in the web part – such as the weather for Carmel, IN vs. Daytona Beach, FL – this isn’t the strategy for you. Although you can show or hide a ton of web parts – one for each city. It’s really not practical.

Pages for People

Another, lower tech solution, which requires neither web part support for personalization nor the SharePoint targeting infrastructure is to have each user have their own page. With MOSS My Sites are available which do essentially this. Each user can have their own personal portal starting page. However, the challenge with this is that changes are hard to implement across the system. If each user has their own page just adding a new web part to the portal means adding one web part for each of your users – if you have 10,000 users you’ve just turned a simple change into 10,000 operations.

Still, the greatest flexibility is offered by having each user have their own page so that they have the flexibility to configure the page exactly as they would like – without concern for impacting other users.

Drawing the Target

In reality there may not be one answer to how you want to personalize your web part pages. In order to produce consistently relevant content to users you may need a variety of strategies. You might create different portal sites for each of the different departments so that users have the option to see content relevant to their department, implement My Sites for a personal view, and customize the home page so that the current weather conditions and predictions for the user’s current location are shown. There isn’t a single right answer to getting the right content to users at the right time.

Having a set of tools that allow you to filter and direct the information that users see is essential to driving relevance and therefore driving engagement in your portal. Go target your users.

SharePoint Isn’t Your Biggest Problem – Right Now

Having spent the last 13 years or so of my professional career connected to doing SharePoint work – and the last 9 doing SharePoint more-or-less full-time, I tend to view the world through a SharePoint lens – whether I like it or not. However, being a business person as well, I realize that organizations today are struggling to keep their doors open. It’s a reality that most organizations don’t believe that SharePoint is their biggest problem – or even the source of gut wrenching problems that can come from a poor deployment – bad teamwork, less communication, and an organization that can feel like a battleground.

It’s common now to hear the phrase “first world problems” come up in conversation. This refers to the kind of problems that most people in the world would love to have, such as paying too much for car insurance – since most people on the planet don’t own a car. When I’m talking to clients about how to improve their organization – which frequently involves the effective use of SharePoint – I sometimes wonder if I’m talking about a “first world problem.”

Quite often I see organizations that are so inundated with day-to-day operations, slogging through responding to clients, recovering their accounts receivable, and finding new customers that they don’t have the mental energy to invest in improving their efficiency so that they don’t have to fight so hard in the future. They’re doing the organizational equivalent of hand-to-mouth living.

Some organizations I work with don’t understand that corporate culture is made up of the people, the systems, and the policies of the organization. They see corporate culture as some dragon that they have to slay – rather than an animal to be tamed and trained. Even if they had the mental energy to invest in making things better, they don’t know how to untangle the mess and make a real difference today and tomorrow.

In this post, I want to address the conflict that organizations face trying to survive in the short-term while making investments in the future – to stop the cycle of struggle. I also want to untangle the mess of culture and help everyone see that you can change culture in the same way that you can turn a large boat. That is, slowly.

The Spin (or Death Spiral)

As a pilot, there are occasionally times when you’ll encounter a problem. Despite popular belief, losing an engine isn’t the worst thing that can happen while flying. Small planes, like the ones I fly, are essentially powered gliders. In fact, for every 1,000 feet of altitude I have, I can go 6,000-8,000 feet across the ground. That’s a pretty long way. The real issue is stalling the aircraft. There are lots of things that can happen to get into a stalled condition but the short is that there isn’t enough airflow in the right shape over the wings to continue flight.

Stalling an aircraft and recovering from the stall is a part of every pilot’s training and while it’s unsettling, it isn’t the end of the world. However, you can get into a critical situation where you enter what’s called a death spiral. That is where you’re being spun around like a downward tornado because one of the wings is generating lift and the other isn’t.

In a single-engine aircraft, we’re taught “ABC” for handling an engine out situation – Get your Airspeed to best glide (give yourself the most space), find the Best field to land in (assuming you won’t get the engine back on), and Communicate. Obviously you’re also trying to restart the engine. Restarting the engine is – of course – the preferred alternative, but it’s not the sole thing pilots are taught to be doing when they lose their only engine.

In an aircraft there’s the natural temptation to want to hold the aircraft in the air by pulling back on the stick to prevent the aircraft from going down – however, that’s where best glide comes in. Aircraft have an optimal speed for gliding – and that’s going to give you the best chance for recovery because it gives you more time. If you follow your instincts and hold the aircraft up you’ll eventually cause a bigger problem – that is you’ll stall the aircraft.

In business, when things begin to flounder, there’s a temptation to “pull back on the stick” and try to keep from going out of business, or from having to lay off workers, or from making dramatic changes. This, however, is the situation that causes stalls – which can lead to death spirals. You’re trying to avoid (or deny) reality.

Once you’re in the death spiral, it’s not as fatal as the name implies. A death spiral leads to death only when you don’t exit it. There are some aircraft where a death spiral isn’t recoverable, but in most cases it is. Exiting the death spiral is primarily about acknowledging what’s happening and taking the right steps. The steps are literally to exit the spiral – to use more energy to exit the cycle.

I’ve seen plenty of businesses enter a death spiral and recover. And I’ve seen plenty more which get so locked into the spiral itself – pushing so hard on the immediate that they can’t plan for the long term – that they never break the cycle. Without some control to stop the spin, the decline won’t stop until the business – or the plane – has run into the ground.

Most organizations today have been impacted by the poor economy. Whether you want to believe that we’re recovering or not, the economy has been hard for nearly everyone that I’ve talked to. Think about this as an ‘engine out’ situation in an aircraft. You can keep flying for a while hoping to restart the engine and keep things going. You can redouble your sales efforts, work on reducing your costs, and hoping that things will get better in general. You can acquiesce to forces outside of your control, or you can start to make changes to make things better.

Rice Patties and Retirement Savings – Change the Long Term

You’re probably thinking that rice patties and retirement savings have very little to do with one another – but there is a connection. The connection is the ability to focus a small amount of energy on the future. The connection is taking just a little bit of energy and diverting it.

As Malcom Gladwell writes about rice farmers in the Pearl River Delta in his book Outliers, he talks about how labor-intensive rice farming is. He also talks about how the farmers become expert at exactly what is needed to make each plant produce the most rice. However, rice farmers barely survive because it takes so much effort to produce enough rice to support the family today there’s little left over to invest in the future.

In the United States, we’re bombarded by messages that the Social Security System is going to fail. It simply cannot pay out the amounts promised when it’s being supported by so few payroll taxes. The models predict the system will run out of money in 25-30 years. That’s created a greater need for individuals to prepare for their own futures through retirements savings in an Individual Retirement Account or a 401k.

Funding a retirement is not something that you can do overnight. I started putting a few percentage points of my income into a 401k at my first job. It wasn’t much but it was something. My mother, who had to struggle to raise my sister and I, didn’t start saving until after my sister and I were out of the house. It’s making a big difference in how hard it will be for each of us to retire. The few percentage points of my income invested at 21 are much more powerful than ten times that much invested at 45.

For some math reasons I won’t go into here, you can relatively safely assume that aggressively invested funds will double every 6 years or so. (See the Rule of 72 for more.) So if you put in $10,000 and you need to retire in 18 years, you’ll get 3 doublings of your money. You’ll have $20,000 in 6 years, $40,000 in 12, and $80,000 in 18 years. The longer you wait to begin the more you have to save to have the same amount.

So even when you’re struggling, if you can shave off just a little energy to plan for your long term success, you’ll find that you may be able to recover more quickly and get into a better position where you’re not having to struggle every day.

Sometimes big problems – like the problem of changing the corporate culture – are achieved with small changes. A few percentage points of retirement savings or a few well understood interventions can be a solution.

Changing the Culture

So, as I said previously, my world has been SharePoint for many years. Over those years, I’ve seen SharePoint projects fail as often as I’ve seen businesses fail. Whether it is your entire organization or your SharePoint project that is in a death spiral, my suggestion is that it’s time to do something differently. Small changes, today. Change. Today.

Quite frequently, folks blame the culture for their failed SharePoint project – or the fact that people just won’t collaborate. However, those folks are fundamentally approaching the problem the same old way, as a victim. The truth is that cultures – for better or worse – are made of the people, the systems, and the policies of the organization. If the culture of the organization is causing the failure, then you should change it – by changing the policies, the systems, and in some cases, even the people.

Some folks bemoan the fact that their organization doesn’t have a culture that supports collaboration. Instead of collaboration, they have knowledge hoarding – or they believe that they have to create their own knowledge – and reuse isn’t something that’s celebrated in the organization.

In some cases, it can be as simple as changing the employees’ objectives so that they’re measured on how much they collaborate, how much they put into a knowledge base – or how much they take out. Obviously, measuring these objectives can be challenging and you’ll have employees that “game” the system so that they meet their objectives, but perhaps you can achieve greater collaboration even when they do.

Consider adding to everyone’s goals for the year that they must have retrieved two things from the corporate knowledge base. If there’s not much in the knowledge base, then you may hear complaints that there’s nothing in there. So encourage the employees to work with their peers. Have their peers put knowledge into the repository that they can use. This would absolutely be considered “gaming” the system – but it actually gets you what you want. That is, it gets reusable content added to the knowledge base. Had you set the goal of adding knowledge to the knowledge base, you could have ended up with some information that’s not useful at all just for the sake of meeting the “add something” requirement.

What we’re getting to here is adoption. In my experience user adoption is the single most overlooked opportunity to make every SharePoint project a success. Perhaps that shouldn’t be a surprise, but it is. How could a tool that is implemented to make the user’s life (okay, at least their work life) more efficient, more simple, more productive, more enjoyable, not be readily adopted by the users? It isn’t happening because you’re doing the same old thing.

Whether it’s easier to be a victim of the corporate culture, or just easier to blame the culture than to attempt to change it, ignoring end user adoption is costing your business. Taking steps now to improve end user adoption and engagement will pay off in the long run.

Actions to Take Today

Given the pressure to keep things going, you may not be able to invest a large amount of time, effort, or money in a big SharePoint project. However, here are some ideas for how you might make some small progress:

  1. Get real about your organization’s adoption of SharePoint. Ignore the server infrastructure optimization projects and do a strategic review of how your employees are using, or not using, SharePoint. Get a qualified professional to help you identify and remove the barriers that are stopping the organization from getting more from SharePoint. Even a few hours of conversation about your situation with an expert can help you get dramatically more use out of your investment. (We do these for clients all the time and they’re not expensive.)
  2. Locate the real, tangible business problem that SharePoint can solve. I talked about this in my article for SharePoint Pro magazine “4 Tips for Engaging Your Executives in SharePoint.” In short, listen for a problem SharePoint can solve and then go implement the solution.

Create a single productivity aid. Creating a complete self-help solution for SharePoint may be overwhelming, but you can take one thing that your users are struggling with and create a resource for that. [Disclaimer: The following is to give you some ideas, it isn’t intended to be a sales pitch though, admittedly, it may sound that way.]

If you don’t want to create your own productivity aids, you can “cheat” by helping users find the samples we provide for free from the SharePoint Shepherd’s Guide. The 2013 version samples are here. The 2010 version samples are here. If you’re not looking for “How To” productivity aids, you can provide decision trees (also found in the sample links above) or you can do a one-page quick reference guide like our User Interface Quick Reference. (You can buy 15 of the cards to share with your users for $30.) If it’s feasible, take advantage of productivity aids that are proven and readily available instead of creating your own. Obviously, if you can license the SharePoint Shepherd’s Guide Corporate Edition (called the Tutor) for your entire organization you will be taking a great leap towards helping your users be self-service. (Pricing for smaller organizations starts at $699 and includes the searchable Wiki pages and the videos for all of the tasks.)

airplane

Collaborating with SharePoint, Outlook Email, and Staying Mobile at 30,000 feet

In 2002, I released Mobilize Yourself!: The Microsoft Guide to Mobile Technology with Microsoft Press. Those were the days of the Pocket PC, Symbian and Palm OS. Even back then people were speaking about how we would have ubiquitous 3G access and that would solve all of our data communications problems. If everyone has access to high-speed Internet all the time, then who needs to have offline storage? Back then we thought 128Kbps was high speed.

I vividly remember being in Hollywood for a conference when a Sheriff’s deputy from Orange County (the county that Los Angeles is in) and I started a discussion. He told me that the police cars didn’t always have a reliable data signal everywhere in the county. I realized at that moment the idea that everyone would have high-speed wireless Internet everywhere was a pipe dream. There are regions where accessing data just isn’t going to work.

Over the years I’ve tried to get access in some very remote places, like Montana, and some less remote places, like southern Illinois. Neither my cell phone data nor the wireless at my family’s home was very reliable, and so as recently as a month ago, I didn’t have access to high-speed Internet in the places I go regularly.

I recently was working with a global client where we were discussing Internet access availability across the globe – and how unstable it was. That is, it’s unstable where you can get it at all. There are still places on the planet where Internet access isn’t an option. If you’ve ever been to a technology conference and tried to do something from the hotel Internet, you know what I mean.

Read more…

Recent Posts

Public Speaking